Educational aims and objectives
This self-instructional course for dentists aims to discuss the process of using photogrammetry for full-arch immediate prostheses during the implant process.
Expected outcomes
Implant Practice US subscribers can answer the CE questions by taking the quiz to earn 2 hours of CE from reading this article. Correctly answering the questions will demonstrate the reader can:
- Be informed about some history and research regarding photogrammetry.
- Realize the accuracy of full-arch implant prostheses over more traditional methods.
- Identify some benefits of photo
- Realize the steps and technique involved in using photogrammetry in the implant process.
Dr. Christopher R. Resnik explores photogrammetry as a way to obtain an accurate representation for a full-arch implant prosthesis.
Dr. Christopher R. Resnik offers insight into improving the accuracy and efficiency of certain implant procedures using photogrammetry
Traditional chairside conversions for full-arch prostheses are time consuming and labor intensive. With the advent of digital technology in dentistry, there have been many advancements that have improved the accuracy and efficiency of the full-arch prosthesis process. Two such advancements include photogrammetry and 3D printing, which have been innovative in the digital work flow for full-arch implant prostheses.
Accuracy of full-arch implant prostheses
Obtaining an accurate representation of implant positioning is critical when fabricating full-arch prostheses. It is well established in implant dentistry that every step through the prosthetic process may lead to inherent error, resulting in an ill-fitting prosthesis. The long-term success of implant-supported prostheses is directly dependent on the accuracy of the records obtained in the prosthetic rehabilitation process.1,2 When a prosthesis exhibits passivity, there exists less stress and strain to the supporting implants. Inadequate fit of the implant prostheses may lead to excessive oblique loads, creating significant stress on the implants and their associated prosthetic connectors. While it is impossible to achieve 100% or total passivity, the goal is to reduce the marginal gap as much as possible. When evaluating prosthesis fit and accuracy, the literature has shown marginal errors up to 150 um to be clinically acceptable.3,4
Why photogrammetry?
In full-arch implant dentistry, obtaining an accurate representation of the implant positions is imperative to the fit and long-term success of the prosthesis. Conventional, open tray-splinted impressions (PVS, polyether) are still the most popular technique in the fabrication of full-arch prostheses. Although intraoral scanning has become very popular, complete arch scanning has been shown to exhibit a margin of error that may lead to prosthesis misfit. Many studies have shown acceptable accuracy with intraoral scanning for single implants;5-7 however, for full-arch implants, questionable results have been documented.8-10 With full-arch prostheses, intraoral scanning studies have shown marginal discrepancies greater than 150 um, which ultimately lead to future complications.11,12
Photogrammetry technology has been advocated to allow clinicians the ability to obtain reliable and accurate representations of dental implant positions digitally. In the past, the photogrammetry technology was first used in non-medical fields such as land navigation, car crash testing, and the development of ships and planes. In 1994, Lie and Jemt were the first to integrate this technology into the field of dentistry.13 In 2005, Ortorp, et al., introduced photogrammetry to implant dentistry with the discussion of the use of this technology in recording implant positions in comparison to conventional impression techniques.14
Kosago, et al., compared the accuracy between conventional splinted open-tray impressions, intraoral scans (i.e., with multiple intraoral scanning systems), and photogrammetry. They concluded that for complete arch implant impressions, photogrammetry had better accuracy and precision than any of the digital or conventional impression techniques.15 Also, a recent systematic review compared conventional impressions, intraoral scanning, and photogrammetry, concluding that photogrammetry is accurate for full-arch implant impressions.16
Advantages of photogrammetry in implant dentistry
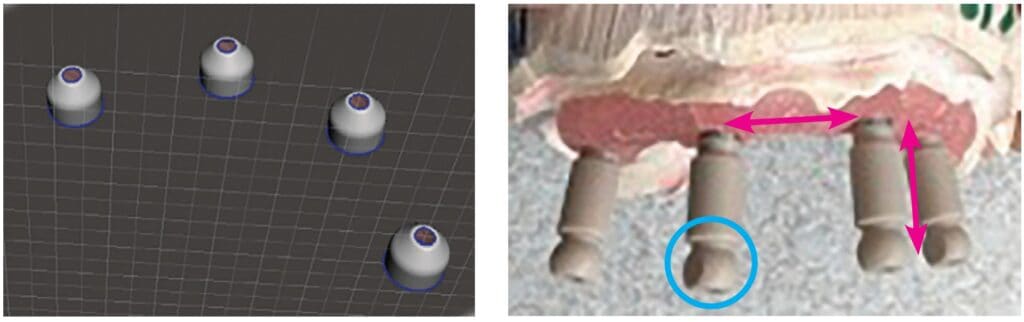
Photogrammetry technology may be used in implant dentistry to obtain accurate information with respect to recording three-dimensional implant positions for the fabrication of full-arch implant-supported prostheses. Through mathematical relations and stitching together 2-dimensional images, a 3-dimensional representation of the multiple implant positioning is created within an XYZ axis (Figure 1). Photogrammetry is the most precise and accurate digital method of recording the intraoral position of multiple implants. It is a technique for determining the geometrical properties of the imaged objects and their spatial arrangement from photographic images.
In comparison to conventional impression methods, photogrammetry is more efficient, faster, and provides greater patient satisfaction than conventional impression methods. With conventional impression methods, there exist many inherent patient factors which lead to inaccuracy. Material shrinkage, splinting material, implant angulation, impression material, patient movement, and intraoral conditions all alter the accuracy of the impression technique. With photogrammetry, these factors do not affect the accuracy as the record is being taken extraorally.
Although both are digital methods, photogrammetry technology is not the same as intraoral scanning. Photogrammetry scanning differs from traditional intraoral scanning in the acquisition and identification of its targets. During a photogrammetry scan, the targets and 3D position of the implant in the XYZ axis can be measured extraorally, from just one side. Therefore, the entire scan body is not required to pick up the implant location. In comparison with intraoral scanning (IO), IO accuracy is lost when measured between each of the scan bodies (Figure 2). Intraoral scanning must register the scan region (top 1/3 of scan body) to register implant positioning. Additionally, intraoral oral conditions (e.g., blood, saliva, soft tissue) and operator experience affect the accuracy of intraoral scanning.
Photogrammetry technique in implant dentistry
In implant dentistry today, there exist three different photogrammetry systems on the market — PICcamera (PICdental), iCam4D (iMetric4D), and MicronMapper (SIN Dental) (Figure 3). All photogrammetry units utilize the same basic techniques and workflow described below.

The photogrammetry technology allows the implant clinician to obtain three-dimensional (3D) coordinate measurements through various photographic images, leading to a representation of the exact implant position. The photographic images utilize an extraoral receiver to record the geometric properties of objects and their spatial position.17 However, the only drawback of this system is that photogrammetry does not depict the soft tissues so a second STL file is required. With this workflow, the photogrammetry record will record the implant positioning within an XYZ axis, and an intraoral impression or scan is obtained to record the soft tissues. These scans will then be merged to create the patient’s prosthesis.
Step 1: Prior to placement of dental implants, the clinician must decide how to establish the correct and ideal tooth position as well as maintaining the patient’s vertical dimension of occlusion. This is a crucial step within the digital workflow to achieve accuracy. The following three methods can be utilized:
-
Use of fiduciary markers
Fiduciary markers can be used as an aide to relate the pre-and post-operative surgical data. Fiduciary markers are fixated within the oral cavity prior to surgery and remain in place until after the post-implant placement soft tissue record is obtained. Because of the constant position of the markers throughout the surgery, the merging of the pre- and post-surgical data can be completed. It is recommended to place a minimum of 2-3 fiduciary markers per arch. In the maxilla, the markers are most commonly placed in the palate, as this will not interfere with the actual surgical procedure. In the mandible, markers are generally positioned bilaterally in the retromolar pad area. The fiduciary marker surface should have a distinct marking (i.e., Phillips head) that can easily be recognized during an impression or scan. Tent screws are ideal to be used as fiduciary markers as they are stable when placed and easily depicted in the intraoral impression or scan. The vertical dimension is maintained by obtaining an accurate impression (i.e., PVS, polyether, or an intraoral scan) of the markers prior to and after surgery, as the fiduciary marker relates both data sets (Figures 4-6).


-
Selected abutment teeth
Another method to maintain the vertical dimension is to retain pre-determined abutment teeth throughout the surgery (Figure 7). Ideally, at least two teeth will be selected that will not interfere with the implant surgery. These teeth will remain in the arch until after the implant surgery, photogrammetry record, and soft tissue impression are obtained. After the records are completed, the teeth can then be extracted. By maintaining the selected teeth in the pre-and post- surgical impression (i.e., soft tissue impression with teeth and MUA healing caps), the two files can be merged together, thereby maintaining the vertical dimension.

-
Existing denture
The patient’s pre-existing or immediate denture can be used to help retain the vertical dimension. After implant placement and the photogrammetry recording, MUA healing caps will be placed on the implant abutments. A reline impression will then be taken with the patient’s denture (Figure 8). The denture will be scanned 360 degrees obtaining the soft tissue registration (from the reline impression), MUA healing cap positioning, and the denture tooth setup as well as bite registration. Within the CAD software, this will be imported as two separate files (i.e., preoperative wax-up and inverted soft-tissue scan). By inverting the intaglio of the denture scan, a soft tissue scan with the MUA healing caps is created. This scan can then be merged with the photogrammetry record, allowing the accurate position of the implants, soft tissue, and the patient’s denture tooth setup at the established vertical.

In summary, when restoring full-arch implants, three different records are needed:
- Preoperative record
- Photogrammetry record
- Postoperative soft-tissue record (with MUA healing caps).
These records are then exported into a design software (e.g., Exocad, 3Shape) where they will be merged to facilitate the design of an All-On-X prosthesis. All three of these methods can be utilized to align data to help record the vertical dimension as well as establish the ideal tooth position.
Step 2: Obtaining the photogrammetry scan
-
Scan body insertion
Photogrammetry scan bodies (e.g., PICtransfers, iCAM bodies, MicronMapper ScanBody) are specific to each photogrammetry system and are encoded with targets that allow the camera to transpose multiple images to determine the exact implant position. The scan bodies are inserted into multi-unit abutments of each implant, and verification X-rays are obtained to confirm seating of the scan bodies (i.e., most important for angled or deeper multi-units).
Once seating is confirmed, they must be oriented in a way to allow visualization of the maximum number of targets. This positioning increases the redundancy of the calculations as the photogrammetry record is being obtained (Figure 9).

-
Photogrammetry scan
The photogrammetry unit identifies the implant positioning from locating the targets on the photogrammetry scan body via an extraoral camera (Figure 10). The number of targets on the scan bodies, the type and number of cameras, and the method of obtaining images differs depending upon the photogrammetry systems (iCam4D, PicCamera, Micron Mapper).
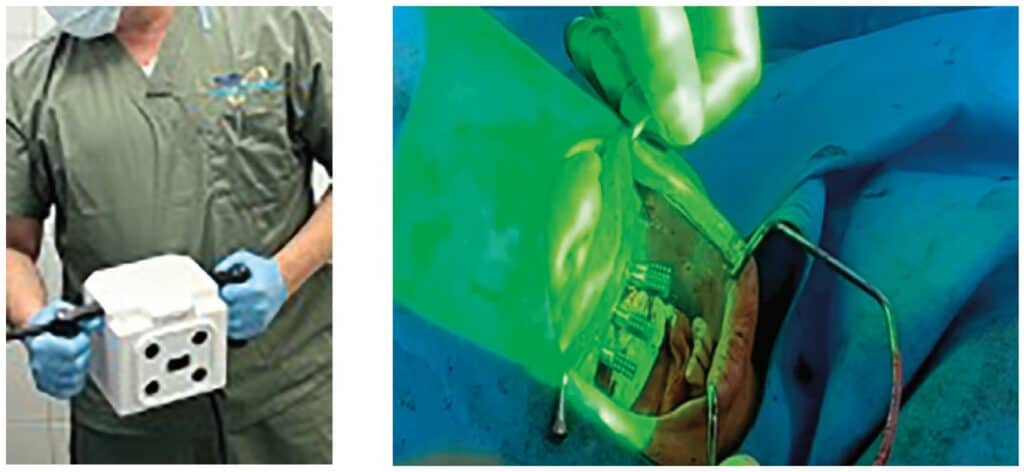
The photogrammetry camera is positioned approximately 10 inches away from the scan bodies, at a maximum angle of 45 degrees (Figure 11). As the camera is rotated, images are continuously captured until the software verifies sufficient data has been obtained. During the scan, the software notifies the user when sufficient information has been recorded by demonstrating a color change in the scan body from red to green (Figure 12). Pictures are continuously obtained until enough intersections are created to record the exact position of the implants. This can generally be achieved in under 30 seconds.

Step 3: Prosthesis fabrication
Once the photogrammetry scan is complete, a digital file extension (STL or XML file) is created that contains all the interrelated information on implant geometries, interfaces, healing abutments, and screws. This data can then be uploaded to CAD software to allow for digital alignment pairing and designing of the prosthesis.

All data sets are aligned within the CAD software (e.g., Exocad, 3Shape), and the patient’s immediate full-arch prosthesis is designed (Figure 13). The clinician has the option of designing and fabricating a prosthesis that inserts directly to the multi-unit abutment, without the use of a titanium cylinder or Ti-base (Figure 14). This is different from standard denture conversions and stackable surgical guides. With this, special abutment screws are utilized that have intimate fit within the prosthesis. All of these parameters are determined and specified within the design software.

After the prosthesis is designed, an “STL” file is sent to the 3D printer (Figure 15). This monolithic prosthesis can then be 3D-printed chairside for the patient in tooth-colored resin (Figure 16). Special characterization can be easily performed to optimize the esthetics prior to delivering the prosthesis. With this process, the patient is able to have an esthetic, passive fitting, immediate prosthesis (Figure 17).
Summary
The use of photogrammetry and 3D printing has given the implant clinician the opportunity to utilize an alternative full-arch prosthetic workflow option. A fully digital concept is now available for immediate loading procedures. Photogrammetry technology calculates the position and orientation of multiple implant interfaces quickly, efficiently, and accurately. It is the most accurate digital method to determine dental implant positioning for multiple implants, especially with full arch cases. Being able to create an instant digital file, many procedures and materials are eliminated, thereby reducing the possibility of error while saving time, reducing visits, and limiting patient discomfort.
Diving into the digital workflow can be an overwhelming journey. Understanding the foundation of implant dentistry and the analog methods are still pivotal to applying these newer digital methods in implant dentistry. The Resnik Implant Institute, where I am a faculty member, has been implementing these digital methods in the surgical, prosthetic, and hands-on curriculum. Attendees receive didactic and hands-on training with photogrammetry and the digital workflow. Teaching these newer methods, as well as the foundation of implant dentistry, can help doctors understand and implement this technology in their practices.
Using photogrammetry helps Dr. Resnick improve his implant placement efficiency. Dr. Paul Tipton discusses other implant advances in full-arch restorations here: https://implantpracticeus.com/full-arch-implant-restoration/
Author Info
 Christopher R. Resnik, DMD, MDS, DICOI, is a prosthodontist in private practice in Winter Park, Florida. He completed his dental degree, prosthodontic residency, and master’s degree in oral implantology from the University of Pittsburgh School of Dental Medicine. He is a faculty member of the Resnik Implant Institute and holds associate faculty positions at the University of Pittsburgh Graduate Prosthodontic Program and Temple University Graduate Periodontics Program. He is a contributing author to multiple textbooks including Avoiding Complications in Oral Implantology, Misch’s Contemporary Implant Dentistry, and Dental Implant Prosthetics.
References
- Abduo J, Judge RB. Implications of implant framework misfit: a systematic review of biomechanical sequelae. Int J Oral Maxillofac Implants. 2014 May-Jun;29(3):608-621.
- Katsoulis J, Takeichi T, Sol Gaviria A, Peter L, Katsoulis K. Misfit of implant prostheses and its impact on clinical outcomes. Definition, assessment and a systematic review of the literature. Eur J Oral Implantol. 2017;10 Suppl 1:121-138.
- Mizumoto RM, Yilmaz B, McGlumphy EA Jr, Seidt J, Johnston WM. Accuracy of different digital scanning techniques and scan bodies for complete-arch implant-supported prostheses. J Prosthet Dent. 2020 Jan;123(1):96-104.
- Moslemion M, Payaminia L, Jalali H, Alikhasi M. Do Type and Shape of Scan Bodies Affect Accuracy and Time of Digital Implant Impressions? Eur J Prosthodont Restor Dent. 2020 Feb 27;28(1):18-27.
- Wismeijer D, Joda T, Flügge T, Fokas G, Tahmaseb A, Bechelli D, Bohner L, Bornstein M, Burgoyne A, Caram S, Carmichael R, Chen CY, Coucke W, Derksen W, Donos N, El Kholy K, Evans C, Fehmer V, Fickl S, Fragola G, Gimenez Gonzales B, Gholami H, Hashim D, Hui Y, Kökat A, Vazouras K, Kühl S, Lanis A, Leesungbok R, van der Meer J, Liu Z, Sato T, De Souza A, Scarfe WC, Tosta M, van Zyl P, Vach K, Vaughn V, Vucetic M, Wang P, Wen B, Wu V. Group 5 ITI Consensus Report: Digital technologies. Clin Oral Implants Res. 2018 Oct;29 Suppl 16:436-442.
- Joda T, Katsoulis J, Brägger U. Clinical Fitting and Adjustment Time for Implant-Supported Crowns Comparing Digital and Conventional Workflows. Clin Implant Dent Relat Res. 2016 Oct;18(5):946-954.
- Zhang Y, Tian J, Wei D, Di P, Lin Y. Quantitative clinical adjustment analysis of posterior single implant crown in a chairside digital workflow: A randomized controlled trial. Clin Oral Implants Res. 2019 Nov;30(11):1059-1066.
- Kim KR, Seo KY, Kim S. Conventional open-tray impression versus intraoral digital scan for implant-level complete-arch impression. J Prosthet Dent. 2019 Dec;122(6):543-549.
- Mizumoto RM, Yilmaz B, McGlumphy EA Jr, Seidt J, Johnston WM. Accuracy of different digital scanning techniques and scan bodies for complete-arch implant-supported prostheses. J Prosthet Dent. 2020 Jan;123(1):96-104.
- Moslemion M, Payaminia L, Jalali H, Alikhasi M. Do Type and Shape of Scan Bodies Affect Accuracy and Time of Digital Implant Impressions? Eur J Prosthodont Restor Dent. 2020 Feb 27;28(1):18-27.
- Wulfman C, Naveau A, Rignon-Bret C. Digital scanning for complete-arch implant-supported restorations: A systematic review. J Prosthet Dent. 2020 Aug;124(2):161-167.
- Vandeweghe S, Vervack V, Dierens M, De Bruyn H. Accuracy of digital impressions of multiple dental implants: an in vitro study. Clin Oral Implants Res. 2017 Jun;28(6):648-653.
- Lie A, Jemt T. Photogrammetric measurements of implant positions. Description of a technique to determine the fit between implants and superstructures. Clin Oral Implants Res. 1994 Mar;5(1):30-36.
- Ortorp A, Jemt T, Bäck T. Photogrammetry and conventional impressions for recording implant positions: a comparative laboratory study. Clin Implant Dent Relat Res. 2005;7(1):43-50.
- Kosago P, Ungurawasaporn C, Kukiattrakoon B. Comparison of the accuracy between conventional and various digital implant impressions for an implant-supported mandibular complete arch-fixed prosthesis: An in vitro study. J Prosthodont. 2022 Sep 9.
- Hussein MO. Photogrammetry technology in implant dentistry: A systematic review. J Prosthet Dent. 2021 Nov 18:S0022-3913(21)00516-3.
- Zhang YJ, Qian SJ, Lai HC, Shi JY. Accuracy of photogrammetric imaging versus conventional impressions for complete-arch implant-supported fixed dental prostheses: A comparative clinical study. J Prosthet Dent. 2021 Nov 11:S0022-3913(21)00567-9.
Stay Relevant With Implant Practice US
Join our email list for CE courses and webinars, articles and mores

