Educational aims and objectives
This self-instructional course for dentists aims to provide an overview of the benefits of the top three dental suturing techniques the types of dental sutures commonly used for implant procedures.
Expected outcomes
Implant Practice US subscribers can answer the CE questions by taking the quiz online to earn 2 hours of CE from reading this article. Correctly answering the questions will demonstrate the reader can:
- Identify why proper suturing is essential after dental implant surgery.
- Realize some characteristics of ideal suture material for certain types of procedures.
- Identify the armamentarium of instruments needed for suturing.
- Realize some techniques for suturing.
- Observe a patient case that uses the top three techniques.
Dr. Steven Vorholt shows how implant suturing techniques can promote healing, reduce infection risks, and minimize discomfort and bleeding.
Dr. Steven Vorholt explores the many aspects of suturing for implant procedures
Suturing and incision design are the bookends to a successful implant surgery. With either of the bookends done poorly, the entire surgery is at risk. While surgical suturing may seem like a topic for beginners only, it is important to revisit and have a firm grasp so you can build on these basics for the benefit of your patients. The three suturing techniques discussed in depth in this continuing education article form the basis for all dental implant suturing. You must be a master of these techniques before you can adequately grow into the master implantologist.
There are several suturing techniques that can be used in dental procedures, each with its own advantages and disadvantages. In this article, we will discuss the benefits of the top three dental suturing techniques: simple interrupted sutures, interlocking continuous sutures, and horizontal mattress sutures and also discuss the types of dental sutures commonly used.
Suturing is the process of closing the wound after dental implant surgery. The sutures help to hold the gingiva in an ideal place, promote healing, and prevent infection. The proper technique and choice of suture material can significantly impact the success of the implant. Proper suturing is essential after dental implant surgery for the following reasons:
- Promotes healing: Proper suturing helps to keep the implant in place and allow the surrounding tissues to heal properly.
- Reduces the risk of infection: Suturing helps to close the wound and prevent bacteria from entering the surgical site, reducing the risk of infection. Proper suturing techniques and the use of sterile materials can help to minimize the risk of postoperative infection.
- Minimizes discomfort and bleeding: Good suturing techniques can help to minimize postoperative discomfort and bleeding, which are common after dental implant surgery. Proper suturing can also reduce the need for pain medication and promote a faster recovery.
Choosing the right suture material
Choosing the right suture material is essential for the success of the implant. The ideal suture material should be strong, flexible, and biocompatible. There are several types of suture materials available, including:
- Non-absorbable sutures: Non-absorbable sutures are made of materials that do not break down in the body and must be removed after the wound has healed. Examples of non-absorbable sutures include silk, nylon, and
- Absorbable sutures: Absorbable sutures are made of materials that break down in the body over time and do not require removal. Examples of absorbable sutures include gut and polyglycolic acid.
- Monofilament: Monofilament sutures have smooth microstructure and therefore prohibit or vastly lessen bacterial migration along the length of the suture.
- Braided: Braided sutures are more apt to allow migration of bacteria and oral fluids and have a higher likelihood of infections. However, braided sutures are easier to throw secure knots and maintain knot stability.
The choice of suture material will depend on the location of the implant, the type of surgery performed, and the patient’s individual needs. It is essential to choose a suture material that is biocompatible and suitable for the specific procedure.1
Armamentarium
The armamentarium for suturing varies based on the surgeon’s preference and the type of suturing being attempted. Generally, it involves a needle holder, tissue forceps, and scissors. Each of these tools has several variations available to the implant surgeon.2
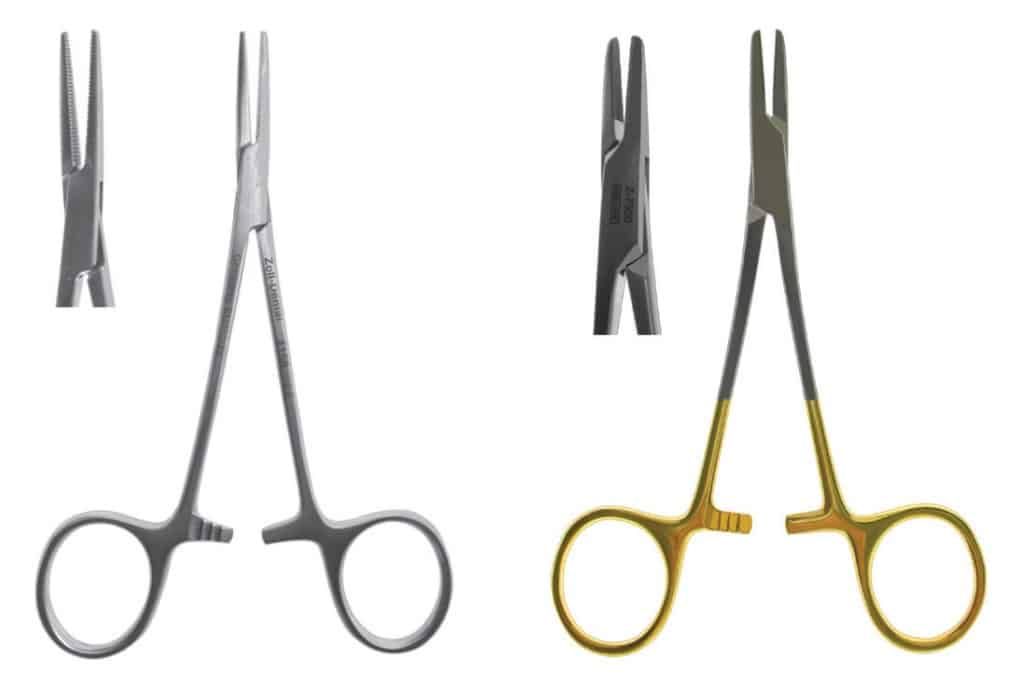
Needle Holders
Needle holders are instruments for gripping, driving, and grabbing suture needles. Not to be confused with hemostats which are generally more aggressively toothed instruments meant for hemostasis control, needle holders are often cross-hatched to allow gentle but firm control of the suture needle itself (Figure 1). The needle should be held ½-⅔ the way back towards the swage (the connection point on the suture and needle) on the body of the needle. Care should be taken to avoid grabbing the needle on the swage to avoid breaking the thread free, and care should be taken to avoid grabbing the needle by the point to avoid breaking, bending, or dulling the needle.
Insertion of the suture needle into the tissue should be perpendicular to the tissue for maximum cutting efficiency. Approaching the tissue at an acute angle can lead to shallow bites, torn tissue, and poor adaptation of the incision line. Needles should not be pushed through tissue but turned through with the wrist movement to allow for maximum cutting efficiency. When the needle exits the tissue, it should not be grabbed by just the tip of the needle; this may blunt or bend the needle tip leading to poor future bites and trauma to the tissue.3
Traditional needle holders have finger-ring handles and are available in differing lengths and tooth patterns. The needle holder is held in balance with the thumb and ring finger in the finger-rings and the middle and index finger stabilizing and guiding the passage of the needle through tissue.

Locking needle drivers come in two main varieties, the Mathieu (and variations) and the Castroviejo (Figure 2). Both needle drivers allow the surgeon to gently engage the auto-locking and unlocking portion of the instrument for better handling. The Mathieu-style needle holder is held in a palm grasp and is generally meant for use with thicker tissue and suture materials, while the Castroviejo is a more delicate instrument more widely used with finer suture materials 5-0 and thinner. The Castroviejo is held in a pen-grasp.

Tissue Forceps (Figure 3)
When engaging tissue margins for accurate suturing, the more mobile tissue should be engaged first, and the more secure tissue should be engaged second. A popular idiom to remember this is to “bring the ship to shore.” Bites should be equidistant depths from the incision line on either side of the incision to ensure equal pressure along the incision line. Tissue forceps can help stabilize mobile tissue for the initial bite and also help in retraction of more secure tissue.
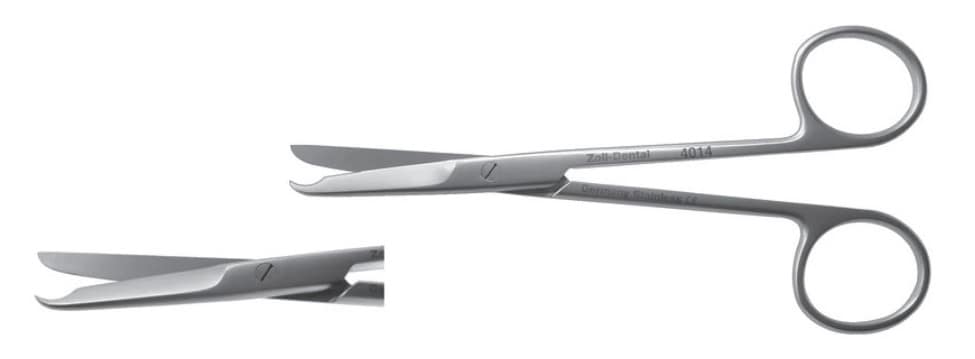
Scissors
Any type of dental scissors can be used for suture removal and trimming, though several variations are available to help overcome common issues — longer scissors, angled cutting blades, hooked tips to facilitate embedding suture removal, etc. (Figure 4). Scissors should be maintained with adequate sharpness to avoid splitting or fraying sutures or accidentally pulling delicate sutures.
The length the suture “ears” should be cut is determined by the location, suture material, and surgical technique employed. Sutures with high shape memory should be cut longer to avoid irritation to the adjacent oral tissues and avoid early unraveling of the knots. Suture materials with low shape memory and braided materials can generally be cut shorter and maintain knot stability and low irritation. Approximately 3 mm to 5mm of ear length is acceptable and works well in most clinical situations.
Top three suture techniques
Simple Interrupted Sutures
Simple interrupted sutures are the most commonly used suturing technique in dental procedures (Figure 5). This technique involves placing individual sutures at regular intervals along the wound edge and tying each stitch separately. Simple interrupted sutures are easy to place and provide excellent wound closure.
Benefits of simple interrupted sutures
- Precise wound closure: Simple interrupted sutures provide precise wound closure, ensuring that the edges of the incision are well approximated.
- Reduced tension: These sutures help to distribute the tension evenly along the incision, reducing the risk of wound dehiscence and promoting faster healing.
- Versatility: Simple interrupted sutures can be used in a variety of dental procedures, including extractions, flap surgeries, and implant placements.
Technique
- Begin in the middle of the wound with the first stitch (bisecting incision technique) to ensure the wound margins are adapted correctly along the length of the 4
- Take a 2 mm to 4 mm bite from the wound margin starting with the more mobile tissue (typically the buccal), and take another bite directly across the wound margin to the same depth as the first bite. This ensures equal tension on either side of the wound.
- Begin the suture throw with a surgeon’s knot (2 forward, 1 backward) to cinch the knot and stabilize the suture. Add additional throws as necessary depending on the suture material chosen.5
- Cut the ears of the suture 5 mm minimum to avoid early untying of the suture material. Stiffer suture material should have the ears trimmed longer to avoid causing the patient pain postoperatively.
- Continue throwing simple interrupted sutures 3 mm to 5mm apart until the length of the incision is closed.

Interlocking continuous sutures
Interlocking continuous sutures are a variation of the continuous suturing technique (Figure 6). This technique involves placing a continuous suture along the wound edge and interlocking the stitches at regular intervals. Interlocking continuous sutures provide excellent wound closure and reduce the risk of suture failure.
Benefits of interlocking continuous sutures
- Reduced risk of suture failure: Interlocking continuous sutures distribute tension more evenly along the incision, reducing the risk of suture failure and promoting faster healing.
- Efficient placement: This technique is faster to place than simple interrupted sutures, reducing the time required for the suturing process.
- Reduced trauma: Interlocking continuous sutures reduce trauma to the tissue by minimizing the number of times the needle passes through the tissue.
Technique
- Beginning at the most posterior segment of the incision, throw a simple ileave the knot placed buccal to the incision line.
- Trim the tail only; do not cut the length with the suture needle.
- Take an equal bite 3 mm to 5 mm more anterior to your initial bite.
- Prior to cinching the loop, twist the loop 1 to 2 times (depending on suture material — sutures with less friction, i.e., PTFE, can be twisted more than braided sutures, i.e., PGA) and pass the needle through the loop.
- Carefully cinch the new segment of suture material and align the interlocking knot buccal to the incision line.
- Complete throws and interlocking loops along the length of the incision until reaching the end. Leave the loop long enough to tie to, and cut all 3 suture ears to appropriate length for suture security and patient comfort.
Horizontal mattress sutures
Horizontal mattress sutures are a technique used to close wounds under tension, such as those in the oral cavity. This technique involves placing stitches parallel to the incision, with each stitch passing through the tissue on either side of the incision (Figure 7). The mattress is typically the first suture throw to help close a wound, finished with either of the two previously discussed techniques. Its ability to reduce tension vectors across the incision line is key to its success in postoperative implant surgery.
Benefits of horizontal mattress sutures
- Effective at closing wounds under tension.
- Minimal tension on the wound edge.
- Reduces the risk of wound dehiscence.
- Helps to maintain downward pressure on a membrane and bone graft.
Technique
- Begin with a bite 7 mm to 10 mm apical to the incision line (typically at the mucogingival junction) on the distal buccal of the incision.
- With your next bite, exit the lingual tissue at similar depth to the initial buccal bite.
- Re-bite the lingual tissue 5 mm to 10 mm mesial at the same depth.
- Exit the buccal tissue perpendicular to the third bite — the four bites now forming a square with two threads crossing the crest/membrane.
- Tie with a surgeon’s knot and any additional throws as needed depending on the suture material.
Building on the basics
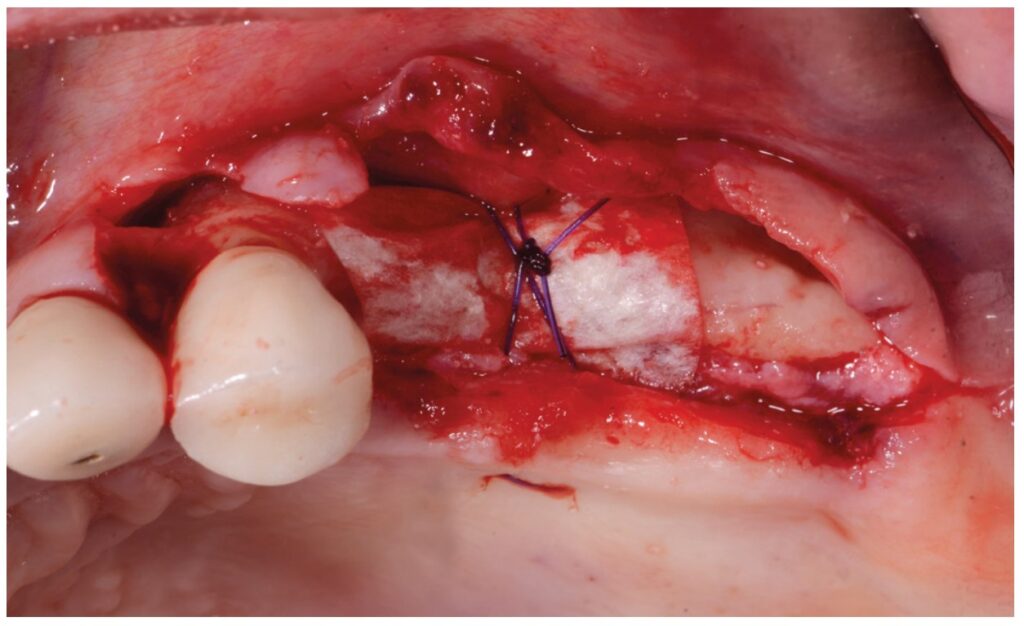
Let’s review a recent case that showcases the rationale and techniques of the top three. It is common to utilize several suturing techniques in surgical closure, especially in larger grafting cases. In the following case, a lateral sinus lift was performed, and all three techniques were used to their full effect. Simple interrupted sutures are used to close small incisions and place tissue margins accurately back in place; horizontal mattress sutures are used to hold membranes in place and relieve tension over the incision line, and running interlocking continuous sutures are used to close longer incisions with watertight closure for maximum healing potential via primary closure.

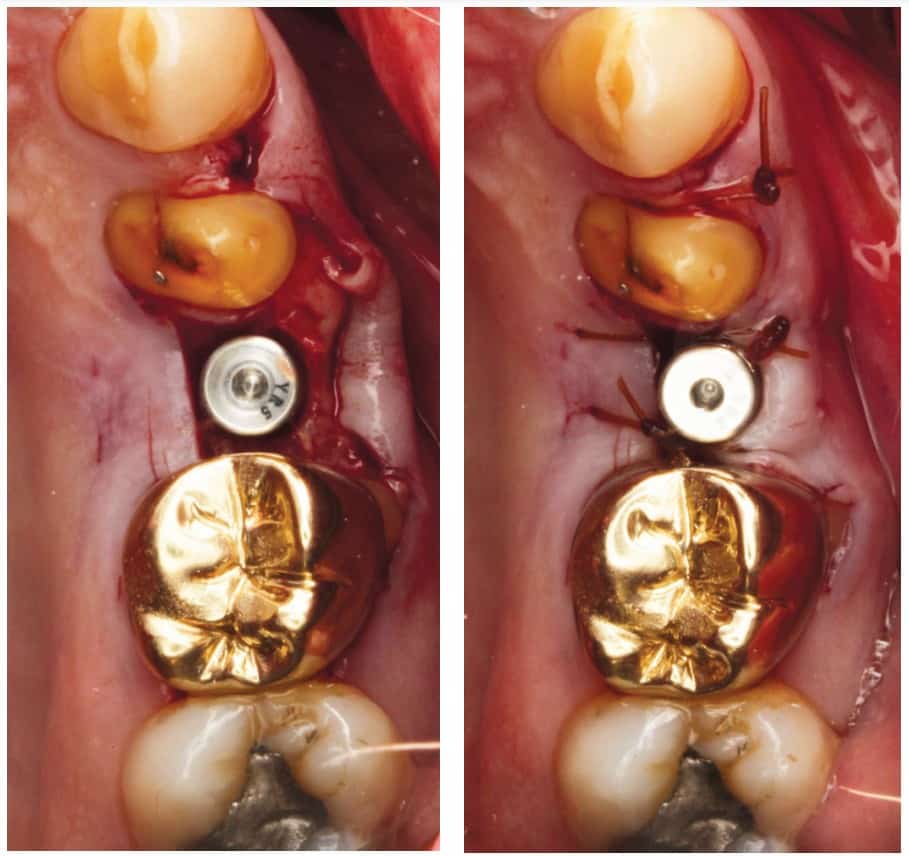
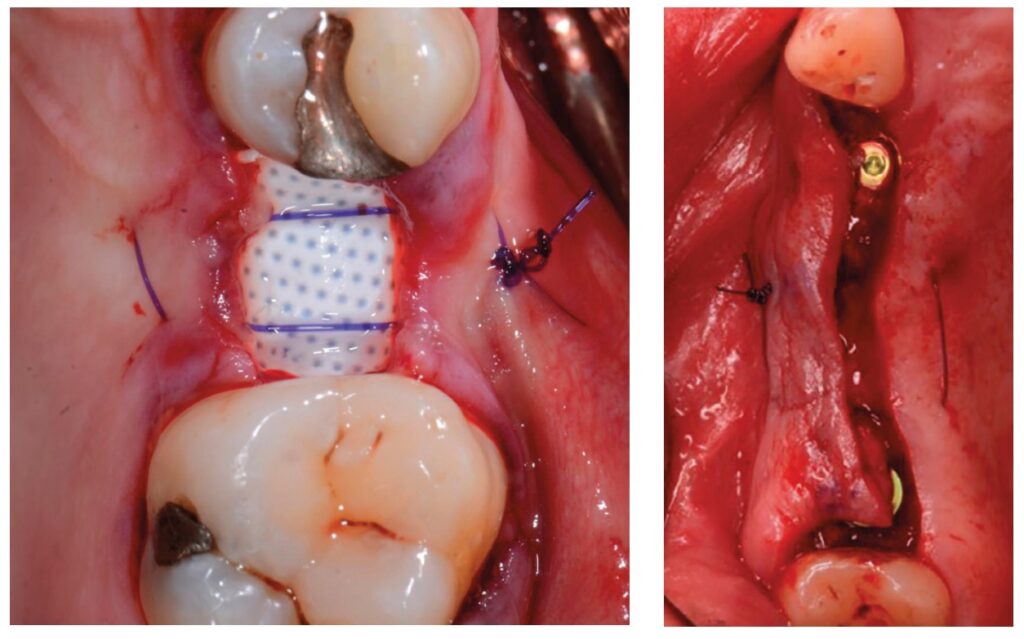
A patient presented with a failing bridge on the upper left that is supported by three mini implants. The implants directly perforate the sinus and only ~2mm of residual bone height remains on the crest (Figure 8). The mini implants were removed, and a lateral window sinus lift was performed. Over the window and crest, a pericardium membrane was positioned to close all perforations into the sinus. Pericaridum membranes are resorbable membranes made from either human or porcine pericardium. The tissue that surrounds the heart is known to be extremely resistant to tearing (a leading reason for pericarditis being potentially fatal), and facilitates great handling properties as a dental material. It can be easily tacked or sutured, and maintains its shape memory for ease of placement over a defect. A periosteal-biting mattress suture is thrown first to help pin the membrane down on the buccal plate and crest (Figure 9). Next, simple interrupted sutures are used to put the vertical incision in the posterior back in position and the vertical incision in the anterior. Third, a papilla sling is used mesial to tooth No. 11 to tightly reposition the gingiva around the canine. A papilla sling suture functions by using a tooth as a pivot point to “sling” around and help reapproximate tissue. Only the buccal papilla are engaged, and the suture is passed underneath proximal contacts (if necessary) to facilitate wrapping around the lingual of the tooth. This suture is very useful for coronally advancing flaps or maintaining the coronal position of papillas after flap release. Fourth, a horizontal mattress suture is placed at the depth of the mucogingival junction to help approximate the flap margins, relieve tension at the incision line, and evert the tissue (Figure 10). Lastly, a PTFE running double-interlocking continuous suture is used to complete the final closure of the surgical site (Figure 11).

Two weeks post-op photos show great tissue response and health thanks in large part to meticulous suturing of the case (Figure 12).

Conclusion
Proper suturing technique is essential for successful dental procedures. By understanding the benefits and techniques of the top three dental suturing techniques, dentists can choose the appropriate technique for each procedure and promote faster healing, reduce the risk of infection, and minimize discomfort and bleeding for the patient.
Awareness of the complexities of implant suturing can help with postoperative complications. Read Dr. Vorholt’s article, “Incision line opening: the good, the bad, and the ugly,” at https://implantpracticeus.com/incision-line-opening-the-good-the-bad-and-the-ugly/
References
- Moy RL, Waldman B, Hein DW. A review of sutures and suturing techniques. J Dermatol Surg Oncol. 1992 Sep;18(9):785-795. doi: 10.1111/j.1524-4725.1992.tb03036.x. PMID: 1512311.
- Yag-Howard C. Sutures, needles, and tissue adhesives: a review for dermatologic surgery. Dermatol Surg. 2014 Sep;40 Suppl 9:S3-S15. doi: 10.1097/01.DSS. 0000452738.23278.2d. PMID: 25158874.
- Moy RL, Lee A, Zalka A. Commonly used suturing techniques in skin surgery. Am Fam Physician. 1991 Nov;44(5):1625-34. PMID: 1950960.
- Davis B, Smith KD. Oral Surgery Suturing. [Updated 2023 Jan 25]. In: StatPearls [Internet]. Treasure Island (FL): StatPearls Publishing; 2023 Jan-. Available from: https://www.ncbi.nlm.nih.gov/books/NBK572089/.
- Romeo A, Rocha CL, Fernandes LF, Asencio FA, Zomer MT, Fujimoto C, Ussia A, Wattiez A, Koninckx PR, Kondo W. What is the Best Surgeon’s Knot? Evaluation of the Security of the Different Laparoscopic Knot Combinations. J Minim Invasive Gynecol. 2018 Jul-Aug;25(5):902-911. doi: 10.1016/j.jmig.2018.01.032. Epub 2018 Feb 5. PMID: 29421249.
Stay Relevant With Implant Practice US
Join our email list for CE courses and webinars, articles and mores

