Dr. Ara Nazarian illustrates a simplified approach to an immediate dental implant
Today, we see more patients presenting to the office with endodontically treated teeth that have failed for one reason or another due to fracture, recurrent caries, or periodontal problems. In the past, the common dental treatment would be to prepare the adjacent teeth for a three-unit bridge.
[userloggedin]
However, with implant therapy increasingly gaining popularity among patients and providers, the request to have implant treatment has increased. It is my opinion that implant tooth replacement is the standard of care, and that every general practitioner needs to learn how to replace missing teeth using this modality at some level. This article focuses on a case where a fractured tooth was extracted, and a dental implant was placed immediately using a simplified approach.

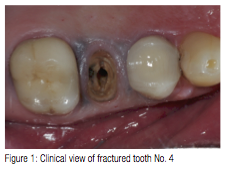
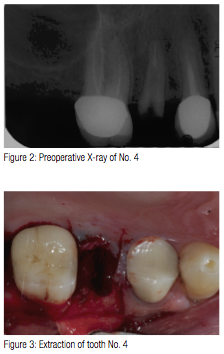
A 58-year-old male patient presented to my practice with a fractured tooth No. 4 (Figure 1) that was previously restored with a root canal, post/core, and crown. Since the tooth had just recently fractured, there was no periapical lesion present that would contradict dental implant placement (Figure 2). In addition, the patient’s medical history was non-contributory. Different options available to restore the area were discussed with the patient as well as any risks, benefits, and alternatives. The patient decided to have an implant placed immediately after the extraction of tooth No. 4.

The site for the implant was begun with a #557FG surgical bur in a high-speed surgical handpiece and surgical motor (Aseptico, AEU 7000). By using the high-speed surgical handpiece, I was able to control the initial penetration through the floor of the socket with total control. The location was centered facial-lingually as well as mesial-distally. Since the tooth being replaced was a premolar, and there was sufficient bone width and height, a 4 mm x 12 mm OCO Biomedical TSI dental implant was selected.The area was anesthetized using 1.8 ml 4% Septocaine® (Septodont) with 1:100,000 epinephrine. Once anesthe-tized, the Physics Forceps (Golden Dental Solutions) was placed and pressure slowly applied using only wrist movement toward the buccal. Approximately within 60 seconds, the force built up and released at which point the tooth disengaged from its socket (Figure 3). Once the tooth was extracted, a curette was used to clean out the socket of any fibrous tissue.
A 1.8 mm pilot drill was placed into the site and advanced to a depth of 12 mm measuring from the height of bone. Since the dental implant was being placed immediately into the socket, it was important to engage the bone apical to the socket for immediate fixation. Ideally, I prefer to place immediate implants 3 mm apical to the socket if the anatomy permits.
Using the pilot drill as a paralleling pin, an X-ray was taken to check the angulations between the adjacent teeth within the maxilla. Once the position was confirmed, the final drill was used to shape the osteotomy for the implant. DBM bone putty (Maxxeus) was placed into the osteotomy and displaced to the lateral walls with a curette. Once complete, a 4 mm x 12 mm TSI OCO Biomedical threaded implant (Figure 4) was placed into the osteotomy using an implant finger driver until increased torque was necessary. The ratchet wrench was then connected to the adapter and the implant torqued to final depth reaching a torque level of 55 Ncm. A 3 mm healing abutment was hand-tightened to the implant (Figure 5) and the tissue sutured. A postoperative radiograph was made of the implant and thehealing abutment. The implant was evaluated clinically after 1 week. The patient stated he had no post operative discomfort or swelling.

When the patient returned 4 months later, the healing abutment was removed (Figure 6) and the implant tested with an Osstell® ISQ implant stability meter, which uses resonance frequency analysis as a method of measurement. Several studies have been conducted based on resonance frequency analysis (RFA) measurements and the Implant Stability Quotient (ISQ) scale. They provide valid indications that the acceptable stability range lies above 55 ISQ. In this particular case, the ISQ meter read 76 (Figure 7), which was far above the guidelines.

A solid stock abutment of 4-mm height was tightened into the implant and then retightened to insure proper seating (Figure 8), and an X-ray taken. An impression was taken of the implant and abutment using a tissue retraction impression pickup (TRIP) from OCO Biomedical Company. The TRIP was tried on to the TSI implant and abutment to check clearance for a triple tray impression. It was important to make sure the TRIP displaced the gingiva and snapped over the collar of the implant to ensure proper seating. Since there was enough clearance and a tooth present on either side of the implant, a triple tray (EXACTA Dental Products) was used with a heavy and light-bodied polyvinyl siloxane impression material (Take-One Advance, Kerr). Once the impression material was set, it was removed from the mouth picking up the TRIP, and a 4.0 mm marginal collar was snapped into the impression and sent to the lab for pour up. From this pour up, the marginal collar would reproduce the margin of the implant, and the pour up would replicate the abutment so that the final PFM crown restoration would be fabricated.


When the patient returned for the seating appointment, the PFM crown was placed on the abutment with its margins on the implant, and another X-ray was taken to verify an accurate fit. Since there were no open margins, and the contacts and occlusion were good, the crown restoration was seated using Nexus™ RMGI (Kerr) cement (Figure 9). Once the cement reached its gel stage, it was quickly cleaned off, and any excess quickly and easily removed (Figure 10). The patient was very pleased with the end result and was surprised at how atraumatically the dental implant was placed at the same time of the extraction.
Today, patients like to get all their services performed under one roof. They know, trust, and feel comfortable with their general dentist and usually prefer him or her to perform dental procedures necessary to reach optimum dental health. I am not advocating general dentists offer procedures they are not comfortable with or not properly trained for. However, it is my opinion that general dentists should implement single posterior implants into their practices. General dentists interested in offering implant treatment should pursue postgraduate implant training in placement and restoration if they want to meet the demands of today’s society at www.aranazariandds.com
Stay Relevant With Implant Practice US
Join our email list for CE courses and webinars, articles and mores


