Dr. David Furze and Kerstin Kress demonstrate how they met challenging esthetic demands to wow their patient and the judges of the Aesthetic Dentistry Awards presented by FMC
The survival of dental implants is well established with 10-year survival rates reported at 95%-98% (Torabinejad, et al., 2007). The success criteria of implants as stipulated by Albrekson, et al., 1986, and Buser, et al., 1990, are based on the biological and functional aspects of implant integration and its survival. With the equivalent high survival of dental implants within the esthetic zone, the criteria for success of dental implant treatment by both the profession and the patient population have changed. The esthetic result is now being challenged with excellence required for success.
This article will demonstrate how the authors met these challenges to provide an implant restoration for a patient that provided a successful esthetic result and good chances for long-term survival.
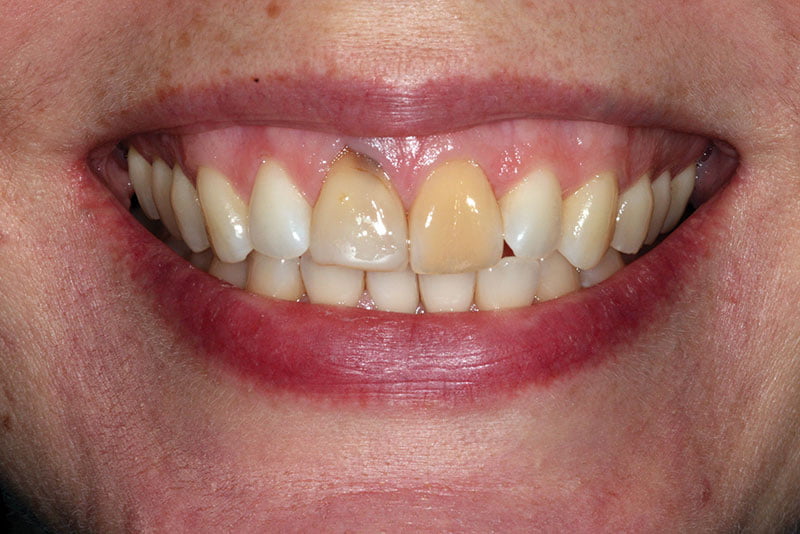 Figure 1: Preoperative photograph
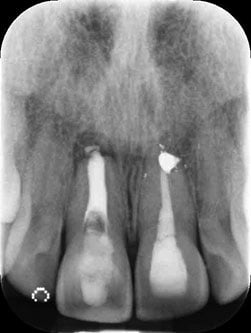 Figure 2: Preoperative radiograph
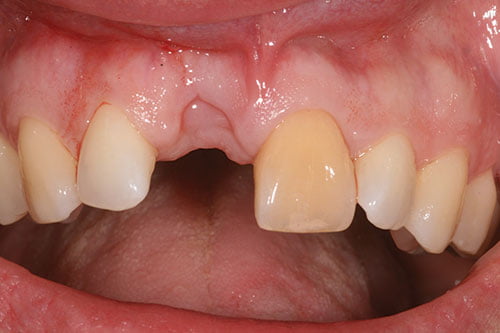 Figure 3: Soft tissue healing at 6 weeks
History
This 38-year-old Caucasian female was referred for the potential placement of a single implant to replace the upper right central incisor. Both her upper central teeth had been traumatized when playing hockey as a teenager. Both central incisors had been root-filled and had discoloration. Both central incisors had been causing her pain, and she suffered recurrent infections.The upper left central incisor had been endodontically retreated, which had been successful. Medically, the patient was fit and well and a non-smoker. She now had two children and, as a present to herself, wanted the esthetics of her front teeth improved.
Examination
The extraoral examination (Figure 1) revealed a very high smile line. Full gingival contour was visible on smiling. Other than the presenting complaint, she had a very healthy mouth with no caries or periodontal disease present. She had a soft tissue defect associated with the upper right central incisor and discoloration of the upper left central incisor. A Class 1 incisal relationship was noted.
Figure 2 shows the preoperative radiograph, while Table 1 shows the International Team for Implantology (ITI) esthetic risk assessment that was carried out.
Diagnosis and treatment plan
The patient was diagnosed with an unrestorable upper right central incisor, and a discolored upper left central incisor.
Treatment options were discussed with her as follows:
Upper right central incisor Extract and:
- Denture
- Adhesive bridge
- Conventional bridge
- Implant
Upper left central incisor
- Internal and external bleaching
- Veneer
- Crown
Treatment phase
The tooth was extracted, and an immediate denture was placed. Implant surgery was performed at 6 weeks (Figures 3 and 4), following tooth extraction in accordance with an early implant placement protocol. Immediately placed and immediately restored implants were not considered due to the increased level of esthetic risk.
 Figure 4: Radiograph before implant placement
 Figure 5: Triangular flap design with distal relieving incision
Systemic antibiotics (single dose: 3 g amoxicillin per-orally) were administered to the patient 1 hour prior to the procedure, followed by 500 mg of amoxicillin every 8 hours for the first postoperative week.
A 0.2% chlorhexidine mouthwash was given to the patient for 1 minute preoperatively. Local anesthesia was achieved by means of infiltration with articaine hydro-chloride 4% together with adrenaline (epinephrine) at 1:100,000.
A full thickness periosteal flap was raised by means of a crestal incision that was positioned palatally of the mid crest and completed with intracrevicular incisions on the adjacent teeth. The flap was relieved on one side with vertical releasing divergent incisions starting at the base of the neighboring interproximal papillae to create a triangular flap (Figure 5). The flap was retracted by means of a 4-0 Vicryl® suture (Ethicon).
A Straumann® bone level SLActive® implant was placed. The preparation of the implant bed followed the manufacturer’s guidelines. The shoulder of the implant was placed approximately 3 mm below the proposed cervical margin of the future restoration. The implant was kept at least 1 mm away from the adjacent roots and placed 1 mm-1.5 mm palatally to the proposed emergence point. The long axis of the implant exited through the proposed cingulum rest of the crown. A 2 mm healing cap was placed to allow tension-free flap closure following a fully submerged implant placement protocol (Figures 6-8).
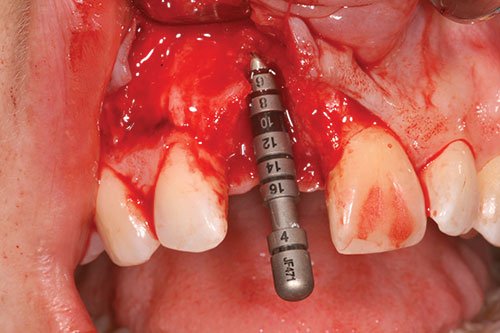
Figure 6: Correct three-dimensional position of implant

Figure 7: Correct three-dimensional position of implant
 Figure 8: Correct three-dimensional position of implant
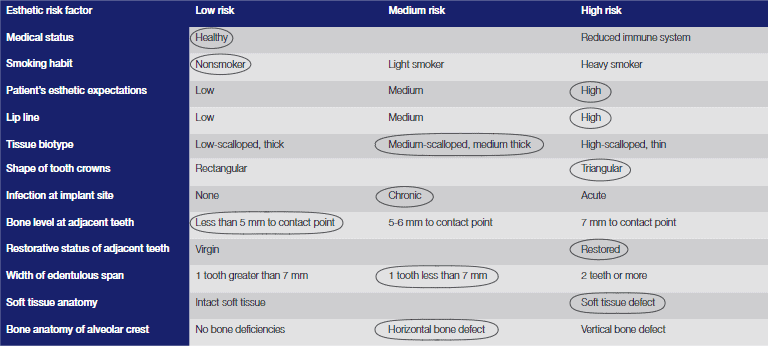
Table 1
Autogenous bone chips were first collected from the flutes of the twist drills and locally harvested where access allowed from the anterior nasal spine, using a reverse action hoe. The autogenous bone chips were placed over the exposed implant surface (Figure 9) in any dehiscence or fenestration defects. Further contouring of the ridge was performed by a layer of deproteinized bovine bone mineral (DBBM) (Bio-Oss®, Geistlich; granule size 250–1000µm) over the already placed autogenous bone chips (Figure 10).
This, in turn, was covered by a double layer of a 25 mm x 25 mm, porcine-derived collagen membrane (Bio-Gide®) (Figure 11). A tension-free flap was created by periosteum dissection at the base of the flap by means of a 15 scalpel. The flap was coronally positioned and sutured using 5.0 prolene sutures. Vertical suspended mattress sutures were utilized in the reconstruction of the papilla with single interrupted sutures for the relieving incisions.
 Figure 9: Implant surface covered with bone chips
 Figure 10: Contour augmentation with DBBM
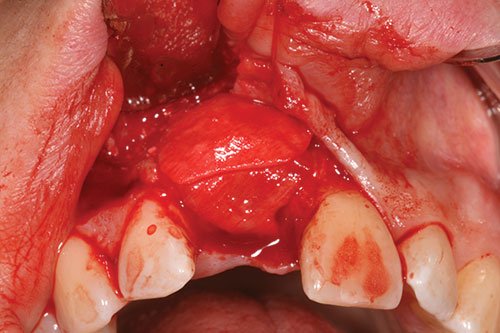 Figure 11: Bilayer collagen membrane
 Figures 12 and 13: Three-month review
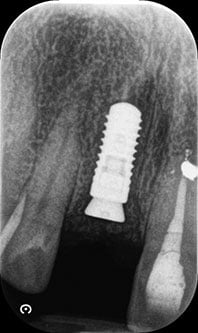
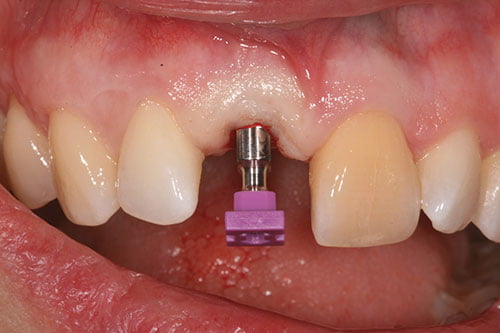 Figure 14: Contour augmentation with DBBM
 Figure 15: Provisional restoration
Postoperative instructions and infection control
The patient was prescribed paracetamol (1 g every 6 hours orally) and ibuprofen (400 mg every 8 hours orally) for pain control at her discretion. She was instructed to refrain from tooth brushing in the operated area and to rinse with 0.2% chlorhexidine digluconate mouthwash, 3 times per day, for 1 week. To avoid postoperative infection, the patient received systemic antibiotics: amoxicillin 500 mg every 8 hours for 1 week postoperatively.
Following the first week, the patient was instructed to resume normal oral hygiene procedures, including full interproximal cleaning, and to discontinue chlorhexidine mouth rinsing. All sutures were removed at the review appointment, 14 days after the surgical procedure.
Following a period of between 12-16 weeks of healing (Figures 12 and 13), access to the implant was achieved by means of a crestal D-shaped incision, not extending to the adjacent papilla. The 2 mm healing cap was changed to a 4 mm conical healing cap for a further week of soft tissue healing.
Restorative phase
The provisional implant-supported restoration was a laboratory-constructed composite screw-retained crown. A closed-tray impression (Figure 14) was taken in polyether (Impregum™, 3M ESPE) using a stock tray.
A Straumann® temporary cylinder was modified with dentin and enamel composite to obtain optimum esthetics and emergence profile. The provisional crown was inserted and torqued to 15Ncm (Figure 15).
Peri-implant tissue conditioning (Figures 16-18) occurred utilizing the dynamic compression technique, with compression of the tissues followed by sequential reduction of the provisional restoration. The provisional crowns were left in situ for 6 months to allow for soft tissue maturation.
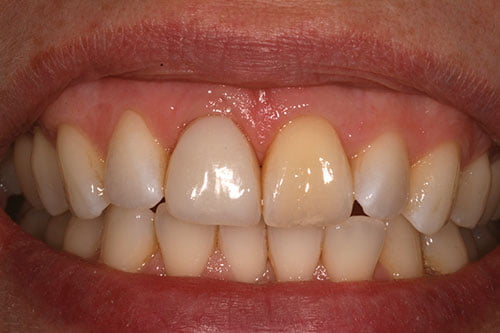 Figure 16: Soft tissue maturation and bleaching

Figure 17: Soft tissue maturation and bleaching
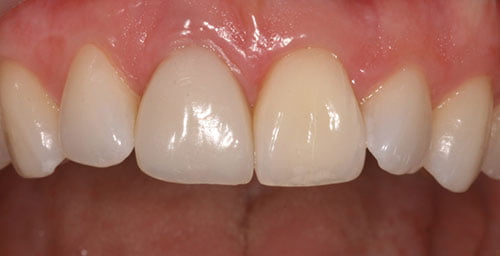
Figure 18: Soft tissue maturation and bleaching
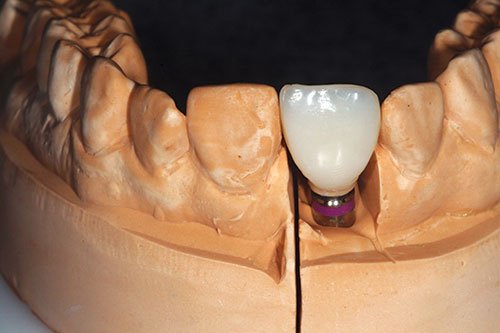 Figure 19: Provisional crown placed onto original cast
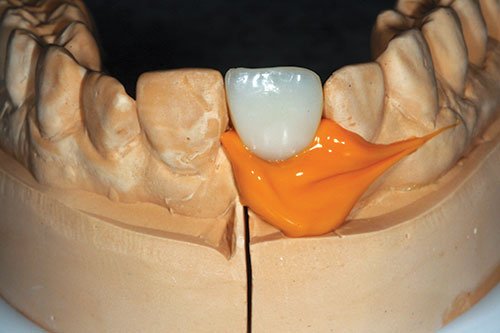 Figure 20: Light-bodied impression coping
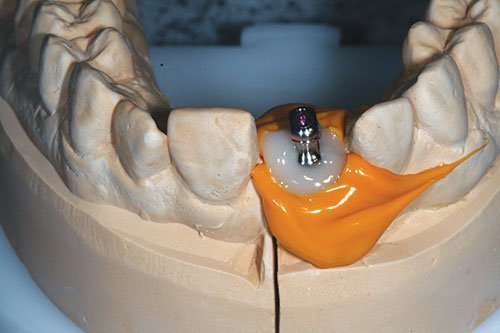 Figure 21: Customized impression coping
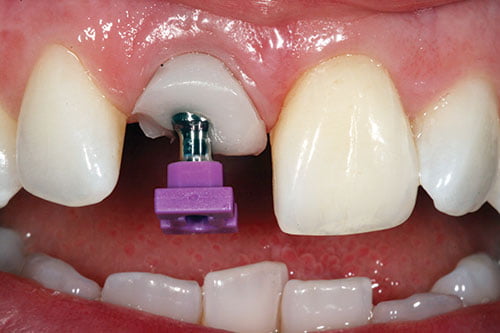 Figure 22: Customized impression cylinder transferred to patient
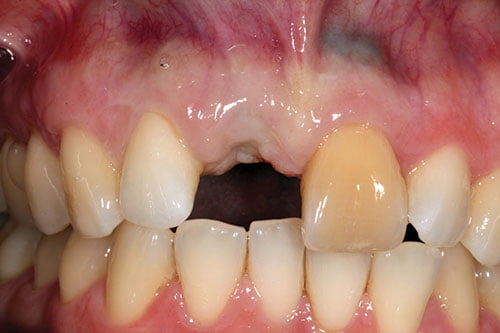
 Figure 23: Final crown on placement
Bleaching upper left central incisor
During this soft tissue maturation phase, internal and external bleaching of the upper left central incisor was completed. All restorative procedures were completed under rubber dam The palatal restoration was removed, and the gutta percha removed to gingival level. The gutta percha was sealed with a resin-modified glass ionomer cement (Vitrebond™) and internal bleach (16% carbamide peroxide) placed into the access cavity. The access cavity was then restored with intermediate restorative material (IRM).
The patient completed external bleaching using her pre-formed bleaching tray and 16% carbamide peroxide on a nightly basis. Once the patient was satisfied with the esthetic result, the temporary restorations were removed, along with the bleach, under rubber dam. Composite was then placed into the access cavity.
Completion of definitive crown
A customized impression coping was constructed by removing the provisional crowns and replacing onto the initial cast (Figure 19). A light-bodied fast-setting addition silicone impression was taken of the apical half of the provisional restoration (Figure 20). The provisional restoration was replaced in the patient’s mouth to prevent soft tissue collapse.
Open-tray impression copings were inserted onto the cast with notable voids present between coping and silicone index. Bis-acrylic temporary crown and bridge material were injected into the space created in order to customize the impression coping and accurately record the emergence profile of the provisional (Figure 21).
The customized impression cylinder was transferred to the patient to support the soft tissues with no soft tissue blanching (Figure 22). An open-tray polyether impression was taken using a customized individual tray, followed by an irreversible hydrocolloid impression of the provisional in situ.
Clinical photographs were provided to the dental laboratory as additional guidance in terms of adjacent teeth shape and color and gingival contours. The abutments were designed using the CAD abutment function in the Straumann® Cares® CAD/CAM system. The exact emergence profiles were then duplicated.
The crown was torqued to 35Ncm and composite placed in the screw access cavity. Occlusion was checked in centric occlusion and in anterior and lateral excursions to ensure a mutually protective occlusion.
Discussion
The patient was very happy with the esthetic result achieved (Figure 23). The implant crown has very high pink and white esthetic scores. Both central incisors are slightly darker than the adjacent lateral incisors. This was discussed with the patient, and a veneer on the upper left central incisor was not completed as the patient wanted to be as minimally invasive as possible.
Due to the patient’s high esthetic demands and high smile line, this case had to be planned and executed to the highest level for success. The outcome in this case has exceeded the patient’s expectations.
- Albrektsson T, Zarb G, Worthington P, Eriksson AR. The long-term efficacy of currently used dental implants: a review and proposed criteria of success. Int J Oral Maxillofac Implants. 1986; 1(1):11-25.
- Buser D, Weber HP, Lang NP. Tissue integration of non-submerged implants. 1-year results of a prospective study with 100 ITI hollow-cylinder and hollow-screw implants. Clin Oral Implants Res. 1990;1(1):33-40.
- Torabinejad M, Anderson P, Bader J, Brown LJ, Chen LH, Goodacre CJ, Kattadiyil MT, Kutsenko D, Lozada J, Patel R, Petersen F, Puterman I, White SN. Outcomes of root canal treatment and restoration, implant-supported single crowns, fixed partial dentures, and extraction without replacement: a systematic review. J Prosth Dent. 2007;98(4):285-311.
Stay Relevant With Implant Practice US
Join our email list for CE courses and webinars, articles and mores

