Mark Chan, DD, Andreas Klie, RDT, and Andriy Khomyn, DD, RDT, combine digital technology with a multidisciplinary approach for accuracy and efficiency
Introduction
The dental industry’s rapid technological advancements present a significant challenge for clinicians. Fortunately, solutions now exist to help them navigate this complex landscape. This article outlines the clinical journey from patient assessment to final prosthesis delivery, focusing on how digital technology and a multidisciplinary approach can lead to optimal outcomes.
Patient presentation and referral
The patient, a 73-year-old female, was referred for consultation regarding a full upper denture and a partial lower denture.
Key findings
- Upper arch: Periodontally compromised with a poor prognosis for all remaining teeth.
- Lower arch: Retention of teeth Nos. 44, 43, 33, 34, and 37 (Universal Tooth Numbering System teeth Nos. 28, 27, 21, 22, and 18) was possible despite some pocketing.
- Primary concern: The patient experienced significant discomfort and mobility in the upper anterior teeth, making chewing difficult.
Referring clinician’s suggestions
- Address both arches simultaneously for better occlusion.
- Consider interim and final prostheses.
- Coordinate surgical timing with denture readiness.
Denturist exam and treatment plan discussion
During initial examination, the patient voiced strong opposition to a full upper denture with palatal coverage due to concerns regarding taste alteration and discomfort. To address patients’ concerns, we opted for an implant-supported fixed solution (teeth-in-a-day).
The patient was then referred to Aspen Oral Surgery, where Maxillofacial Surgeon Dr. Martin Cloutier performed a thorough evaluation and planned the subsequent procedures:
Surgical intervention
- Extractions: All maxillary teeth were extracted.
- Implant placement: Seven implants were immediately placed in the maxilla.
- Six implants achieved high primary stability, enabling immediate function.
- A seventh implant was placed for potential inclusion in the final prosthesis.
Immediate same-day conversion
After surgery, I (Andriy Khomyn) performed the chairside conversion of the All-on-X provisional prosthesis.
Steps
- Provisional prosthesis: Adapted to the implant positions and secured with Multi-Unit Abutments (MUAs) for immediate function.
- Fit and function: Adjustments were made to ensure proper fit, function, and esthetics.
- Occlusal verification: Undue stresses were minimized to protect the implants during healing.
- Night guard: A transitional night guard was provided to reduce stress on the implants and promote optimal healing.
The immediate solution restored function and esthetics, greatly improving the patient’s confidence and comfort during the healing phase.
Six-month follow-up
Oral surgeon review and final torque test: Six months later, the patient returned to Dr. Cloutier for evaluation. He performed a final implant torque test to ensure implant integration and stability. The Multi-Unit Abutments (MUAs) were retorqued to their recommended specifications to confirm the implant stability before the fabrication of the final prosthesis.
Digital workflow: scanning for the definitive prosthesis
On the same day, the patient returned to my office for the final prosthesis workflow.
Pre-scan preparation
Temporary prosthesis assessment: The temporary fixed provisional was evaluated for fit and function.
Scanning process using the Shining Aoralscan Elite
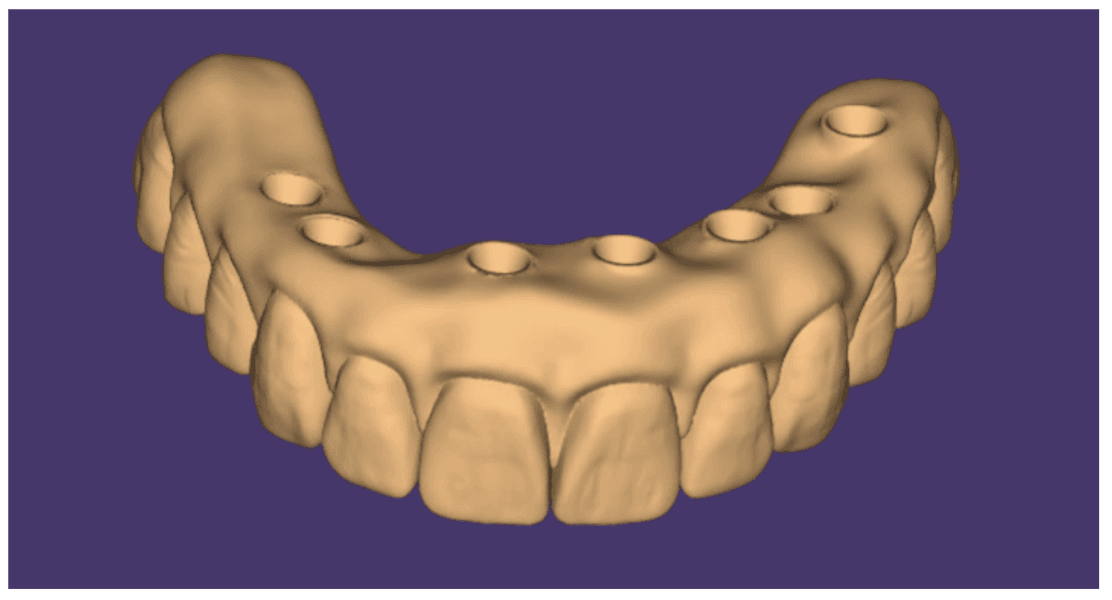
A comprehensive scan was performed to record all anatomical landmarks, including the palate, residual ridge, implant positions, and opposing arch.
- A detailed pre-op scan was performed before removing the temporary prosthesis. This is a vital step as the temporary serves as a blueprint for the final esthetics and occlusion.
First, the prosthesis is scanned in the patient’s mouth, followed by moving systematically from the anterior teeth to the posterior region on one side, and then repeating the process on the other side. I ensure I capture all surfaces — the occlusal, buccal, and palatal. It is important to scan the soft tissue contours around the prosthesis.
- Soft tissue and opposing arch scans: After removing the temporary prosthesis, I scanned the upper arch soft tissues, including the residual ridges and palate, to capture all anatomical details.
I used smooth, steady motions to ensure a complete scan without gaps or stitching errors, focusing on areas that would directly interact with the prosthesis for a clear, detailed scan of the soft tissue.
Next the opposing arch is scanned for occlusal alignment (Figure 1).
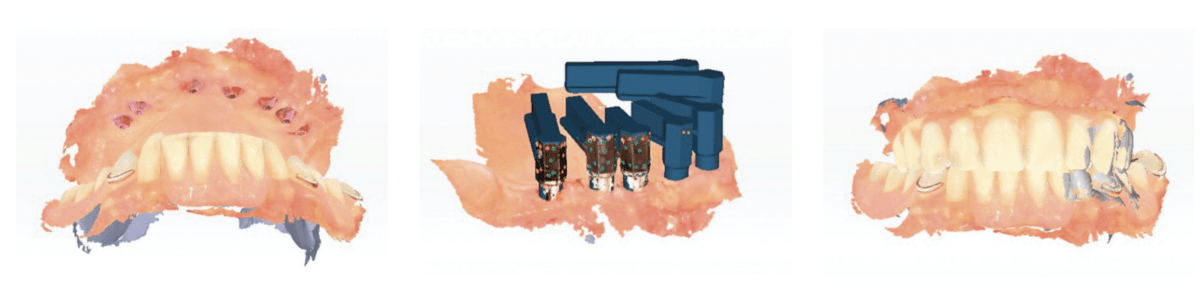
- Implant Scan. Proper seating of scan bodies is crucial; even one scan body that isn’t fully seated can disrupt the entire digital workflow (Figure 2).
First, I scan fiducial (reference) markers. These markers allow the scanning software to accurately identify and align each implant’s position and orientation, ensuring precise digital mapping, which is essential for implant-supported prosthesis design and fabrication.
After the fiducial markers, I scan the scan bodies and surrounding soft tissue on one side of the arch, then proceed to scan all remaining scan bodies on the other side.
- Next, I perform the bite registration. We reinsert the temporary prosthesis, ensuring proper seating prior to proceeding.
I ask the patient to bite into their natural centric occlusion and keep their bite steady. Then, I use the scanner to capture the buccal surfaces of both arches, starting at the midline and moving towards the posterior regions on both sides. The bite scan must show clear contact points and alignment; any discrepancies are corrected with adjustments and rescanning (Figure 3).
Stitching and verification
The scans of the implant positions and soft tissue were digitally stitched to create a seamless model.
Pre-op scan integration
The pre-op scan of the temporary prosthesis was overlaid with the implant scan data to guide the final prosthesis design.
I can manually inspect the alignment to confirm everything is accurate. If corrections are needed, I can easily address them at this point.
Finally, all scan data is exported as STL files and uploaded to Panthera Dental, with specific notes on tissue compression preferences, esthetic requirements, and the reference points from the pre-op scan.
Tips
- Take your time with the implant scan bodies. This is the foundation of the entire case, so precision is key.
- Utilize your scanner’s AI to identify gaps or missed areas.
- Always verify the alignment of your scans before sending them to the lab. Small errors now can cause major issues later.
By following this workflow, I can ensure the prosthesis will fit precisely, function optimally, and meet the patient’s esthetic expectations. The Shining Aoralscan Elite has become an indispensable tool in my practice, streamlining the process and improving outcomes for complex implant cases like this one.
Laboratory phase
The digital scans were processed in exocad using the temporary prosthesis as a guide to design the patient’s final smile. This approach ensured the design mirrored the provisional’s esthetics and function while enhancing tissue adaptation and compression. Two designs were produced to evaluate tissue compression, as the intaglio surface of the final will be finished in highly polished titanium.
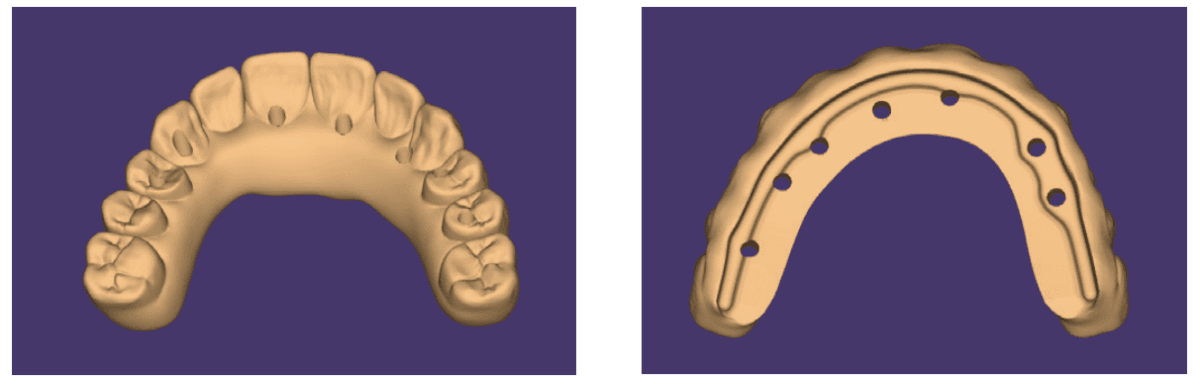
Importance of intaglio surface design
The intaglio surface of the prosthesis (tissue-facing) was carefully designed to be flat or slightly convex, which is essential because:
- It minimizes soft tissue irritation and ensures even pressure distribution.
- It reduces the risk of food entrapment and tissue overgrowth by avoiding concave designs.
- This design promotes healthier tissue and provides a better seal (Figure 4).
Prototyping with 3D printing
Two full-arch prototypes were printed using Rodin® Titan resin and were then used for clinical evaluations. This allowed us to:
- Evaluate fit: Confirm accurate seating on the implants and tissue adaptation.
- Verify tissue compression: Check the effectiveness of tissue support without causing discomfort.
- Assess esthetics: Confirm the final smile’s appearance and alignment in relation to the patient’s facial features.
- Ensure implant fit: Leveraging accurate implant scan data ensured that the bar would align perfectly with the implants, reducing stress and enhancing longevity.
- Guide esthetics: The provisional prosthesis’ pre-op scan provided a roadmap for replicating the desired smile, ensuring the patient’s expectations for appearance were met.
Full digital workflow for the manufacturing of the PFB
We were able to fully integrate the photogrammetry scans from Andriy into our workflow, designing and manufacturing the PFB for his patient.
The following scans (Figures 5, 6, 7, 8) were sent to Panthera as per the required scans to proceed with the design and manufacture of the PFB:
- Tissue scan;
- DESS scanbody;
- Post-op temp on the model; and
- Post-op temp off the model.
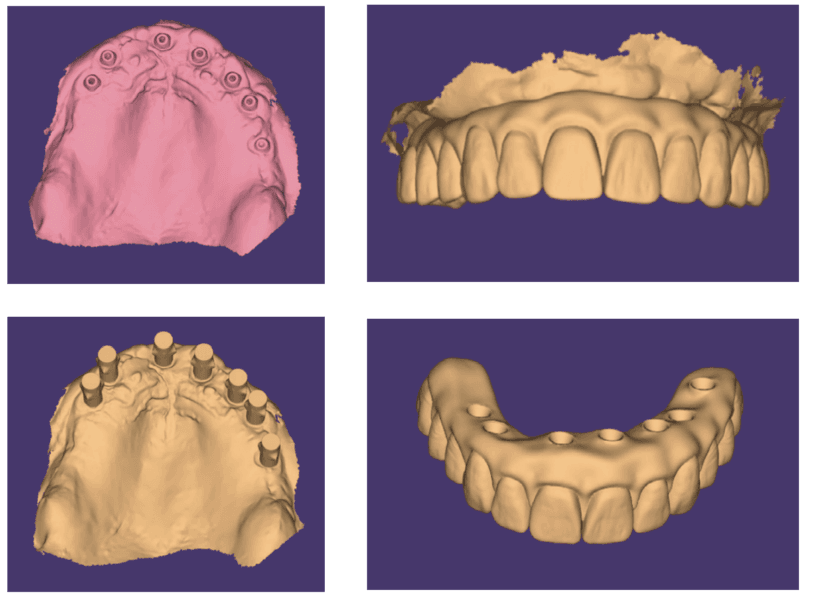
7 (bottom left). DESS scanbody. 8 (bottom right). Post op temp off the model
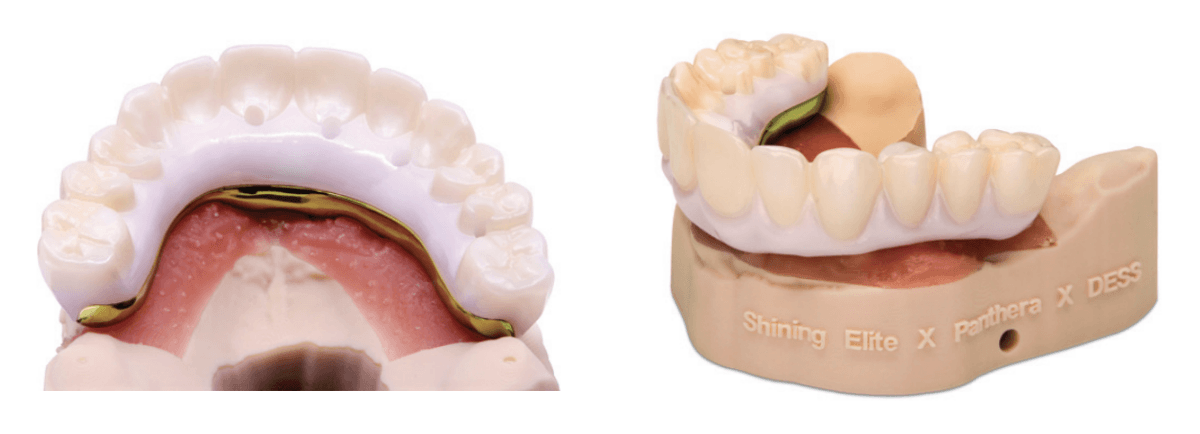
Using the received files and a specialized splitting protocol, Panthera designed the implant bar and overlay with a straight milling line, ensuring no undercuts for streamlined production and precise fit. The Panthera Fusion Bar (PFB) workflow offers various options in terms of overlay manufacturing: most choose to receive the overlay’s STL file for in-house milling in their preferred material. Alternatively, the overlay can be milled at Panthera for them — the option Andriy chose for this case (Figures 9 and 10).
After design completion, Andriy reviewed the case in the online 3D Viewer. The bar is shown in relation to the overlay a cross-sectional view allows to see the bar’s size and shape inside the overlay, as well as its position on the soft tissues. In this case, the bar measured 6 mm at its highest point and 3 mm at its lowest. Upon Andriy’s approval, the case proceeded to production (Figures 11 and 12).

Milling and finishing
Panthera offers various options for manufacturing cases. Andriy opted to have Panthera mill the zirconia. Panthera has also sent the STL overlay to Andriy to mill or print any additional overlays if needed.
The Zirconia overlay was milled with Vita YZ® ST. Andriy chose preparation A2 for the tooth base shade and Gingiva Light Pink (Figure 13 and 14).

The bar was trimmed, polished, and fitted on the model which was printed by Mark Chan for this case.
Panthera offers multiple choices for the bar finish. Andriy chose the sandblast and anodizing options. This provides the surface texture recommended for cementation, and the anodizing minimizes the dark grey titanium showing through the zirconia overlay (Figures 15 and 16).

The bar and the milled zirconia overlay were shipped to Andriy for his technician to complete the case (Figures 17 and 18).
Final prosthesis insertion
- Upon receiving the Panthera Fusion Bar, the bar and prosthesis were evaluated and confirmed for optimal fit and function.
- The final insertion went very smoothly, without any adjustments required.
- The lower cast partial denture was modified to achieve ideal bite management, ensuring proper occlusion with the new upper prosthesis.
- To protect the implants and maintain the occlusion, the patient was provided with a hard night guard.
This workflow maximizes accuracy and efficiency, ensuring seamless digital capture, design, and final prosthesis delivery for full-arch implant cases. The smooth insertion of the Panthera Fusion Bar demonstrates the importance of precise scanning and careful planning in achieving predictable outcomes (Figures 19-22).

Patient review
Following the procedure, the patient shared this review:
“I am not one for writing reviews. There isn’t anything more I can say that hasn’t already been written in all the others before this one.
So I am just going to say thank you.
Andriy, you and your wonderful staff made a very distressing situation so incredibly easy.
I know it might sound a bit strange under the circumstances, but it has been fun.
To the people reading reviews to possibly make a decision as to which denture clinic to visit — there is no better than Smile Care Denture Centre.
You will be so pleased you did.
Thank you again.”
This heartfelt review reflects the positive experience and quality care provided throughout the process, highlighting the impact of a supportive and professional team.
This section highlights the clinical journey from patient assessment to the final prosthesis delivery (Figure 23).
 Mark Samuel Chan, DD, SwissNF, received his diploma for Denturism in Toronto at George Brown College with honors. Currently Mark is practicing in Ontario, Canada, with a main focus on high-end removable and implant prosthetics. With a passion for both technical and clinical techniques, he is certified in Bio-logic, BPS, and SDC denture concepts and is an “Art of Denture” award winning Denturist. He is a sought-after international lecturer and opinion leader for many companies and the youngest recipient of the “George Connolly Memorial Award,“ one of Denturism’s highest and top honors.
 Andreas Klie, RDT, Panthera Dental, is a Registered Dental Technologist with over 38 years of experience in the dental field. Andreas graduated as an RDT in South Africa in 1986. He founded La Lucia Dental Laboratory in 1991 and operated it until he came to Canada in 2001. In 2005, he became an RDT in Ontario. Andreas is a Senior Technical Expert and plays a major role in Panthera Dental’s strategy to incorporate more technical guides and articles into its portfolio. His experience as a dental technologist, combined with his field experience, allows him to offer customers precise and detailed solutions on a more technical level.
 Andriy Khomyn, RDT, DD, Smile Care Denture Centre, is the founding Denturist behind Smile Care Denture Centre and a recognized leader in modern denture implant solutions. With a background in Dental Technology, he became a Registered Dental Technician (RDT) in Ontario in 2007 before advancing his expertise by completing the Denturism program with honors, earning his Denturist (DD) license. Andriy is a licensed BPS Denture provider and a skilled Suction Effective Mandibular Complete Denture (SEMCD) clinician. His pursuit of excellence has taken him across Canada and internationally, where he continuously integrates cutting-edge denture technologies into his practice. Beyond patient care, Andriy is deeply involved in denturist education. As a member of AIC Education Canada, he teaches lectures on locator dentures, immediate locators, and implant conversions, sharing his expertise with fellow professionals.
Stay Relevant With Implant Practice US
Join our email list for CE courses and webinars, articles and mores

