Educational aims and objectives
This article aims to show the process for making a simple screw-retained immediate restoration on an immediate implant.
Expected outcomes
Implant Practice US subscribers can answer the CE questions by taking the quiz to earn 2 hours of CE from reading this article. Correctly answering the questions will demonstrate the reader can:
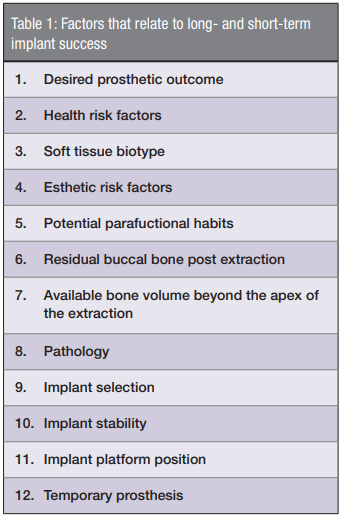
- Realize some factors that relate to long- and short-term implant success.
- Identify some preparations for temporary restorations.
- Recognize the benefit of CBCT in the implant process.
- Identify “gap distance” and considerations for different types.
- Identify possible pharmacology protocol.
Dr. Justin Moody illustrates the steps to a screw-retained immediate restoration that can achieve the treatment goals.
Dr. Justin D. Moody discusses an implant technique that achieves relievable and predictable results
When teeth come to the end of their functional life, clinicians are asked to make decisions based upon the situation they present. The use of an immediate dental implant in many cases is the best treatment for true tooth replacement. To achieve repeatable and predictable results, clinicians must take into account a number of factors (Table 1) that will relate to its short- and long-term success. Case selection1 is without a doubt the primary ingredient for good clinical outcomes.
Dr. Carl Misch stated that the goal of modern dentistry is to restore the patient to normal contour, function, comfort, esthetics, speech, and health.2 To achieve this goal with implant dentistry at the time of tooth loss, the fabrication of a temporary prosthesis is often imperative for preservation of both hard and soft tissue as well as any esthetic concerns. Creating a simple and efficient way to deal with the temporization of an immediate dental implant is key to making these spontaneous procedures flow smoothly in your office. Let’s walk through a case and the process for making a simple screw-retained immediate restoration on an immediate implant.
History and examination
A 46-year-old male in reported good health presents to the clinic with the crown of tooth No. 9 in his hand. He states that he had broken this tooth in college playing basketball and has had a root canal and several crowns over the years. He reports no pain or symptoms, but his desire is to leave today with a tooth replacing the lost one, as he is a real estate agent and says no one will take him seriously without a front tooth.
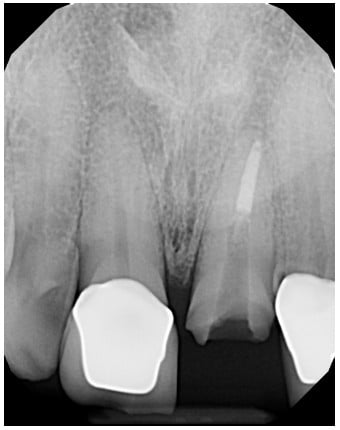
Medically, he is unremarkable, reports taking no medications, addresses any medical issues early with his physician, and sees his general dentist every 6 months for hygiene. Clinically, he presents with lost PFM crown on tooth No. 9 containing a metal post-and-core buildup. The root of the tooth has significant decay to the bone level, and after review of the periapical radiograph, a diagnosis of a nonrestorable tooth was made. We discussed the treatment options available to him today, and we both agreed that the replacement of this tooth with a dental implant would provide the best long-term prognosis.
He has a thick biotype (>2 mm) and a low lip line at maximum smile, lending himself to a lower esthetic risk for the case. After a review of his dental history, centric relation of his bite, and the minimal wear to his existing teeth, it was determined that he may be at a low risk for parafunctional habits.3 We talked about the removal of his tooth and placement of a dental implant depending upon several key indicators that will only be known once we remove the tooth.
I discussed with the patient that if we are not able to maintain enough bone at the crest of the ridge after the extraction, we may need to graft the site prior to dental implant placement. He also understood that if the implant did not have adequate stability at the time of placement, he would be fitted with an alternative temporary prosthesis that day.

Treatment plan
It was decided that our plan was the extraction of tooth No. 9, placement of an immediate dental implant, and temporization via a screw-retained provisional crown. Once we obtained verbal and written consent, a pharmacology protocol was given of 2g Amox4, 4mg Decadron, 600mg ibuprophen with a chlorhexidine rinse. While these medications will be used 1 hour prior to surgery, there is plenty to do as we need to prepare our temporary restorations — placement of the patient’s lost crown back into the tooth, and taking of upper and lower PVS impressions, bite registration, shade selection, and clinical photos. Impressions were poured in snap stone and trimmed, and a vacuum-form stent was made. We are now prepared for any scenario that comes up. If we need to graft, or the implant is not of adequate stability, we can use the old crown in the stent as an Essix appliance, or we can use the stent to make a custom screw-retained provisional.5
CBCT 3D planning: Figures 2-5
Viewing tooth No. 9 within the CBCT6 software allows us to visualize the cross section of the root within the alveolar bone, existing buccal bone width, and available bone apical to the existing root. Virtual treatment planning allows for implant selection and placement utilizing the available bone while maintaining as close to ideal bone width and position as possible. Implant selection is important for immediate implants as there are several features that we are looking for. First is an aggressive thread pattern, which will allow for good initial implant stability. Second is platform switching, which will allow us to place the implant more subcrestal for a better emergence profile and microchannels such as Laser-Lok®7 by BioHorizons®, which has a dual affinity for bone and soft tissue attachment. For the implant in this case, I selected a 4.6 mm x 15 mm BioHorizons tapered PRO8.


Treatment
Surgical: Figures 6-15
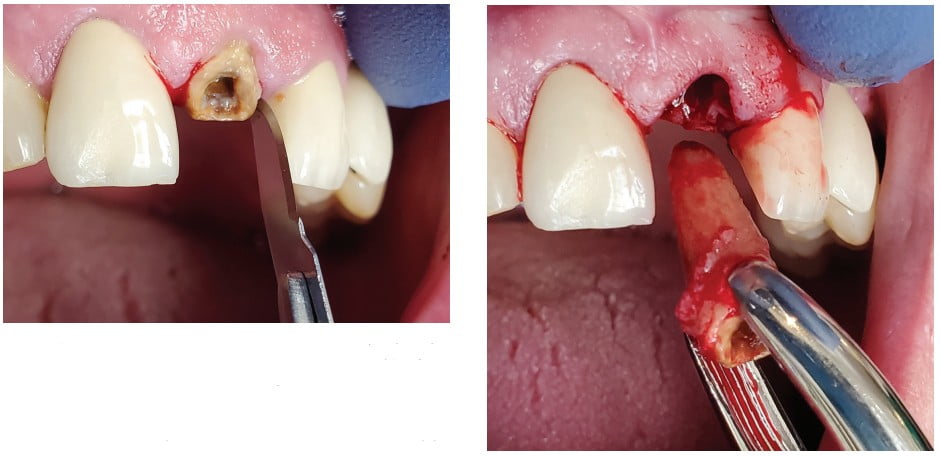
The anterior maxilla was anesthetized using articaine with 1:100,000 epi. A No. 15 scalpel blade around the tooth allows full release of the soft tissue without any releasing incisions or disruption of the papilla. With the adjacent teeth being PFM crowns, the luxation and elevation of the tooth will be difficult in order not to damage these existing crowns. This is an ideal situation for the use of technology9 such as Piezotome®Cube to help remove the tooth without luxation against the adjacent teeth and maximum retention of the buccal plate The tooth was removed; the socket was curetted well and rinsed with sterile saline. With our final restoration planned for a screw-retained crown, we would like to see the screw access slightly inside or palatal to the incisal edge. Even if we end up under the edge or slightly facial, we may still be able to do a screw-retained crown with an angled screw channel. Otherwise, we will make a custom abutment and cement-retained crown.
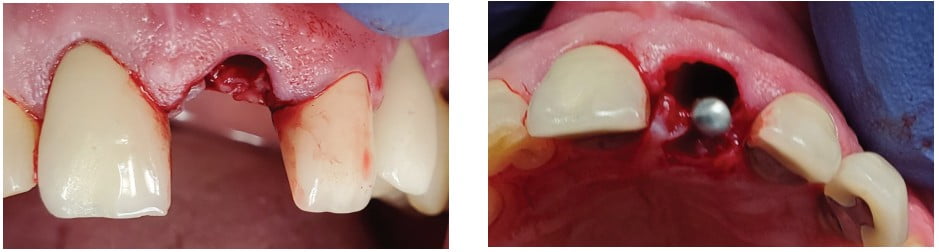


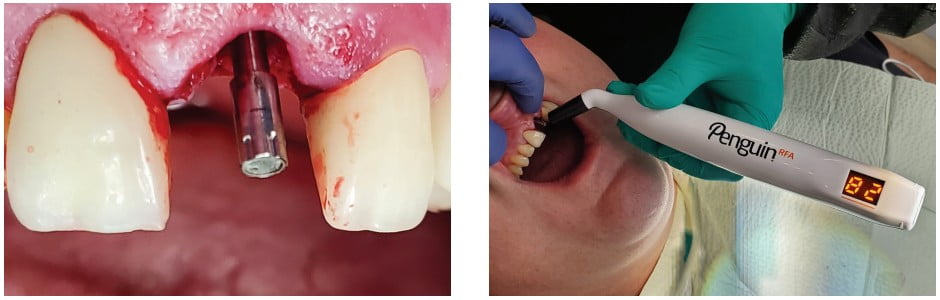
Using a 2.0 started drill, the palatal plate was pierced, and the drill was directed to allow for the proper emergence and to get apical of the extraction site to find solid bone, which will help the stability. The osteotomy was widened according to standard drilling protocol while omitting the final drill in the sequence to allow for more stability. Implant platform was in an ideal position 2 mm-3 mm below the adjacent cemento-enamel junction (CEJ) and slightly subcrestal10 of the buccal plate. The implant motor was set at 40Ncm and hit the torque limit before it was in the final position. Using the hand ratchet, I was able to finish placement the final 1 mm approximately to the desired depth. Although a good initial torque was reached, it is always a good idea to get an implant stability quotient (ISQ)11 for the implant. With an ISQ of 82, we were able to confirm that this implant should be a good candidate for an immediate provisional restoration.
Temporary prosthesis: Figures 15-20
I placed a PEEK plastic abutment on the implant and hand-tightened it using the 050 driver. The clinician must be careful that the abutment is fully seated; the downside to PEEK polymer material is that you cannot verify it using a radiograph. The upside to placing a platform-switched implant is that the platform is narrower than the implant diameter allowing for the seating to be visually checked. A vacuum-formed stent is seated on the teeth and used as a prep guide allowing the clinician to see if reduction is needed to allow for thickness of temporary material. The PEEK abutment can be adjusted with a course diamond or a carbide.

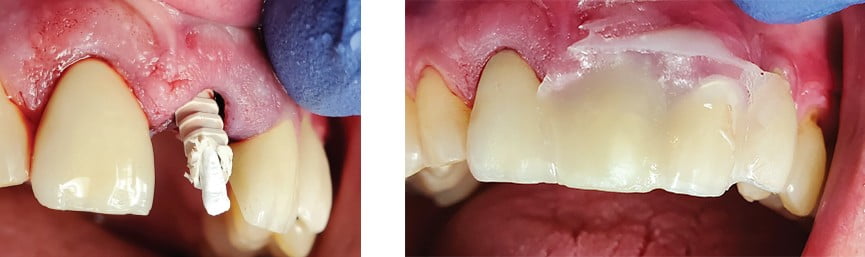
After that, I placed a rolled Teflon flag into the abutment and allowed it to extend out the top 2 mm-3 mm; this will be visible through the temporary material and allow for ease of access location and removal. Once set up, the screw channel can be accessed with a carbide bur. Then the Teflon is removed, the screw loosened, and the crown teased off with a set of hemostats. If the crown does not immediately release, there may be temporary crown material in an undercut. If this occurs, simply remove this with a needle diamond or carbide bur. Once removed, all blood is cleaned from the abutment and screw channel, the PEEK abutment is bonded, flowable composite is used to make the emergence from the PEEK platform to the contact points, and then finish with contour and polish.

Gap distance
The space that is often created between the buccal plate and the facial surface of the dental implant is called the “gap” or “jump distance.”12 We know that when this distance is 2 mm or less, you can reliably just leave it, and the blood clot will allow for adequate bone formation. When this distance gets beyond 2 mm, the gap should be grafted. In the past, I have used cancellous allograft material but have been having great success by placing a collagen plug into this area to allow for clot formation and excellent healing/bone growth. I will do this once I remove the temporary crown and immediately follow up with a stock healing abutment, which will keep the soft tissue from slumping into the site during completion of the temporary provisional.


Occlusion: Figures 23-28
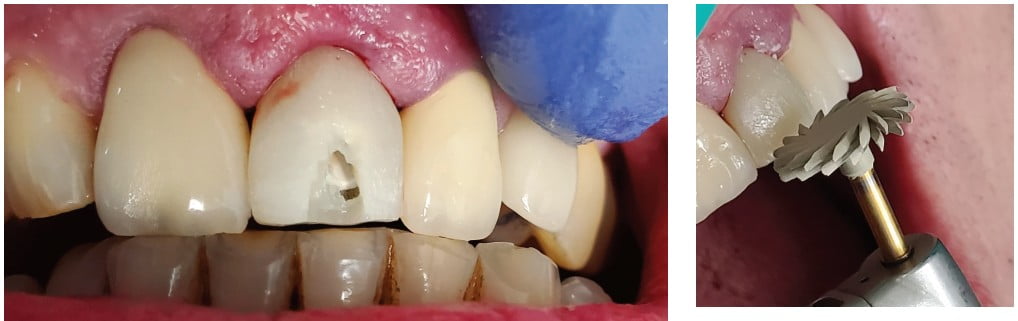
At this point, I removed the stock abutment, rinsed the hex of the implant with chlorhexidine, and seated the screw-retained temporary prosthesis, being careful not to over contour and blanch the tissue too much. If the blanching does not go away in a matter of minutes, the clinician should remove and recontour. The abutment is hand-tightened, and occlusion and excursions are checked. Then sit the patient up and first adjust the CR position — it is critical not to miss the end-to-end position. You will see in Figure 26 only the temp is hitting in forward protrusive in end-to-end, adjusted the restoration to be slightly out of occlusion and out of function as seen in Figure 27. Teflon was placed over the hex, and the access was filled with bonded composite and polished.13


Follow-up: Figures 29-30
I usually see the patients back in 24/48 hours to check occlusion and excursions once they are no longer numb and have had a chance to start the healing process. Be sure to follow up to ensure that they are taking all of the pharmacology protocol you have given them. In 2 weeks, the patients return for a post-op check. Sometimes you may have needed to place a suture through the papilla, and this is when I would remove them. If they are symptom-free, I will recall them at 4 months, and this appointment is scheduled for final impression/scanning. My checklist for this appointment is first a periapical radiograph, which is used to determine any crestal bone loss, removal of temporary prosthesis, and ISQ acquisition. Based upon the results, I will proceed directly with a scan body and replacement of the temporary.

Conclusion
Understanding the risk factors associated with immediate dental implants and provisional restorations is a guide to good case selection. Developing systems to treat your implant patients can help these procedures smoothly flow into your schedule and provide timely and needed treatment for your patients. This case completed with a very grateful and appreciative patient.
Whether you are performing immediate restoration or another implant technique, it’s important to trust your implant systems. Dr. Justin Moody discusses his implant system of choice in this article: https://implantpracticeus.com/implant-practice-just-implants/
Author Info
 Justin D. Moody, DDS, DABOI, DICOI, is a Diplomate in the American Board of Oral Implantology, Diplomate in the International Congress of Oral Implantologists, Honored Fellow, Fellow, and Associate Fellow in the American Academy of Implant Dentistry, and Adjunct Faculty at the University of Nebraska Medical Center. He is an internationally known speaker, founder of the New Horizon Dental Center (nonprofit clinic), and Director of Implant Education for Implant Pathway. You can reach him at justin@justinmoodydds.com.
Disclosure: Dr. Moody is a paid speaker for BioHorizons®.
References
- Daniel Buser, Vivianne Chappuis, Urs Belser, Stephen Chen. Implant placement post extraction in esthetic single tooth sites. 2017;73(1):84-102.
- Carl Misch. Contemporary Implant Dentistry. 3rd ed. St. Louis, MO: Mosby Elsevier; 2007.
- Chitumalla R, Kumari K, Mohapatra A, et al. Assessment of survival rate of dental implants in patients with bruxism. Contemp Clin Dent. 2018;9(suppl 2):S278-S282.
- Greenstein G, Tarnow D. Effectiveness of antibiotics to reduce early implant loss in systemically healthy patients. Compend Contin Educ Dent. 2020;41(2):102-110.
- Siadat H, Alikhasi M, Beyabanaki E. Interm Prosthesis Options for Dental Implants. J Prosthodont. 2017;26(4):331-338.
- Jacobs R, Salmon B, Codari M, Hassan B, Bornstein M. Cone beam computed tomography in implant dentistry: recommendations for clinical use. BMC Oral Health. 2018;18(1):88.
- Farronato D, Mangano F, Briguglio F, et al. Influence of Laser-Lok on immediate functional loading of implants in single-tooth replacement: a 2-year prospective clinical study. Int J Periodontics Restorative Dent. 2014;34(1):79-89.
- Saito H, Chu S, Zamzok J, et al. Flapless Postextraction Socket Implant Placement: The Effect of a Platform Switch-Designed Implant on Peri-Implant Soft Tissue Thickness — A prospective study. Int J Periodontic Restorative Dent. 2018;38(suppl):s9-s15.
- Blus C, Moncler S. Atramatic tooth extraction and immediate implant placement with piezosurgery: evaluation of 40 sites after at least 1 year of loading. Int J Periodontics Restorative Dent. 2010;30(4):355-363.
- Guirado J, Lopez P, Sanchez J, et al. Crestal bone loss related to immediate implants in crestal and subcrestal position: a pilot study in dogs. Clin Oral Implants Res. 2014;25(11):1286-1294.
- Monje A, Ravida A, Wang H, Helms J, Brunski J. Relationship between primary/mechanical and secondary/biological implant stability. Int J Oral Maxillofac Implants. 2019; 34(suppl):s7-s23.
- Pluemsakunthai W, Le B, Kasugai S. Effect of buccal gap distance on alveolar ridge alteration after immediate implant placement: A microcomputed tomographic and morphometric analysis in dogs. Implant Dent. 2015;24(1):70-76.
- Martin W, Pollini A, Morton D. The influence of restorative procedures on esthetic outcomes in implant dentistry: A systemic review. Int J Oral Maxillofac Implants. 2014;29 (suppl):142-154.
Stay Relevant With Implant Practice US
Join our email list for CE courses and webinars, articles and mores

