A patient presented to the clinician with a lost LR6, which she wanted restored. This case study details her dental implant treatment.
Presentation
Patient complaint
- The patient had lost the LR6, a failed root-filled and crowned tooth, 2 years previously; she had considered an implant in the past and felt that it was the right time to pursue this course of treatment.
- The patient found herself chewing on the left-hand side to avoid the gap on the right.
- The patient had no other dental concerns, and her expectations were realistic.
- The patient was a dental nurse and had assisted on dental implant procedures, so was well aware of the treatment, risks, and benefits.
[userloggedin]

Medical history
- The patient had a well-restored mouth and no previous implants.
- Dental attendance is good.
- Her last treatment was removal of the LR6 2 years ago.
- Her dental awareness was very good.
- The patient was a nonsmoker.
- The patient consumed three-to-four units of alcohol per week.
- There was no other significant medical history to report.

Extraoral examination
- Muscles of mastication — NAD.
- Mouth opening — even opening to three fingers width.
- TMJ — no deviations and no clicking or crepitu.
Intraoral examination
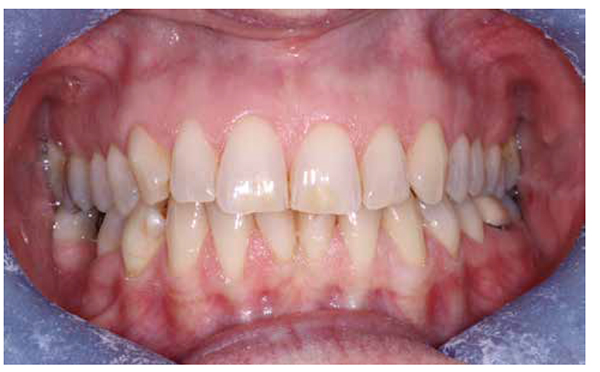
- All teeth present except for LR6.
- Soft tissues — scalloped tongue and linea alba on the left and right buccal mucosa.
- No caries present.
- BPE was 000/020 (minimal supra-gingival calculus on the lower anterior teeth with no inflammation).
- Tooth wear was age appropriate.
- Patient was aware of clenching. The only signs were the scalloped tongue and linea alba on the left and right buccal mucosa.
- Teeth were carefully examined for signs of occlusal disease; and there were no cracks or fractures, no fremitus, no bruxism-related wear, and no unexplained sensitivity or other signs of active bruxism.
- Posterior occlusion was stable, and posterior support was sufficient.
- The opposing tooth was very slightly overerupted (less than 1 mm).
- The occlusal contact pattern in maximum intercuspation is a cusp/fossa contact pattern.
- In lateral excursions, the patient starts with group function, which proceeds
to canine guidance.
Implant site assessment
When considering the site for the implant in more detail, it was noted that there were no horizontal or vertical defects in the ridge. There was good horizontal and vertical space for placement of the implant. The opposing tooth had not extensively overerupted, and the teeth mesial and distal to the space had not drifted; hence, there was also adequate room for the restoration of the implant.
There was, therefore, no need for any pre-prosthetic adjustments to the occlusion, to the arch form, or to the adjacent teeth.
Special tests

Upper and lower alginates were taken along with a facebow so that mounted models could be made. A wax-up of the proposed crown was made upon the mounted cast and duplicated. An X-ray stent with radiopaque tooth and a drill guide was also fabricated.
As with all good implant planning, the treatment was prosthetically driven, so making the final crown first in the form of a wax-up was the natural first step in properly planning this case. Bitewings and periapical radiographs of the LR6 area were taken and did not suggest any problematic anatomy. Proximity to the inferior dental (ID) canal was carefully considered, and the decision was made to take a CBCT scan in order to ensure there were no anatomical issues. Potential concerns in this area are damage to the ID bundle or perforation into the lingual space if there is a surprisingly deep lingual concavity.

It was clear that the case needed to be prosthetically driven, so as previously mentioned, a wax-up was made before the CBCT scan so that a radiopaque tooth could be placed in a stent, and the CT scan could be done with the radiopaque tooth in place. This allowed planning of implant placement in the perfect position within the bone in order for the crown to be placed optimally and ensuring that a screw-retained crown could be used.
There is much to be said in the debate between screw-retained and cemented crowns. It is the author’s opinion that screw-retained crowns are more easily retrievable, and although the number of failures with screw-retained and cemented crowns is similar, the evidence shows that the types of failures attributed in cemented crowns tend to be more serious. It is very easy to leave the cement deep down where the crown margins are (if a customized abutment is not used), and these can lead to the inability to clean and, ultimately, to peri-implant disease.

This author feels that that screw-retained crowns sidestep this problem. Although they have a higher rate of technical complication (such as screw loosening), they are also relatively easily retrieved, and these complications can be managed relatively simply.
Surgical treatment
Local anesthetic was administered (4.4ml lignocaine with adrenaline 1:80,000) as an ID block as well as infiltration around the area to give good anesthesia when raising the flap and preparing the osteotomy. An H-shaped incision was made in the middle of the ridge in the LR6 position (making sure there was adequate attached gingivae both buccal and lingual to the incision). The flap was reflected to ensure the entire width of the ridge could be visualized so that we could place the implant optimally.
The drill guide was placed and used to start the osteotomy in the correct position. The position of the implant for optimal crown placement is not always consistent with the middle of the ridge. Once upon a time, the implant would be placed in the best surgical site, and then the crown would just have to “fit.” This often resulted in compromised treatment. The drill guide pushes the clinician to think more about where the implant needs to go to ensure that the crown is in the correct place. Sometimes this means that the implant is not squarely on the ridge; and especially in the esthetic zone, this can mean that the ridge has to be augmented (either before the implant is placed or at the time of placement). Raising of the flap and adequate visualization allows the surgeon to make sure that the quality of the bone is good, and in this case, that the prosthetically-driven position of the osteotomy was not so buccal or lingual that it might need augmentation afterwards.


The sequence of drills was followed exactly as outlined by Straumann®, and checking was done between each successive drill to ensure that angulation and depth were correct.
After drilling to a length of 8 mm, the bone was tapped as it was very dense, which you would expect in the posterior mandible.
A Straumann bone level 8 mm RC (4.8 mm) implant was then placed, achieving primary stability with a very high insertion torque.
With the implant in situ, a healing cap was placed and two simple interrupted sutures (5.0 Vicryl Rapide™ dissolving [Ethicon]) were placed mesially and distally. Good closure of the wound was obtained.
Post-surgical treatment
Being that the patient is the dental nurse at the clinician’s practice, she was seen again just 3 days after the procedure.
She had experienced no swelling or bruising over the weekend, so both the patient and I were very happy with this result. The patient was seen again after 2 weeks for a review and removal of the sutures. It had been an uneventful 2 weeks. On examination, the patient’s oral hygiene was excellent.

Prosthetic treatment
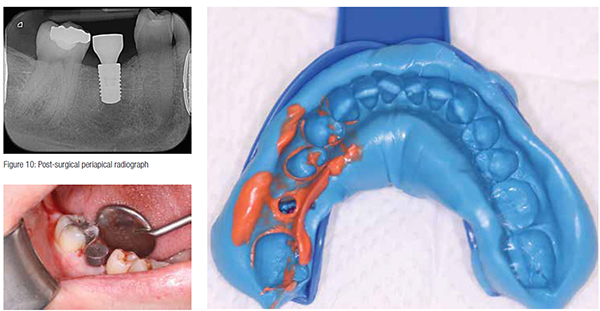
After 2 months, the healing cap was removed, an impression fixture was placed, and a closed tray putty wash impression was made.

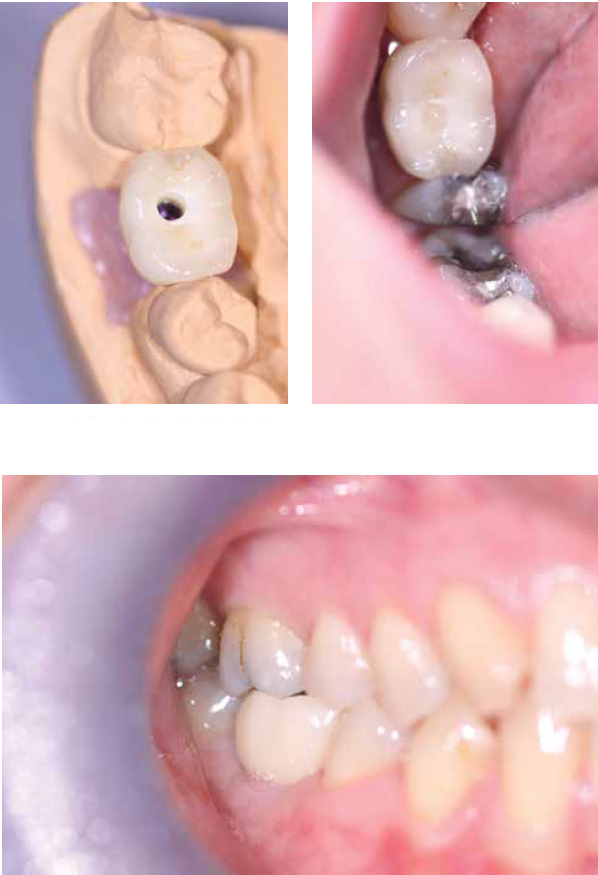
The lab used a Variobase™ (Straumann) abutment, and a Straumann original zirconia coping was milled using CAD/CAM. Feldspathic porcelain was added as a veneering ceramic. When the crown returned, it was checked on the articulator so assessment of the occlusion could be carried out before it was fitted. Contacts were checked as well. The crown was a screw-retained porcelain-fused-to-zirconia on a Variobase abutment.
On the day of the crown fit, the healing abutment was removed, and the crown was seated and then torqued to 35Ncm. The screw access hole was protected with polytetrafluoroethylene (PTFE), and then an occlusal composite was placed to restore the access hole. The fit was excellent, and the contacts were fine, though the occlusion did need some adjustments. There was point contact in centric, with no contact in lateral excursions, though shimstock could not be pulled when the patient was in contact with light force. Therefore, the occlusion was very subtly adjusted down until shimstock was pulled through on light contact but was held on heavy contact. This was done because the implant has no suspension as it has no periodontal ligament. (It is an ankylosis.) Therefore, when patients bite down hard or if they clench, the teeth will move apically very slightly but the implant cannot, and so it has to be protected slightly by managing the occlusion this way to act as a stress break.
A postoperative periapical radiograph was taken, which showed that the implant crown was well seated and that there was no bone loss since the implant was placed. The patient is delighted with the result, and she says that it feels as though the tooth is her own. A review was carried out 2 weeks posttreatment, and she is keeping the area very clean. The occlusion is stable, and tissues have healed and adapted well.
Personal reflection
Having completed the International Team for Implantology (ITI) FID yearlong course in dental implants, I was very keen to place my first implant.
Theoretical learning is incredibly important, but it does not compare to practical experience. This is the time when you can test your knowledge and learn the little nuances that allow you to treat cases better.
When I reflect on this case, I see many positives. I believe it was planned well and that the execution was generally good.
I have become very comfortable with “hard tissue dentistry.” Crown and bridge provision and treatment of occlusally complex cases used to really worry me, but I am very comfortable with these cases now. However, I am well aware that my personal weakness lies in surgical dentistry. This was something that I knew had to be addressed if I wanted to have any chance of being able to do good surgical implant work, and this is why I enrolled on a certificate course in oral surgery at the same time as doing my implant training.
As my first case, I think it was really important to have my mentor Dr. Bayan Al-Sarraj by my side. There were times when his guidance on this case was invaluable. By its very nature, the stakes are high when performing implant treatment, and failure can be punished harshly.
Our patients deserve the best, so if guidance will allow us to provide this, then that can only be a good thing for all parties.
[/userloggedin]
[userloggedout][/userloggedout]
Stay Relevant With Implant Practice US
Join our email list for CE courses and webinars, articles and mores


