Dr. Douglas Wright illustrates a successful restoration using mini implants
Background
There are over 35 million edentulous patients in the United States. About 178 million Americans are missing at least one tooth.1 Restoring a patient who needs an upper complete denture over a lower jaw containing only the six anterior teeth is a common challenge.
[userloggedin]
Along with difficulties of making a stable lower partial denture with a Kennedy Class I relationship, the long-term function of lower anterior teeth against an upper denture leads to combination syndrome. Combination syndrome has been described as the changes that occur when a patient has no maxillary teeth and only natural mandibular anterior teeth (Kennedy Class I). The syndrome can include loss of bone in the anterior maxillary ridge, overgrowth of maxillary tuberosities, extrusion of the remaining mandibular teeth, and loss of bone height in the posterior areas of the mandible.
Introduction
While tooth loss and denture fabrication is something often associated with the later phases of life, younger patients can be affected. A young patient will have to successfully wear a maxillary denture and mandibular partial denture for 4 or even 5 decades. In addition, younger patients may have less disposable income for their dental care because of their recent entry into the workforce and the financial needs of their children. While options such as All-on-4® may be clinically available, the financial requirements of this treatment may be impossible for the younger patient.
Case report
CC is a 44-year-old mother of two who presented with two remaining upper teeth (teeth Nos. 7 and 8) and 7 remaining lower (teeth Nos. 22-28). She hoped to get a maxillary denture, so she could go to interviews with more confidence and get a better job to support her family. Her medical history was clear with no reported allergies. She did not have diabetes, osteoporosis, or kidney disease. She had recently quit smoking.
A CBCT scan was exposed (GALILEOS SICAT, Sirona), and the inferior alveolar nerves were highlighted on the software.
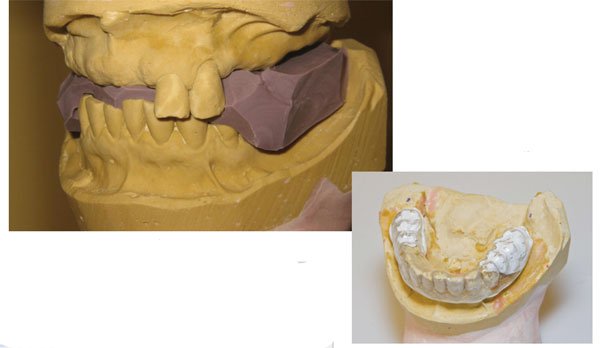
Alginate impressions for diagnostic casts were made. Using Dawson’s technique, the patient was manipulated into centric relation.2 She had a Class I skeletal relationship, and her centric stop was on her upper incisors. This allowed us to use polyvinyl siloxane putty (Express™ 3M ESPE) to capture centric relation and vertical dimension record (Figure 1).
From these models and other more detailed models, an immediate upper denture was fabricated. After scaling and root planning of the lower teeth and restoration of carious lesions, teeth Nos. 7 and 8 were removed, and the immediate upper denture was inserted.
To restore the lower dentition, the patient elected to have implant-supported crowns made instead of a lower partial denture. With a cast of the upper denture mounted in centric relation to the lower cast, denture teeth were added to the lower model in an ideal location for support and function of the upper denture. Once the waxup of the denture teeth on the lower model was completed, a copy of this model was fabricated, and a suck-down plastic stint was fabricated (Figure 2).
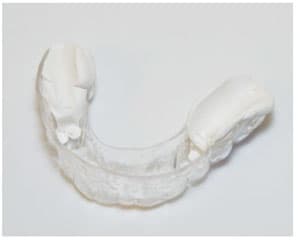
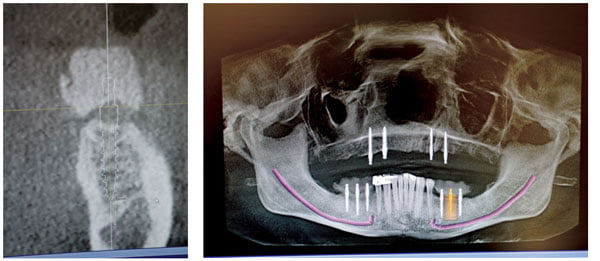
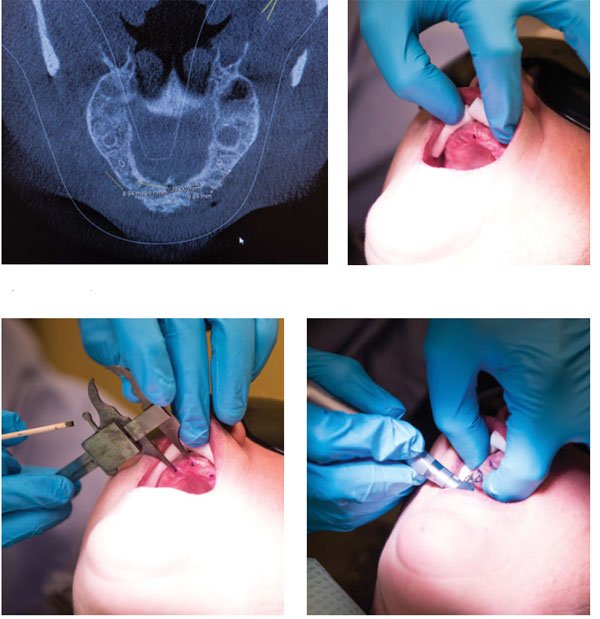
Once the patient returned, this stent was filled with a polyvinyl-barium mixture (Futar® Scan by Kettenbach Dental) and placed into the patient’s mouth. Once set, the stent was trimmed and smoothed (Figure 3). Then an additional CBCT scan of her mouth was captured with the stent in place. This particular scan showed the buccal cusps of the lower teeth located very close to the crest of the alveolar bone (Figures 4A-4B).
The SIDEXIS (Sirona) software allowed for easy measurement of the distance from a hard reference point, such as from the distal edge of the most distal tooth in the arch and from the crest of the bone to the inferior alveolar nerve canal. With these clear reference points, a factory-made surgical guide was deemed unnecessary (Figures 5A-5B).
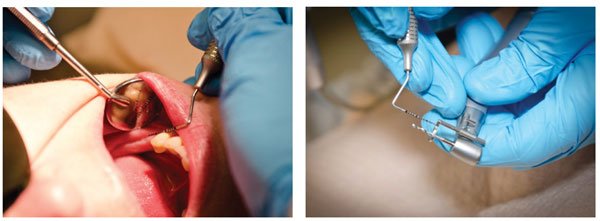
The patient elected to have each side of the lower arch restored separately. On the day of treatment, the patient rinsed with chlorhexidine gluconate (CHG) for 30 seconds prior to anesthesia. Local anesthesia was provided via a nerve block with 3% mepivicaine and infiltration with 4% articaine 1:200,000 epinephrine (Septocaine®).
Mini dental implants (Intralock® 2.4 mm x 13 mm) were placed using an electric surgical torque handpiece (Aseptico®).
Once the implants were in place, the exposed-ball attachments were covered with a thin coating of flowable composite. The composite coating makes the exposed implants smooth, less detailed, and easier for scanning with CEREC Bluecam camera. Once covered and powdered, the implants were scanned for digital models. The restoration was made using IPS e.max® lithium disilicate ceramic (Ivoclar Vivadent®) (Figures 6A-6C).
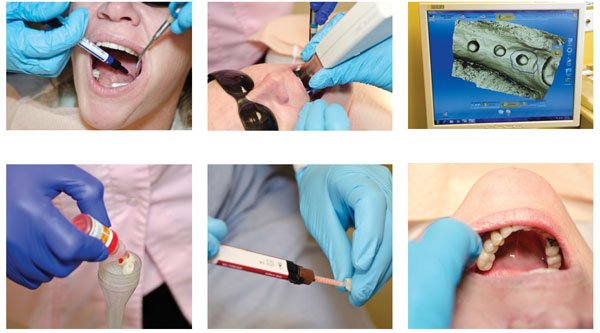
The completed restoration was adjusted to allow for easy cleaning with a floss threader. The restoration was treated with fluoric acid, mono-link silane, and cemented with Kerr NX3 cement (Figures 7A-7C).
After several months, the other side was restored using the same technique. Mini dental implants were used because they can be immediately loaded, and they cost less than conventional implants.
The patient was very pleased with her lower dentition. She made inquiries as to what would be available to stabilize her upper denture. While complete restoration of her upper arch using implants and fixed bridges was out of reach financially, the patient was able to afford placement of four mini dental implants in the upper arch.
On the day of treatment, the patient again rinsed with CHG and was anesthetized with articaine 4% with epinephrine 1:200,000. This time, four Zest LOCATOR® (Zest Dental Solutions™) implants 2.5 x 14 were placed in the anterior maxilla. Again, measurements on the CBCT scan were taken, this time from the center of the incisal foramen giving the position of the implants with careful examination of the bone providing the information needed to select the length of the implant (Figure 8A-8D).
After these implants were seated, the denture was hollowed. The four Zest metal housings were placed onto the implants, and the hollowed area of the denture was filled with regular body polyvinyl siloxane impression material. Once set, the denture was removed and taken to the laboratory.
After disinfection, the snaps were removed from the polyvinyl impression material. Implant analogs were attached to the snaps, and these were placed back into the set polyvinyl material. Snap stone was poured into the denture and allowed to harden. After set, the denture was removed from the stone. The stone model was lubricated with petroleum jelly. The impression material was removed from the denture, and pink Jet acrylic was mixed. The wet acrylic was poured into the openings made in the denture and lightly coated onto the Zest snaps. The denture was placed onto the lubricated stone cast. This was held together with rubber bands and placed into a pressure pot for 20 minutes at 20 psi (Figures 9A-9H).
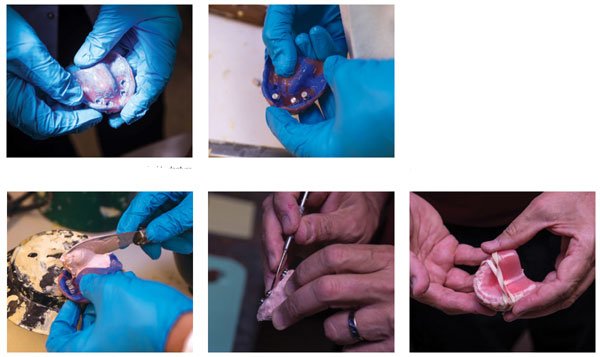
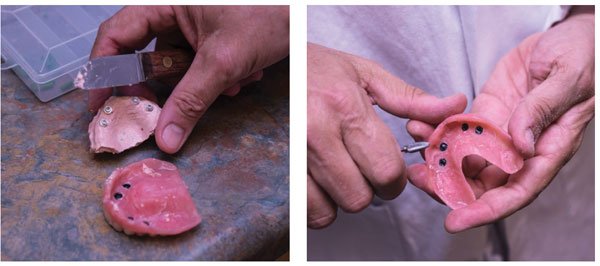
After the denture was removed from the pressure pot, the cast was separated from the denture, and the restoration was smoothed.
Discussion
Fabrication of an immediate complete upper denture in this case immediately reduced the complexity of treatment. With this new upper denture, critical aspects of the occlusion such as the Frankfort plane and the inter-pupillary line are restored. With this, the prosthetic portion of the case is greatly simplified. The implant retained lower crowns were built to this restoration.
Using mini dental implants with CEREC to restore the lower arch allowed for immediate 1 day restoration of each side of the mandible. This was less expensive than traditional implant restoration of an edentulous space and allowed the patient to have the site restored with crowns immediately after placement of the implants. Restoring the upper with an immediate denture followed by restoration of the lower left and the lower right made this case easier for the patient to afford.
Using mini dental implants to support immediately placed permanent ceramic restorations is controversial, however; there is ample support in the literature for using mini dental implants to support single tooth and multiple tooth restorations.4, 5, 6
Once the patient grew accustomed to the implant-supported lower bridges, she asked to have her upper denture stabilized with implants as well.
The upper arch was restored with mini implants supporting Zest LOCATOR attachment because the attachment housings have a lower vertical profile than the traditional ball-shaped mini dental implant abutments. While the increased height of the traditional mini implants are advantageous for fixed bridge restorations, in the anterior maxilla, a taller implant may require adding acrylic to the anterior portion of the denture. This could have an undesirable effect on the patient’s phonetics. Zest LOCATOR attachments require 4 mm of acrylic versus 6 mm to 7 mm for a ball attachment-type mini dental implant. Because of bone height and the health of the patient, only four implants were necessary to stabilize the upper denture.
This case highlights some common problems with mini implant stabilization of a removable appliance. The problem with any acrylic restoration supported by implants is weak areas in the acrylic of the denture base. This can lead to fracture of the denture.Using chairside pickup materials exacerbates these problems because the pickup materials are not methyl acrylic but typically a BIS-GMA product. The BIS-GMA does not create a chemical bond with the acrylic, only a mechanical attachment. This makes the denture base even weaker and prone to fracture.
By performing the laboratory technique described here and having the attachments held in place with pressure cured methyl acrylic, the strength of the removable is maximized.
These patients must be warned that they can generate stronger chewing forces than a patient who has simple conventional partial and complete dentures. There are denture teeth available with more resistance to wear than conventional acrylic teeth.7 Because of their additional strength, SR Phonares® (Ivoclar Vivadent) denture teeth were used in the maxillary denture. In spite of this, the patient was told that implant-supported dentures will wear considerably faster than most dentures wear and will need to be replaced much more often than traditional dentures.

Conclusion
A young, partially edentulous patient was successfully restored using mini dental implants and CEREC-fabricated restorations for the lower arch. Her upper arch was restored with a complete denture supported on four Zest locator mini implants.
The advantages of this treatment include:
- Providing the patient with afford-able dental implant treatment options.
- Treatment can be provided in phases for financial purposes.
- Use of CEREC technology with mini dental implants provides immediate results for the patient.
The disadvantages of this treatment are that the upper denture will need to be replaced much more frequently than a traditional denture. This information must be related to the patient prior to treatment.
Acknowledgement
Special thanks to Mr. Dan Emmerman and DBE Photography.
 Douglas Wright, DDS, graduated from the University of Maryland in 1985. After serving 4 years in the United States Navy, Dr. Wright operated a private practice in Maryland. After 10 years in practice, he joined the staff at the Washington DC Veterans Administration Medical Center. Now, Dr. Wright is in private practice in Harrisonburg, Virginia. He is married to Karen Wright and has three children: Nicholas, Julia, and Rosemary.
REFERENCES
- American College of Prosthodontists. Missing teeth. American College of Prosthodontists website. https://www.gotoapro.org/facts-figures/. Accessed January 3, 2017.
- Dawson PE. Evaluation, Diagnosis and Treatment of Occlusal Problems. 2nd Edition. St. Louis, MO: Mosby; 1989:41-44.
- The Journal of Prosthetic Dentistry. Glossary of prosthodontic terms. J Prosthet Dent. 2005;94(1):10-92.
- Kumari P, Verma M, Sainia V, Gupta A, Gupta R, Gill S. Mini-implants, mega solutions: a case series. J Prosthodont. 2016;25(8):682-686.
- Flanagan D. Fixed partial dentures and crowns supported by very small diameter dental implants in compromised sites. Implant Dent. 2008;17(2):182-191.
- Shatkin TE, Shatkin S, Oppenheimer BD, Oppenheimer AJ. Mini dental implants for long-term fixed and removable prosthetics: a retrospective analysis of 2514 implants placed over a five-year period. Compend Contin Educ Dent. 2007;28(2):92-99.
- Hahnel S, Behr M, Handel G, Rosentritt M. Two-body wear of artificial acrylic and composite resin teeth in relation to antagonist material. J Prosthet Dent. 2009;101(4)269-278.
Stay Relevant With Implant Practice US
Join our email list for CE courses and webinars, articles and mores

