Dr. Ludwig Hermeler demonstrates how to modify an existing overdenture for use with implants and secure it with direct intraoral adhesion
The secure hold of full dentures, particularly in the lower jaw, decreases with age. This is essentially due to progressive jaw atrophy in connection with soft tissue changes and reduced salivation.

Implants can help to remedy this. In many cases, the existing restoration can still be used if connecting elements, such as locators, provide a reliable connection between the implants and the functional overdenture.
To allow such attachments to be bonded in at chairside, Voco has developed the Quick Up set that makes the clinical workflow both simple and safe for the dentist. Dental implants were originally developed for use in edentulous jaws. As patients become increasingly older, the natural changes in the edentulous alveolar ridge, and, in particular in the lower jaw, result in a deterioration in the hold of the denture.
A firm bite can be recreated using various types of implants (one-piece, two-piece, mini-implants).
The existing restoration can often be used, but is modified for the connection between the implants and the denture. This is where the attachments, which are precisely aligned to the implant system, come into play. These are bonded into the basis of the denture at the chairside. Thanks to this method, the workflow can be handled internally at the practice, the costs and time required are significantly reduced, and the patient is spared the otherwise unavoidable waiting time due to external laboratory work. Direct intraoral adhesion ensures the maximum possible accuracy.
The Quick Up set by Voco (Figure 1) includes all of the necessary components for safe and simple luting.
- Fit Test C and B, a low-viscosity liquid control silicone
- Quick Up adhesive, a bonding agent between the denture material and Quick Up
- Quick Up, a self-curing luting composite in the color of the denture base (gingiva colored)
- Quick Up LC, a light-curing, also gingiva colored, luting composite for amendments/corrections after the luting of attachments with the self-curing material Quick Up.
Case study
Initial clinical situation: Two OsseoSpeed™ TX implants (Astra Tech) with a diameter of 3.5 mm were inserted in parallel alignment in the atrophied jaw of a 77-year-old male patient. Around 4 months later, they were exposed following a complication-free period of healing and osseointegration.
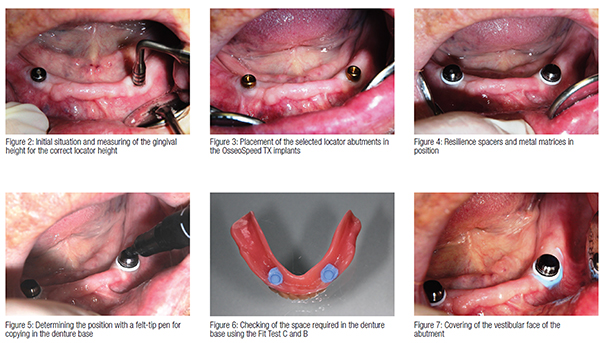
The fit of the margins and the base of the existing lower jaw dentures are fully functional, the hold is to be enhanced using locators because of jaw atrophy. Figure 2 shows measurement of the height of the mucosa using an abutment depth gauge (Astra Tech).
The retentive part of the locator abutments selected according to height should be located supragingivally with sufficient spacing.
Placement of the finished overdenture is easier for the patient if the locator secondary components are at the same horizontal height.
The abutments are screwed in and tightened to 25Ncm (Figure 3).
The resilience spacers, which serve to compensate for mucosal resilience, are positioned on the locator abutments, and then, the locator metal matrices are placed on the locator abutment analogues (Figure 4).
Using Quick Up, attachments are secured chairside in three simple steps.
Step one: preparation
Using a felt-tip pen (alternatively, articulating paper, occlusion spray, or similar can be used), the position of the locator metal matrix can be transferred to the denture base by simple copying (Figure 5). The marked areas are relief-ground only enough to enable the denture to be easily inserted over the implants with attached secondary components. Large-scale relief-grinding, and the creation of drainage channels is not necessary when using Quick Up.
As well as the clinical check, with the control and covering silicone Fit Test C and B, the correct relief-grinding is simply shown in the denture base (Figure 6). Fit Test C and B can also be used in particular to block out and protect undercut interface areas between the implant and gingiva. The slim, angled cannulae ensure simple and delicate application.
Figure 7 shows the applied silicone for demonstration purposes; as there were no undercuts, it was not required and removed again.
Step two: luting
The prepared denture base is wetted with the Quick Up adhesive. The overdenture openings intended for the attachments are filled two-thirds full (i.e., not completely) with Quick Up (Figure 8).
The denture is reinserted, and correct occlusion is checked without exerting too much pressure on the soft tissue. After a Quick Up curing time of 3-1/2 minutes, the lower dentures can be removed from the mouth. The locator abutments are now bonded into the base both securely and precisely.
Step three: corrections and polishing
Since the ground openings in the denture are deliberately not completely filled with Quick Up, ditchings (Figure 9) are evident. These can be filled under visual inspection with the light-curing Quick Up LC and polymerized (Figure 10). With finishing and polishing, successful adhesion with Quick Up (Figure 11) is concluded.
On the locator abutment, the black working insert is exchanged for a locator insert with the desired bond strength – here, initially blue (680g retention force) – and the resilience spacers are removed (Figure 12).
Handling is practiced together with the patient, optimal oral hygiene (including the use of Solostix and chlorhexidine gel) is shown, and the necessary frequent recalls are arranged.
Weeks later, a happy patient, who can bite powerfully again, comes to the follow-up session (Figure 13).


Conclusions
With the Quick Up method – whereby firstly self-curing Quick Up material, followed by light-curing Quick UP LC is used to lute the attachments, and secondary components – disastrous adhesion to the implant in the mouth is avoided.
The Quick Up components included in the set have been specially designed and combined to enable the simple and safe luting of attachments at the chairside.
Stay Relevant With Implant Practice US
Join our email list for CE courses and webinars, articles and mores

