ESSET (Easy Safe Stable Expanding and Tapping Kit)
In development for over a decade, the introduction of HIOSSEN’s ESSET Kit is the solution for successful implant placement when presented with insufficient horizontal bone volume without the use of bone grafts. The ESSET Kit focuses on the visco-elastic properties of bone tissue and the elasticity coefficient of the alveolar bone.
The new ESSET Kit is the ideal implant solution for patients with narrow alveolar ridges. Easy-to-follow steps safely and predictably allow practitioners to split and expand the crestal bone, preparing the site to accept dental implants with minimal patient discomfort or complications. Specialized tools minimize bone fracture, and initial implant stability is enhanced by tapping of the basal bone base. Moreover, the split and expanded bone process provides an ample supply of bone-forming cells for quicker integration and reduced recovery time.
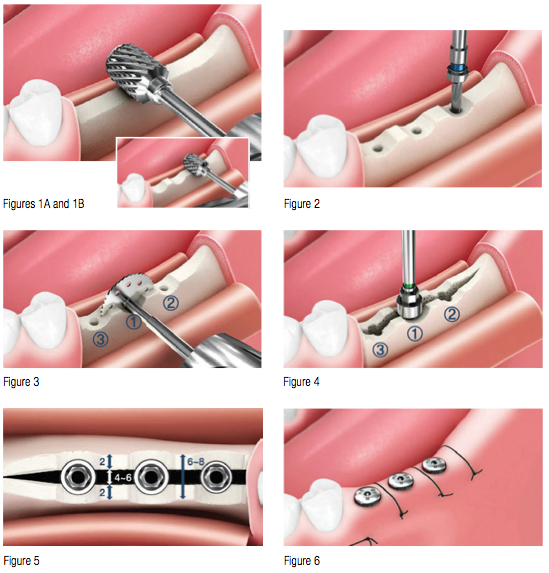
To begin, the practitioner will need to modify the crest to form at least 3-4 mm of the horizontal bone (Figures 1A and 1B). It is recommended to use crest remover 7.0 with an rpm of 1,200–1,500 for successful modification.
Then create an indentation where the implant is to be placed, and mark the implant placement location using the initial lance drill. With the implant placement location identified, the area can now be drilled using the 1.8 mm twist drill (Figure 2).
The site is now prepared for the practitioner to perform a full-depth vertical cut using the ESSET Kit’s 13 Saw (Figure 3). After the initial vertical cut, horizontal splitting along the crestal bone can now be executed from distal to mesial direction. If needed, additional splitting can be performed around the proximal tooth using the ESSET Kit 7 Saw.
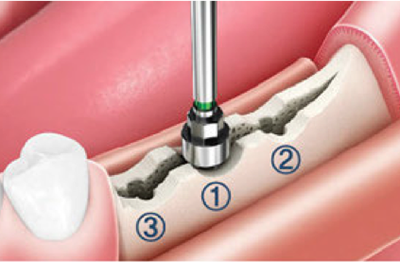
The bone is now ready for expansion using the SET drill sequentially at full depth (Figure 4). The sequence of the SET drill for bone expansion is as follows: 1.6/2.8, 2.2/3.6, 2.7/4.1, and 3.1/4.5. Recommended rpm for expansion is 25-35 rpm. Using the drill extension before applying high amounts of torque is suggested, as excessive torqueing can pose a risk of locking the handpiece. 
Place the implant taper fixtures (Figure 5). Normal bone density will work well using a 4.5 mm fixture; however, the 4.0 mm fixture works best in hard bone density cases.
After placing the healing abutment, the site is now ready to be sutured (Figure 6). The healing abutment should ultimately be 2 mm higher than the height of the gingiva.
Compared to conventional ridge splitting methods (i.e., mallets and chisels) the ESSET Kit’s specialized tools safely and predictably split and expand the crestal bone, preparing the site to readily accept dental implants. The patient will experience a significant reduction in recovery time, with the process ensuring minimal bone fracture and high initial stability, while the practitioner will be able to save time and money using a simple, safe, and predictable procedure with an easy-to-use ridge split technique.
Each ESSET Kit contains all the components needed for each unique case:
Crest removers (2)
- 5.0, 7.0 diameter
- 29, 45 length
Twist drills (3)
- 1.8 diameter
- 8.5, 10, 11.5 length
Saws (3)
- 7.0, 10.0, 13.0 diameter
- 0.3 blade thickness
SET drills (4)
- 8.5, 10. 11.5 length
- 1.6/2.8, 2.2/3.6, 2.7/4.1, 3.1/4.5 diameter
Mount extension
Torque wrench
Depth gauge
Stay Relevant With Implant Practice US
Join our email list for CE courses and webinars, articles and mores

 ESSET (Easy Safe Stable Expanding and Tapping Kit)
