Educational aims and objectives
This self-instructional course for dentists discusses an innovative concept in custom CAD/CAM implants.
Expected outcomes
Implant Practice US subscribers can answer the CE questions by taking the quiz online to earn 2 hours of CE from reading this article. Correctly answering the questions will demonstrate the reader can:
- Define subperiosteal implants.
- Realize some history leading up to modern subperiosteal implants.
- Identify various treatment solutions for the posterior mandibular region.
- Realize various approaches that can compensate for certain anatomical
- Observe a procedure for subperiosteal implants.
Drs. Laurine Birault and Antoine Diss show how subperiosteal implants combined with CAD/CAM can reduce the challenges of rehabilitation of atrophic posterior mandibular areas.
Drs. Laurine Birault and Antoine Diss discuss an innovative concept in custom CAD/CAM implants
Introduction
Subperiosteal implants, more recently called AMSJI (Additively Manufactured Subperiosteal Jaw Implants) by some authors,1 are an innovative concept in custom CAD/CAM implants. They perfectly match the ridge anatomy of patients with insufficient bone volume to receive endosteal implants traditionally used in axial implantology.
Dr. Gustave Dahl first described the concept of subperiosteal implants in 1940. However, the first implants, made of cobalt-chromium and using a direct bone impression from wide-flap surgery, were not very successful. Their poor fit, lack of stability, and inability to osseointegrate resulted in an excessively high failure and complication rate.
With the advent of digital tools, it is now possible to perfect implant design using materials such as titanium. This advancement considerably improves fitting accuracy. As a result, subperiosteal implants have increased success rates and are becoming a relevant treatment option that deserves our attention.
Complexity of the posterior mandibular region
Treatment of atrophic posterior mandibular regions has long been a challenge in our rehabilitation procedures. The various treatment solutions depend on a number of parameters:
- Removable solutions are rarely accepted due to their initial bulkiness. Moreover, their instability leads to functional and esthetic limitations. In the most severe cases, they can even cause pain when chewing due to the compression of the inferior alveolar nerve.2
- Implant solutions face several anatomical limitations. On one hand, there is a concomitant lack of height and width of the alveolar ridge, making vertical augmentation particularly difficult to achieve. On the other hand, the superficialization of the inferior alveolar nerve considerably increases the risk of postoperative nerve disorFinally, resorption of the bone surface leads to a reduction in the surrounding soft tissue, thus limiting the survival rate of the joint prosthesis.3
Various approaches have been developed to compensate for these numerous anatomical constraints:
- Several bone reconstruction techniques are used to restore sufficient crestal volume to allow the placement of endosteal implants. These methods include expansion, bone distraction, guided bone regeneration procedures using specific protocols such as the “sausage technique” or the use of titanium mesh, bone blocks, or mandibular framework.4,5
- In direct contrast, basal implantology by definition consists of anchoring implants of specific design (disc, blade, plate, oblique, etc.) in the basal bone of the maxilla without the need for bone grafts.6
- Finally, subperiosteal implantology offers another treatment solution, as it requires neither bulky reconstruction nor bone anchorage. These implants are specially designed to adapt to residual bone and are positioned under the periosteum.
Newer patient-specific implants use modern CBCT and patient scanning technology to create custom-milled patient specific subperiosteal implants. The authors selected Panthera Dental as their partner to design and manufacture this patient-specific subperiosteal implant. Nevertheless, other companies like Bone Easy® and KLS Martin also provide similar implants.
Procedure for subperiosteal implants
-
Planning and designing Panthera implants
After a patient with no contraindications to oral surgery is selected, these implants are designed after collecting three pre-implant data:
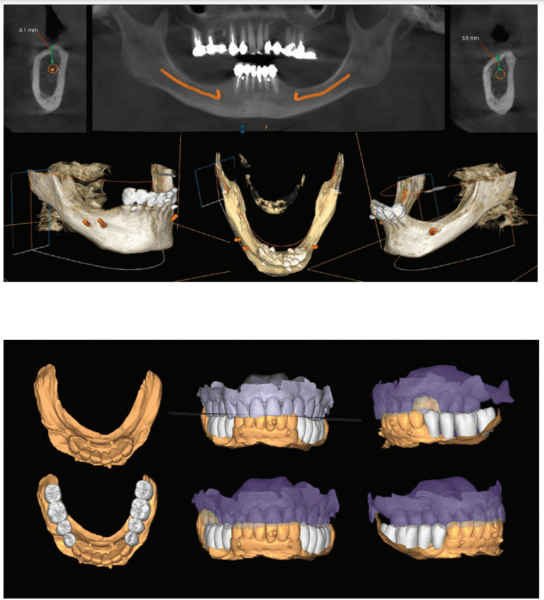
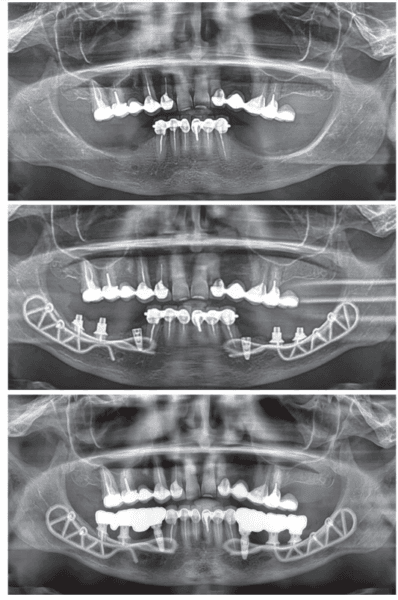
- A cone beam scan exported in DICOM format. The success of the treatment depends largely on the accuracy and quality of the CT data. It is therefore advisable to opt for a large acquisition field, covering the entire mandible up to the posterior ascending ramus. In addition, the highest possible image resolution and the use of metal artifact reduction tools (such as the CS “MAR” — Metal Artifact Reduction) are essential to ensure optimal implant adaptation (Figure 1).7
- An optical impression of the dento-mucosal surfaces.
- This is all combined with a digital wax-up, a preview of the future prosthetic project which will be exported in STL or PLY format. In the case of a limited number of residual teeth, radiopaque markers can be used to help combine the three types of data (Figure 2).8,9
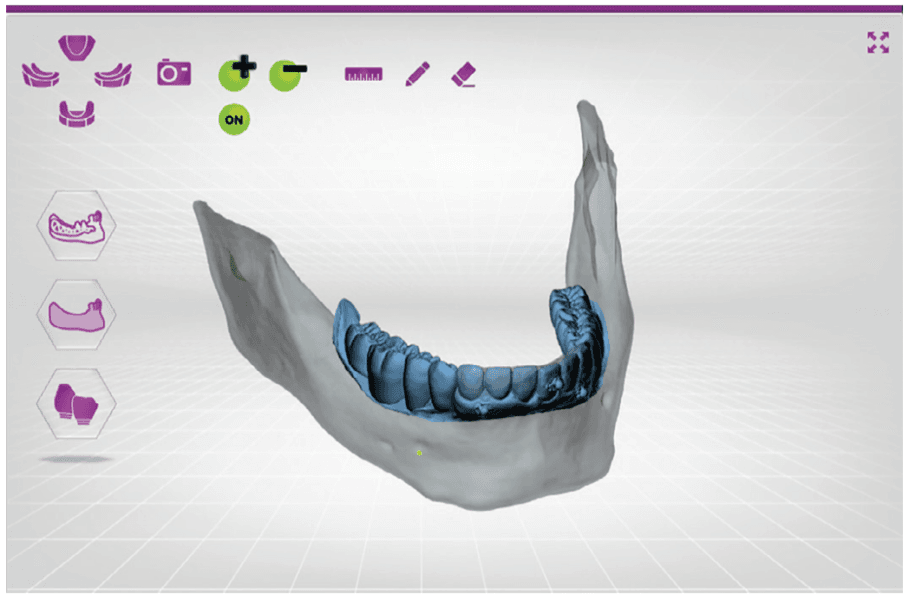
DICOM and STL files are transferred to the Panthera online platform. Once the order has been placed, a viewer allows you to follow and validate the implant creation stages (Figure 3).
Implant modeling is performed by the company’s designers using their proprietary software, adapting to the clinical case and respecting a common structure. At the vestibular level, the exoskeleton bypasses the chin (mental foramen) foramen, while osteosynthesis screws positioned more posteriorly stabilize the implant on the cortex of the external oblique line. A loop extends and completes the structure on the lateral surface of the ascending branch.
Lingually, the framework forms a loop in the retro-symphyseal region and stops at the most distally located abutment, remaining coronal to the mylohyoid line (Figure 4).

Thanks to the evolution of materials, the development of digital tools, and the improvement of production techniques, Panthera is able to manufacture subperiosteal implants in grade 23 6AL 4V ELI titanium discs using 5-axis milling machines with a precision of 5 mm. Finally, the surface finish is sandblasted in areas in contact with bone and the periosteum to promote bone regeneration.10.11
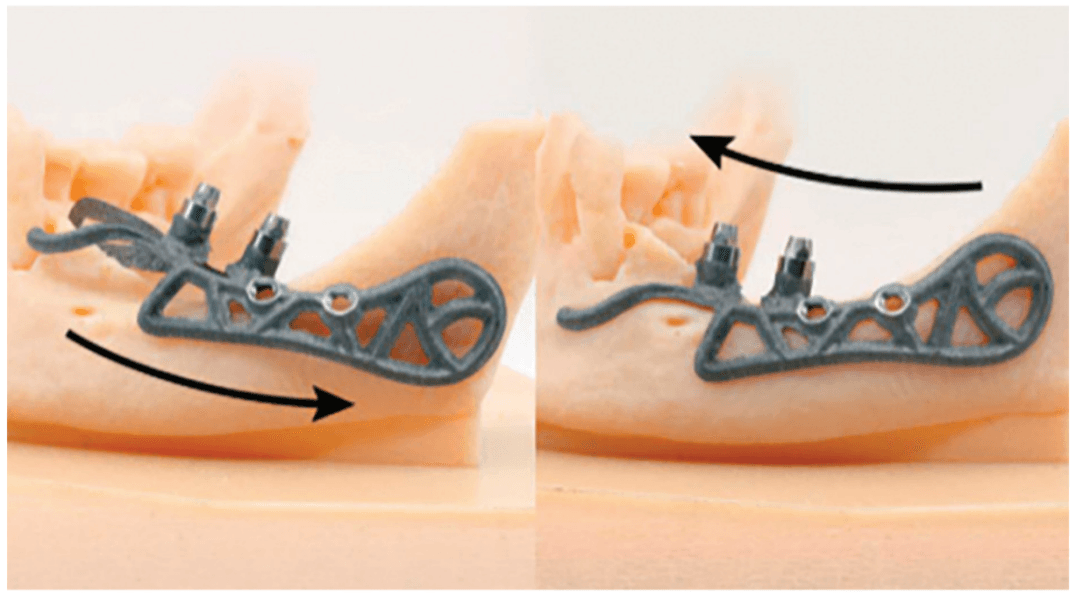
Implants are supplied with a 3D resin model of the jaw. This model is used to check that implants fit perfectly before they are inserted. It also helps the operator find the ideal insertion axis, which should be achieved by distal translation followed by mesio-lingual rotation. This movement may differ slightly from one patient to another (Figure 5).
-
Surgical protocol
The procedure is performed under local anesthetic and lasts between 1 and 1-1/2 hours per side.
The first step is to raise a flap wide enough to allow adequate access to the surgical site. The crestal incision is made so as to evenly distribute the attached gingiva on either side of the future abutments. It extends to the anterior teeth via an intrasulcular incision and ends along the anterior edge of the ascending ramus.
The aim is to create full-thickness flaps to expose the chin foramen and protect the inferior alveolar pedicle (nerve) on the vestibular side. The detachment should then continue beyond the external oblique line to the basal margin of the mandible, then to the insertion of the buccinator muscle without detaching it.
On the lingual side, it is also important to push back the sublingual compartment by lifting, still in full thickness, to the medial oblique line posteriorly and apically up to the anterior digastric fossa, avoiding effraction of the mylohyoid muscle and mental spines (Figures 6 and 7).12
Some clinicians may choose to use a technique for one-piece subperiosteal implants. However, the author notes that one-piece bilateral subperiosteal implants are more difficult to insert, making surgery more complex. The surgery time while the flaps are detached is longer with a one-piece bilateral subperiosteal implant, increasing the risk of complications, infections, pain, edema, and discomfort for the patient. If there are minor or major complications, it’s easier to manage them when there are two unilateral subs. Finally, thanks to the large bone/implant contact surface, there is great stability even with a unilateral sub implant, making no difference between a bilateral or two unilateral.
Before inserting the implants, a “soft brushing” technique can be used to relax the flaps and thus allow tension-free closure of the site while preserving the periosteum. The bone is then scraped to ensure that any residual fibrous tissue is removed.
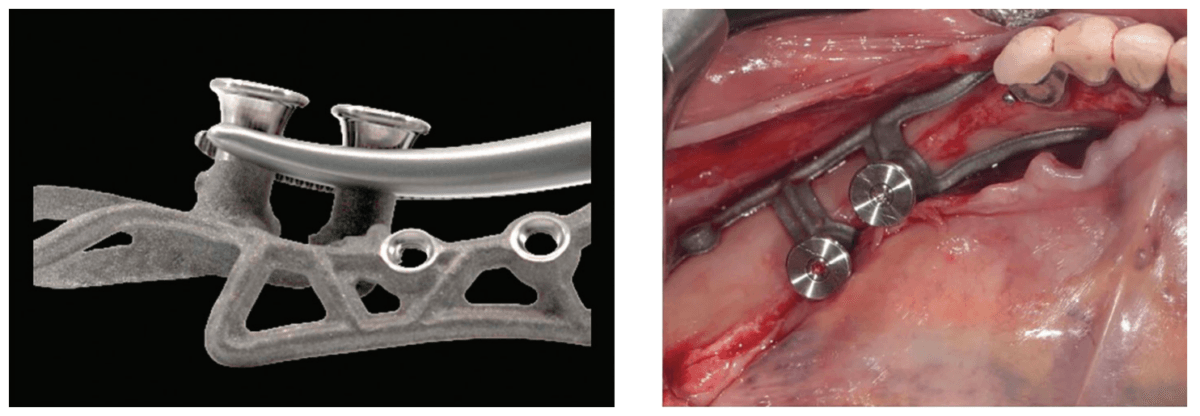
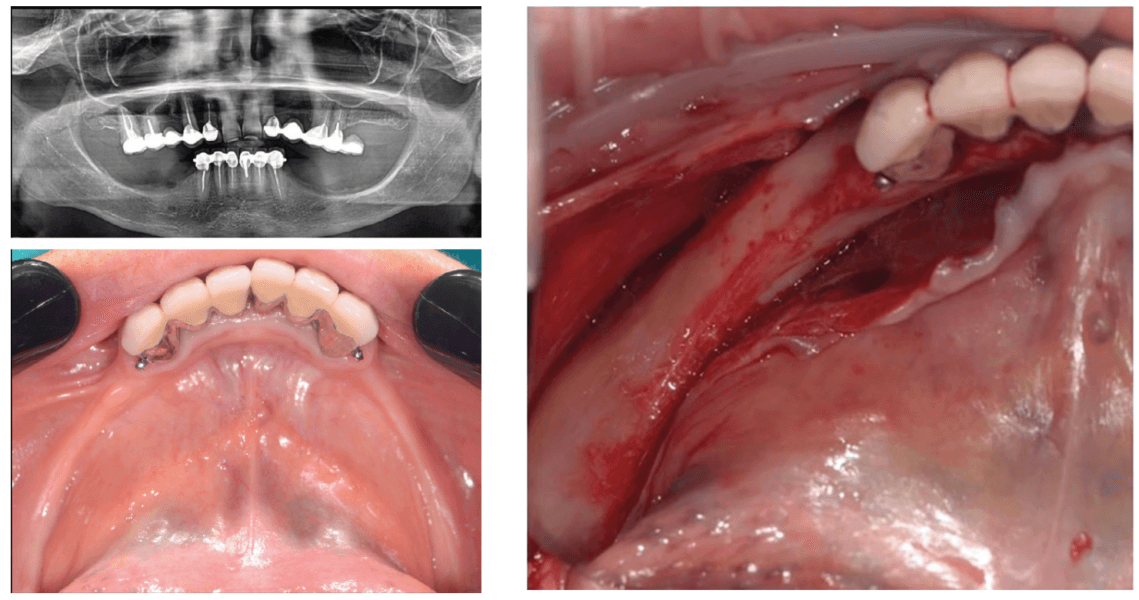
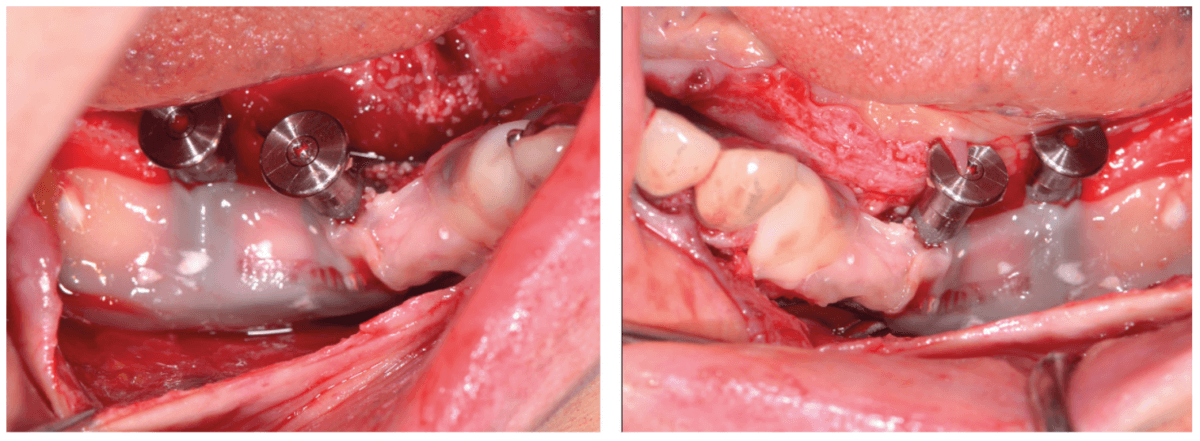
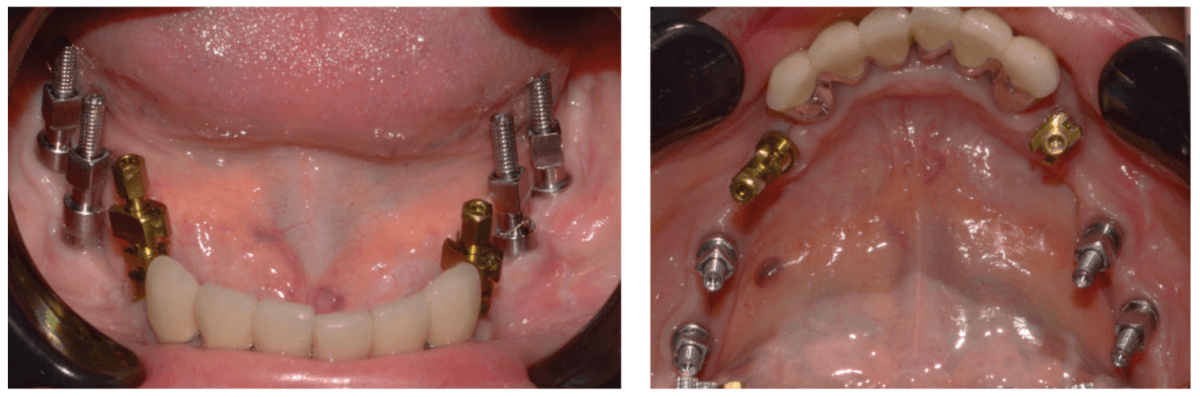
The implant is inserted along the recommended axis, validated beforehand on the resin model. It is advisable to leave the healing abutments in place and use hemostatic forceps to facilitate gripping of the implant, while remaining clear of the subgingival portion during the placement procedure (Figures 8, 9, and 10).
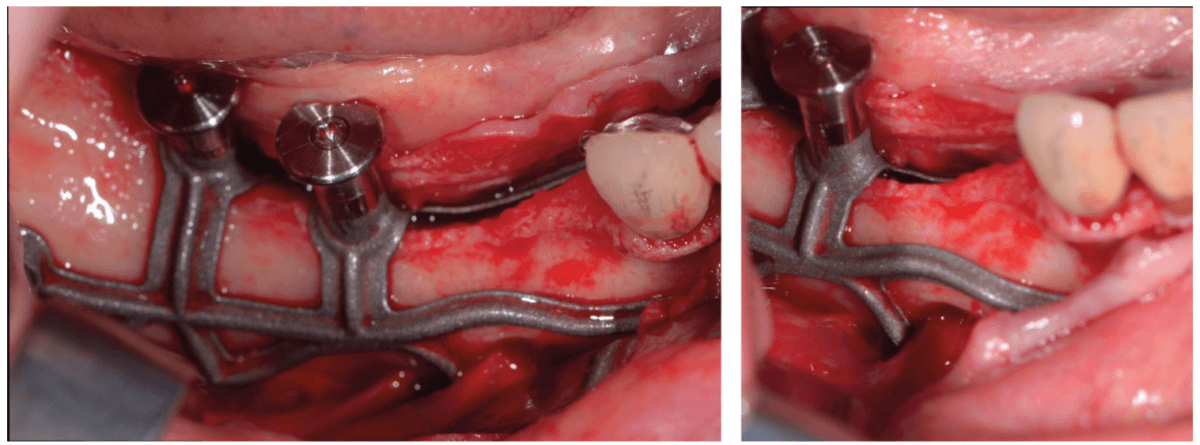
Once the position and fit have been carefully checked, the implant is stabilized using two osteosynthesis screws. A drilling guide is also provided to facilitate the procedure (Figure 11). In this specific case, two endosteal implants are placed simultaneously in positions 34 and 44.

PRF membranes are positioned to optimize gingival healing (Figure 12). Finally, the flaps are sutured tension-free using apical and crestal mattress stitches.
-
Prosthetic steps
After 4 months of osseointegration, the second surgical stage uncovers the buried implants, and a 15-day gingival maturation period around the healing abutments will be observed before proceeding with the prosthetic steps (Figure 13).
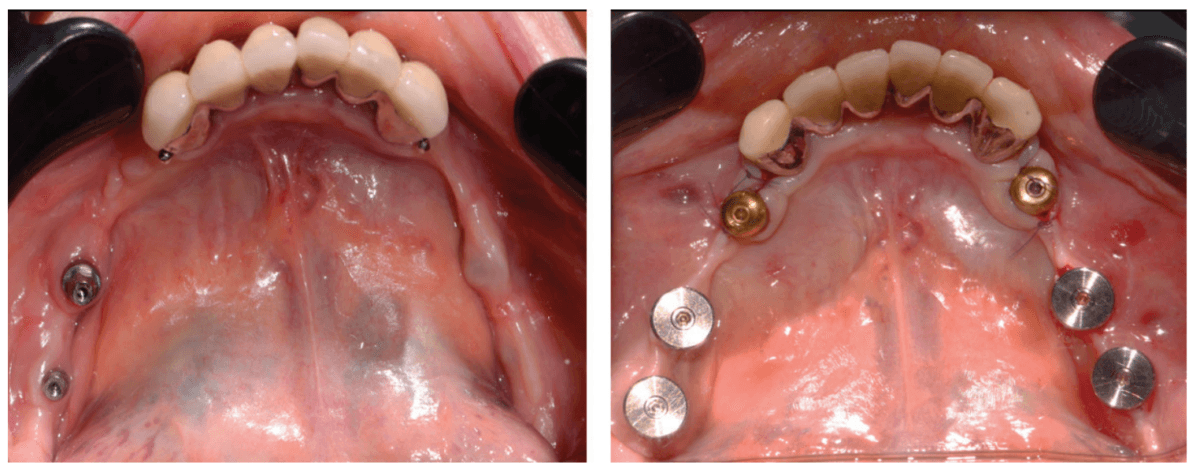
Transgingival abutments for subperiosteal implants are similar to those used for endosseous implants. These are tapered abutments designed for a fixed, screw-retained prosthesis.
The steps involved in using prostheses are the same as for conventional techniques:
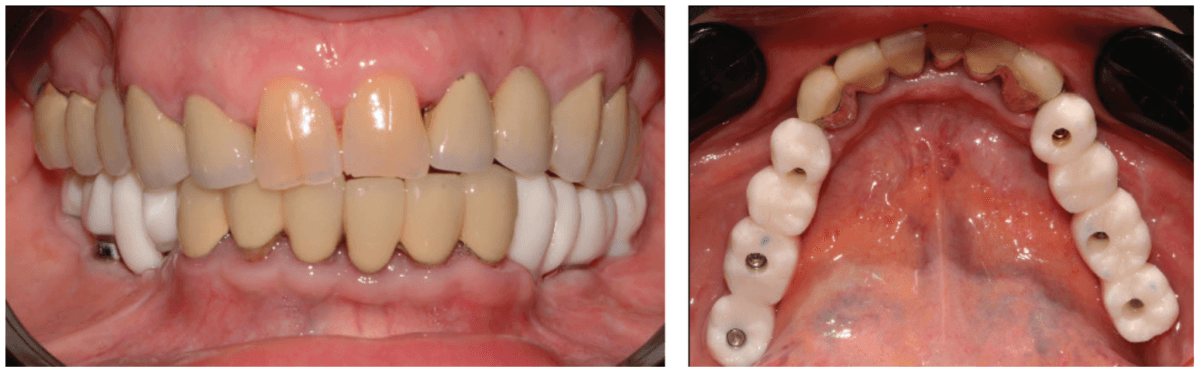
- physical impression using the pick-up technique (Figure 14)
- fitting mock-ups to validate the prosthetic project (Figure 15)
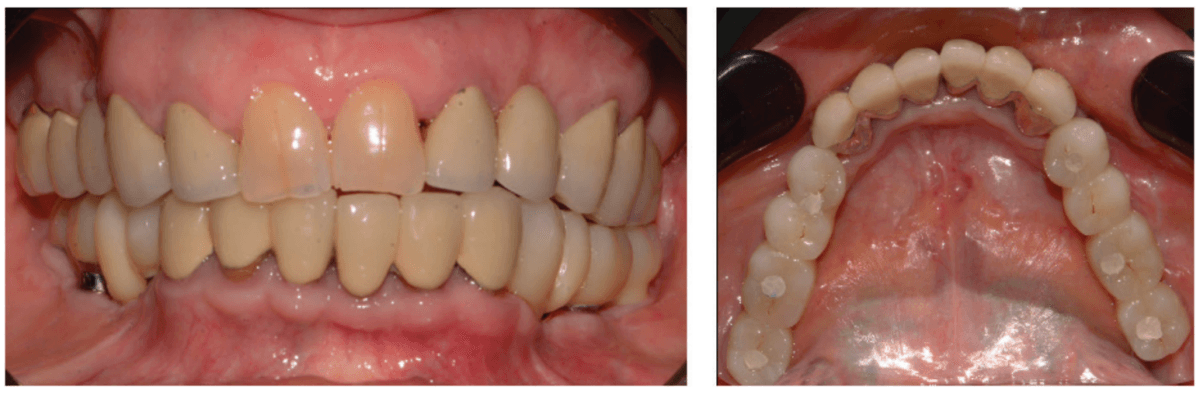
- final screwing of permanent prostheses (Figure 16)
Conclusion
The rehabilitation of atrophic postero- mandibular areas is a major surgical challenge. In certain clinical situations, the limits of implant and bone reconstruction therapies may be reached.
Thanks to the evolution of CAD/CAM technologies and the improved accuracy of CBCTs, the subperiosteal technique is becoming a genuine treatment alternative.
Thanks to their unique surgery with no bone contribution, subperiosteal implants are a minimally invasive approach. Postoperative recovery and the risk of complications are thus reduced. Healing times prior to prosthetic rehabilitation are also reduced for the patient.
First developed over 80 years ago, this solution is now more sophisticated and biocompatible than its historical counterpart, with reliable and promising results.
Take a close look at the subperiosteal implant called CAD/CAM SUB Implant™ by Panthera Dental in this case study by Drs. Mathieu Goudal and Cécile Bailly. https://implantpracticeus.com/treating-posterior-mandibular-atrophy-using-cad-cam-subperiosteal-implants-clinical-case-and-literature-review/
Author Info
 Dr. Laurine Birault is a Doctor of Dental Surgery graduated from the University of Nice Sophia-Antipolis. She is in private practice in Nice, as a Doctor of Dental Surgery. She practices Periodontology and Implantology at Cabinet Arénas Dentistes in Nice and is a trainer for the Génération Implant association. Dr. Birault also holds a University Diploma in Implantology from the Université D’evry Val d’Essonne and a specification in Periodontology from the Université de Nice Sophia-Antipolis. Her professional journey includes contributions to dental literature, such as her work on the integration of facial scanning in surgical planning and on immediate loading.
 Dr. Antoine Diss is a Doctor of Dental Surgery and holds a University Diploma in Implantology from the Faculté de Chirurgie Dentaire de Nice. He is in private practice in Nice, as a Doctor of Dental Surgery, Doctor of Odontological Science (PhD). He is the Founder and President of the Génération Implant association, a former Scientific President of the Société Française de Parodontologie et d’Implantologie Orale de la Côte d’Azur and holds a Doctorate in Odontology Sciences. Dr Diss has made significant contributions to dental education as a former professor of periodontology at the Faculté de Chirurgie Dentaire de Nice, and to dental research, particularly on platelet-rich fibrin (PRF), its evaluation, effects, and healing.
References
- Mommaerts MY. Additively manufactured sub-periosteal jaw implants. Int J Oral Maxillofac Surg. 2017 Jul;46(7):938-940.
- Le Bars P, Kouadio AA, Niagha G. Prothèse amovible et pertes de substance des maxillaires: une association incontournable. (Removeable prosthesis and loss of jawbone substance: an essential association.) Paris, France: Editions CdP; 2012;160.
- Keller Pierre, La gestion des tissus mous après les augmentations osseuses, (Management of soft tissues after bone augmentation) Paru dans Réalités Cliniques n° 3 – September 2018: 205-213. https://www.information-dentaire.fr/formations/la-gestion-des-tissus-mous-apres-les-augmentations-osseuses/.
- Urban IA, Nagursky H, Lozada JL, Nagy K. Horizontal ridge augmentation with a collagen membrane and a combination of particulated autogenous bone and anorganic bovine bone-derived mineral: a prospective case series in 25 patients. Int J Periodontics Restorative Dent. 2013 May-Jun;33(3):299-307.
- Khoury F, Hanser T. Three-Dimensional Vertical Alveolar Ridge Augmentation in the Posterior Maxilla: A 10-year Clinical Study. Int J Oral Maxillofac Implants. 2019 Mar/Apr;34(2):471-480.
- Scortecci GM, Odin G. “Evidence-based basal implantology.” Basal Implantology. Cham, Switzerland: Springer; 2019: 69-85.
- Davidowitz G, Kotick PG. The use of CAD/CAM in dentistry. Dent Clin North Am. 2011 Jul;55(3):559-570, ix.
- Janeva NM, Kovacevska G, Elencevski S, Panchevska S, Mijoska A, Lazarevska B. Advantages of CAD/CAM versus Conventional Complete Dentures – A Review. Open Access Maced J Med Sci. 2018 Aug 4;6(8):1498-1502.
- Truitt HP, James R, Boyne P. Noninvasive technique for mandibular subperiosteal implant: a preliminary report. J Prosthet Dent. 1986 Apr;55(4):494-497.
- Cohen DJ, Cheng A, Kahn A, Aviram M, Whitehead AJ, Hyzy SL, Clohessy RM, Boyan BD, Schwartz Z. Novel Osteogenic Ti-6Al-4V Device For Restoration Of Dental Function In Patients With Large Bone Deficiencies: Design, Development And Implementation. Sci Rep. 2016 Feb 8;6:20493.
- Claffey N, Bashara H, O’Reilly P, Polyzois I. Evaluation of New Bone Formation and Osseointegration Around Subperiosteal Titanium Implants with Histometry and Nanoindentation. Int J Oral Maxillofac Implants. 2015 Sep-Oct;30(5):1004-1010.
- Poitras Y. Diagnotic et plans de traitement (Diagnosis and treatment plans) [Internet]. Canadian Implant Institute. 2021. Available at: https://www.youtube.com/watch?v= y3oNPMEk9Dg
Stay Relevant With Implant Practice US
Join our email list for CE courses and webinars, articles and mores

