Educational aims and objectives
This self-instructional course for dentists aims to discuss placing anterior implants immediately using the socket shield technique when there is a thin buccal plate or fenestration following an extraction.
Expected outcomes
Implant Practice US subscribers can answer the CE questions by taking the quiz online to earn 2 hours of CE from reading this article. Correctly answering the questions will demonstrate the reader can:
- Define the socket shield technique
- Recognize when the socket shield technique would benefit preservation and maintenance of bone after extraction.
- Identify materials for utilization of the socket shield technique.
- View digital planning that will benefit the socket shield technique.
- Identify the poncho technique and its effect on periodontal tissues, overall patient discomfort, and site healing time.
In this CE, Dr. Joshua Nagao explains why the socket shield technique is important in the event of complications after an extraction.
Dr. Joshua Nagao discusses placing an implant when there is a thin buccal plate or risk of fenestration following an extraction
One of the most frequent challenges in implant dentistry is maintaining the ability to place an implant immediately when there is a thin buccal plate or fenestration following an extraction, especially in the anterior segments. After an extraction, a cascade of events occurs that eventually leads to, at minimum, some resorption of the alveolus around the site. In the event of the complete loss of the buccal plate during an extraction, a contraindication to immediate placement is created. This makes the ability to maintain the anatomical structures around the extraction site an important skill for any practitioner who is currently placing implants. One advanced treatment method that has shown significant success in combating this scenario is the socket shield technique.1 This technique, first described in literature by Hürzeler,2 involves bisecting the root of a tooth and preserving a portion in areas of thin bone to maintain the periodontium and bundle bone of the site. Preservation of these structures will aid in preventing the collapse of the bone vertically and horizontally, inhibiting apical migration of the tissues, and helping the practitioner avoid additional grafting (both hard and soft tissue) procedures in the future, shortening overall treatment time for the patient.3 The following is a case report highlighting the step-by-step procedure that can lead to a successful socket shield.

Patient presentation and history
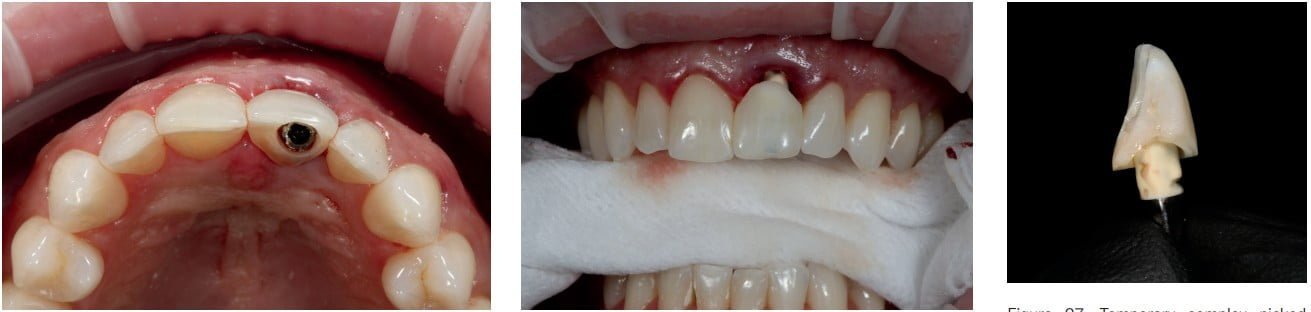
The patient presented as a 44-year-old white male who happens to be a dentist. His overall health is impeccable with no underlying medical conditions, medications, or other contraindications to surgical treatment. The patient reported that when he was 25 years old, he was involved in a baseball accident where he was head-butted during a game. Tooth No. 9 was subluxated with corresponding broken alveolus but was able to be retained after being reset and splinted. Subsequent radiographs had shown initial signs of external resorption, but the tooth had been asymptomatic until recently. The patient had noticed sensitivity during flossing, which started “a few years ago.”
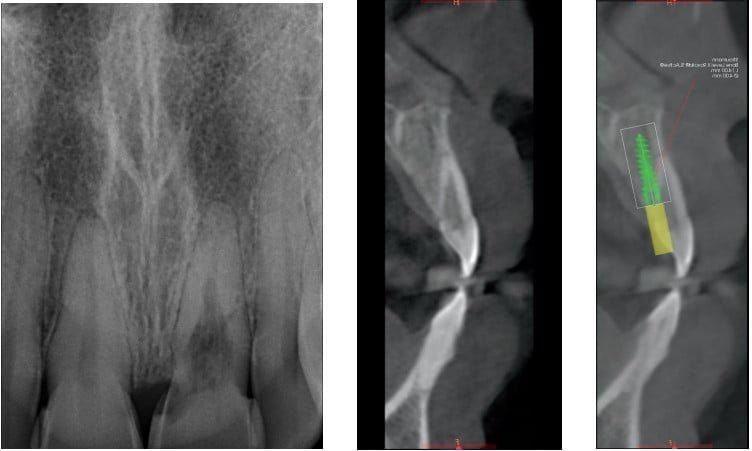
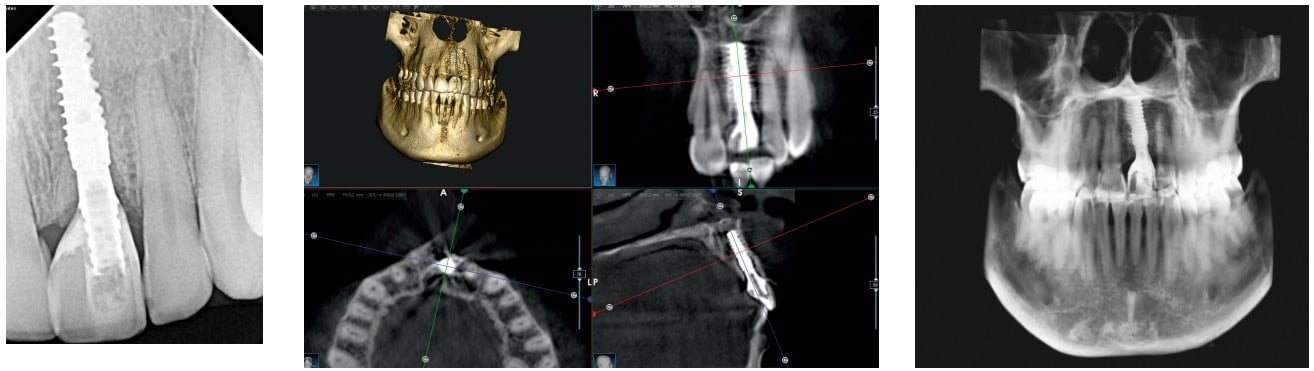
Pre-op CBCT and periapical radiograph show significant expansion of the resorption and exposure of the canal space to the oral cavity. Symptoms were limited to flossing. The tooth was diagnosed as nonrestorable due to the extent of the resorption.4 The diagnosis of the tooth was discussed with the patient, and it was mutually decided that having the tooth extracted and replaced with a dental implant would give him the best long-term prognosis of the site. As the patient is a dentist, he was adamant that he have a fixed temporary prosthesis for the site.
Treatment plan
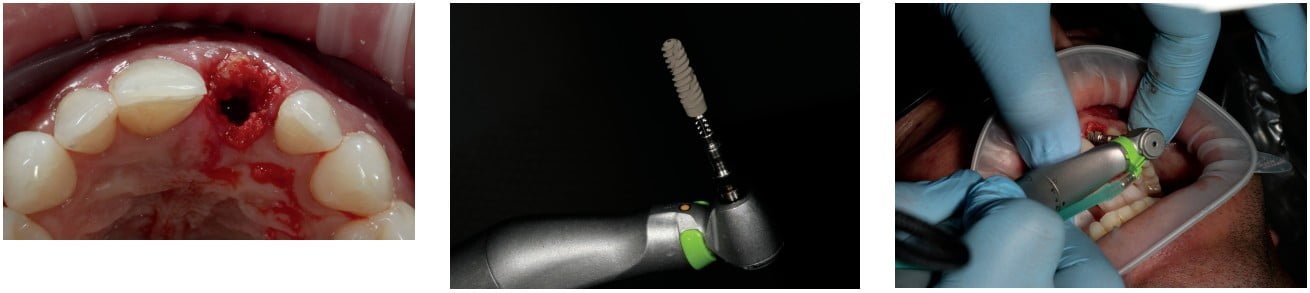
The plan for the case was to perform the socket shield technique on tooth No. 9, removing the clinical crown, sectioning the tooth, extracting the palatal portion of the root, and leaving the buccal segment to maintain the buccal plate. With a history of resorption, it was very likely that at least some portions of the tooth could be ankylosed to the surrounding bone, so careful attention would have to be paid to remove as much of the existing root structure atraumatically. An Acteon Piezotome® Cube would also be used throughout the procedure to ensure atraumatic removal of the root sections. It was also crucial to remove as much of the root as possible as resorption could continue over time, even in sections of the tooth that currently did not exhibit resorption. A Straumann® BLX implant would be placed immediately in the area after performing the guided osteotomy. This implant was specifically chosen for a number of reasons — the primary being the aggressiveness of the thread pattern, which would contribute to a high primary stability.5 The buccal gap would be grafted with allograft sticky bone made with leukocyte- and platelet-rich fibrin (L-PRF) from the patient’s blood. Once placed, the initial stability of the implant would be checked with both torque value and Implant Stability Quotient (ISQ) and, if deemed stable, would be immediately loaded using the patient’s clinical crown for temporization. If, for any reason, the tooth was unable to be used as a provisional, records were taken so that an Essix-style retainer could be fabricated. The patient was to receive the standard pharmacology protocol of 2g amoxicillin 1 hour prior6 and thorough rinse with chlorhexidine immediately prior to beginning to the procedure. Supplemental medications including 30mg Torodol and 8mg Dexamethasone would be given via IV access.
Digital planning
Cross-section viewing of the CBCT allowed visualization of the thin buccal plate of tooth No. 9, confirming the decision to perform socket shield. The location of the implant was planned to the lingual aspect of the ridge as to allow space for grafting material as well as to keep the implant from touching the shield itself. The access opening of the implant was designed to be placed in the area of the cingulum to ensure the final prosthesis could be screw-retained. Once the planned location was satisfactory, a maxillary arch intraoral scan was merged with the CBCT data in Blue Sky Plan® software. The software was used to create a surgical guide with the intention of creating the osteotomy with the guide and placing the implant freehand. Once digitally designed, the guide was printed using a SprintRay Pro 95 resin printer.
Procedure
Preoperatory preparation
Prior to beginning the procedure, treatment was overviewed with the patient, including risks, materials that would be used, and the timeline for healing. Consent for treatment was given, including specific consent for the use of biologics as indicated. The patient did not report any moral or religious aversion to any biologic materials.
Preoperative records were taken that included intraoral photos and a sextant impression for temporary fabrication if needed. IV moderate sedation was utilized for the comfort of the patient.
Crown removal and socket shield
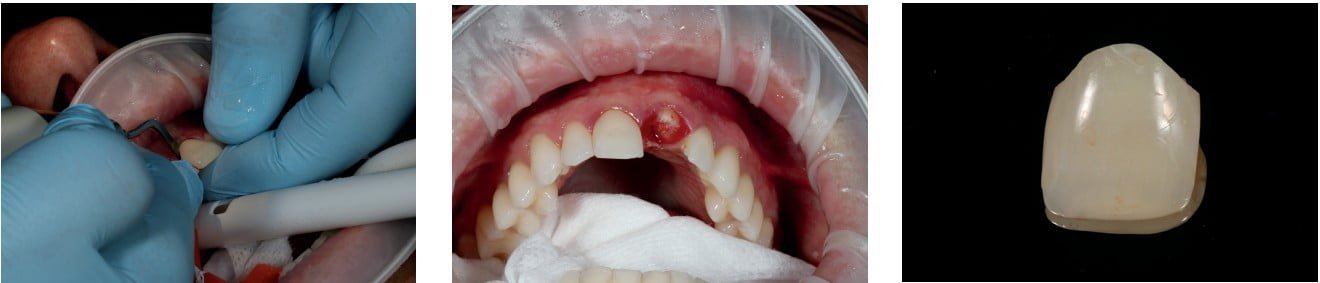
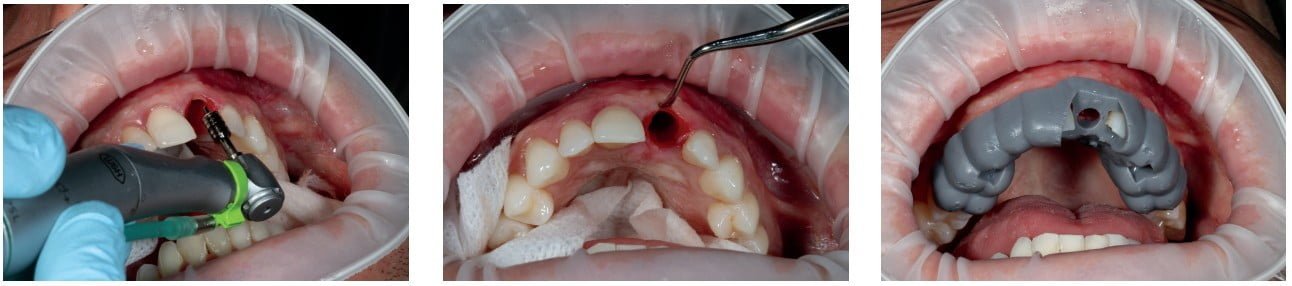
Approximately 3 ml of 4% septocaine with 1/100,000 epinephrine was administered to the anterior segment of the maxilla for local anesthesia. Once adequate anesthesia was achieved, the clinical crown of the tooth was sectioned from the root with the Acteon Piezotome Cube using the SL1 tip from the sinus lift kit. This tip, a flat diamond blade, was chosen because of its thin nature, which allowed minimal loss of coronal structure while offering effective cutting. This instrumentation also allowed atraumatic removal of the crown without damage to surrounding tissues or teeth.7 The entirety of the clinical crown was removed and set aside for temporization. The remaining root was leveled to the gingival level with the same instrumentation.
Upon removal of the clinical crown, the MegaGen PET kit was used to perform the socket shield. First, the CBCT data was used to measure the canal length. The Nos. 1 and 2 burs were then used to widen the canal space and allow for further instrumentation.
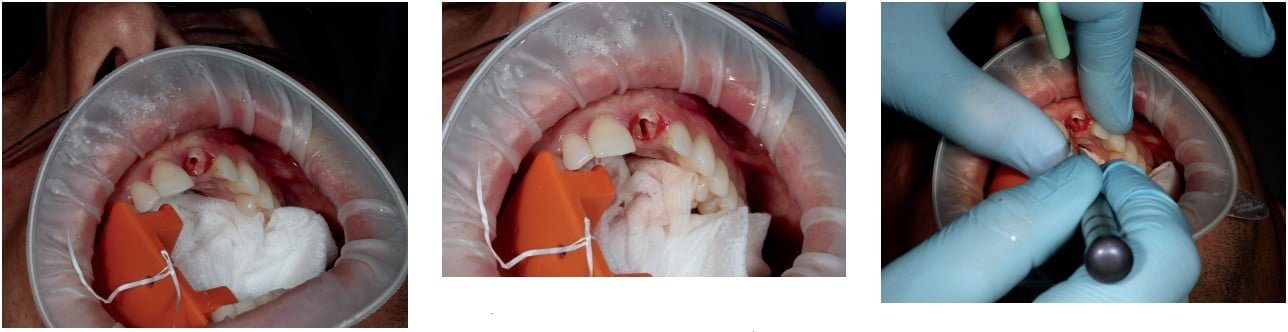
Shaper diamonds (long shank diamonds with labeled measurements) were used to section the tooth along the long axis from mesial to distal, effectively creating two sections of tooth — a buccal and a lingual segment. The lingual portion was then further sectioned into mesial and distal halves for easier access for elevation.
The lingual portions were elevated with great care to keep all pressure off the buccal segment, as displacement or mobility of that segment indicates abortion of the procedure and potentially ridge preservation only. Both lingual segments were retrieved with luxators and spade elevators only.
The fragment of the buccal root that remained was thinned significantly and formed into a crescent shape with the round diamonds in the kit. Smoothing was then completed with a finer cylindrical diamond. Once adequately thin (Han, et al., recommend less than 1.5 mm thickness8), the crestal portion of the buccal fragment was reduced in height to the surrounding bone level in an S-curve shape with the end cutting diamond (No. 5 bur). This shape creates a bevel on the lingual slope that offers an improved emergence profile, which is beneficial for the surrounding soft tissue.9
Osteotomy, grafting, and implant placement
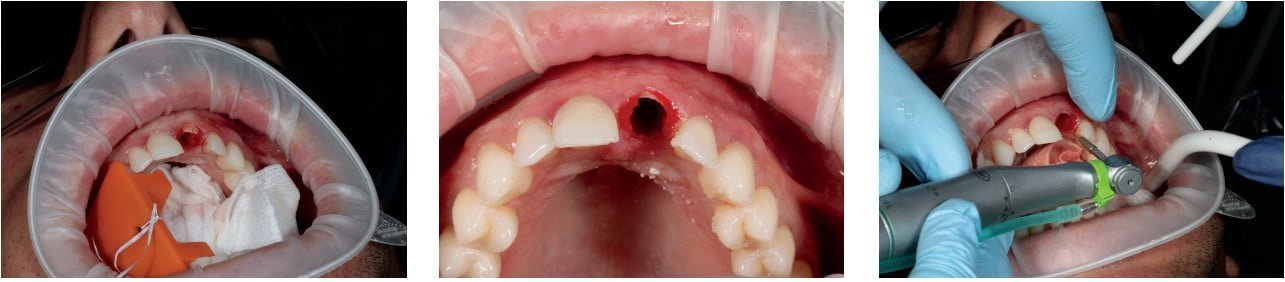
Upon completion of the shield preparation, the fabricated guide was used to create an initial pilot osteotomy. The osteotomy was completed and was expanded in a typical fashion under heavy irrigation and was left undersized to aide in primary stability.
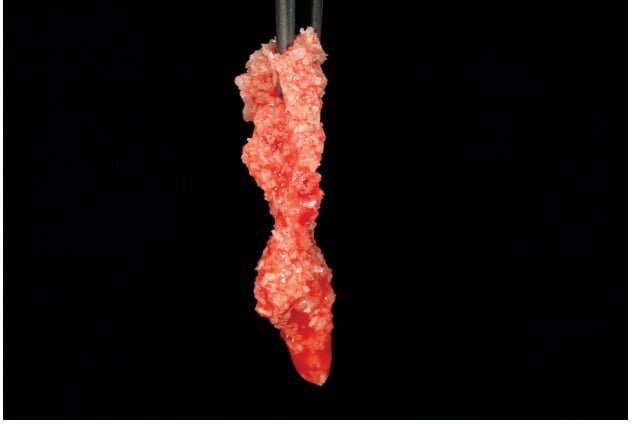
Typically, the implant is then placed and the “jump space” or buccal gap grafted, but the operator prefers to graft prior to placing the implant. The buccal portion of the extraction site/osteotomy complex was grafted with BioHorizons® Genate Blend™, which is a 70% cortical, 30% cancellous allograft blend. This material was hydrated with PRF liquid to create sticky bone and other blood tubes used to create PRF membranes for later use.
The implant was then placed with the implant motor to 40 Ncm and finished by hand until the operator was satisfied with the position, depth, and stability. Resonance Frequency Analysis was then used to measure the ISQ via the Osstell Beacon. As the ISQ value was greater than 70, immediate load was considered appropriate.10
Temporization
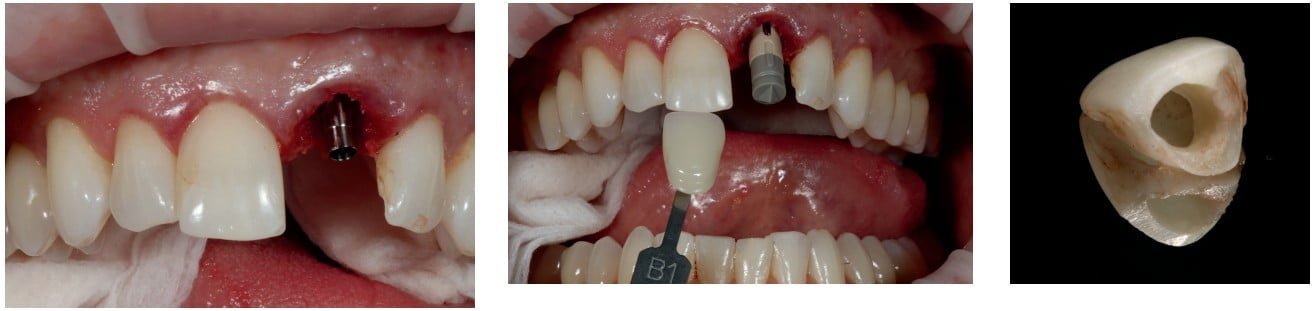
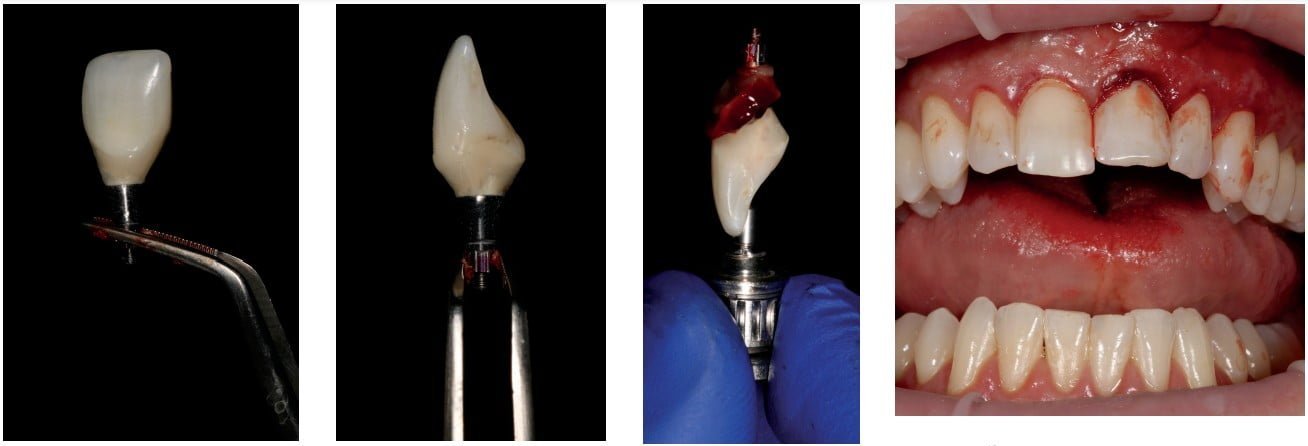
A TiBase® and scan body were placed to create a milled temporary as a backup if the tooth itself could not be used or needed esthetic improvement.
A titanium cylinder was placed and trimmed to an appropriate height. White opaquer was used to block out the underlying metal from showing through the prosthetic. A hole was created in the lingual aspect of the patient’s clinical crown approximating the path of draw of the titanium cylinder. This was widened and adjusted until the clinical crown was able to be placed in a natural position. Once the position of the crown was acceptable, flowable composite was used to pick up the cylinder inside the hollowed tooth. A minimal amount of material was used to avoid displacement into the surgical site.
The entire temporary complex (titanium cylinder and picked-up crown) was removed and cleaned thoroughly. Flowable composite was then used to approximate an ideal emergence profile, which included an S-curve profile on the buccal, which has shown to promote tissue health.11 Diamond burs and 3M™ Sof-Lex™ disks were used to complete the finishing of the temporary, and polishing cups were used to achieve a gloss finish.
A “poncho technique” was used by folding a PRF membrane in half and placing the prosthetic screw completely through the membrane. Utilization of the PRF membrane in this manner allows the temporary to be “sealed” against the tissue.12 This technique has been reported to help maintain periodontal tissues, reduce overall patient discomfort, and accelerate site healing.13 The prosthetic screw was tightened to approximately 20 Ncm, and the access was filled with Gingitech™. Protrusive and excursive movements were checked for and completely eliminated.
Postoperative recommendations and follow-up care
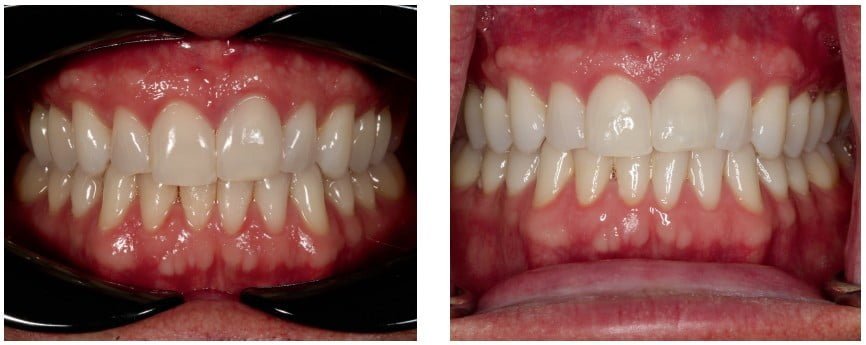
The patient was thoroughly instructed on care for the site, and avoidance of any function on the tooth was stressed. As the patient lived in a different state than the practitioner, he was left responsible for monitoring the area and reporting any abnormal healing or problems. Follow-up radiographs were taken of the area after 4 months of healing. The ISQ was taken in the patient’s office, and maintained levels over 70, indicating final restoration was appropriate. Photos were also taken by the patient in his office and reviewed. The gingival tissue showed a significant improvement from the preoperative condition. As the patient was referred to the surgical provider for placement only, he returned to his general dentist for final restoration.
Conclusion
Expansion of a provider’s skill set to include advanced procedures like the socket shield can be an effective way to make treatment more predictable, faster, and less invasive. This procedure is something that a practitioner can effectively achieve with a solid surgical knowledge base, skill set, and the correct instrumentation.
Drs. Filipe Amante and Patrik Zachrisson discuss how the socket shield technique can avoid the disruption of periodontal dynamics. Read more about it here: https://implantpracticeus.com/ce-articles/partial-extraction-therapy-the-socket-shield-technique-and-digital-workflow/
Author Info
 Dr. Joshua Nagao, DDS, earned his dental degree from The Ohio State University, graduating first in his class clinically. While in Ohio, he received advanced surgical training working with a prominent oral surgeon in the area. Dr. Nagao is particularly passionate for dental surgery, including implant placements, sedation dentistry, and complex reconstructions. He is a faculty member and mentor at Implant Pathway, which focuses entirely on the surgical placement of dental implants. Dr. Nagao is an Associate Fellow in the AAID and is currently undertaking the process of becoming a Diplomate in the ABOI.
Disclosure: Dr. Nagao does not have any financial interests in any of the products or brands mentioned in this article.
References
- Kumar P, Kher U. Shield the socket: Procedure, case report and classification. J Indian Soc of Periodontol. 2018;22(3):266-272.
- Hürzeler M, Zuhr O, Schupbach P, et al. The socket-shield technique: a proof-of-principle report. J Clin Periodontol. 2010;37(9):855-862.
- Blaschke C, Schwass D. The socket-shield technique: a critical literature review. Int J Implant Dent. 2020;6(1):52.
- Pinto L. External root resorption: diagnosis and treatment. clinical case report. J Dent Health Oral Disord Ther. 2018;9(2):160-164.
- Menini M, Bagnasco F, Calimodio I, et al. Influence of Implant Thread Morphology on Primary Stability: A Prospective Clinical Study. Biomed Res Int. 2020;5:1-8.
- Roca-Millan E, Estrugo-Devesa A, Merlos A, et al. Systemic Antibiotic Prophylaxis to Reduce Early Implant Failure: A Systematic Review and Meta-Analysis. Antibiotics (Basel). 2021;10(6):698.
- Tsirlis A, Eliades A, Georgopoulou-Karanikola T, Vasiloudi M. A technique for atraumatic root extraction, immediate implant placement and loading in maxillary aesthetic zone. Oral Surg. 2014; 8(2):102-110.
- Han C, Park K, Mangano F. The Modified Socket Shield Technique. J Craniofacial Surg. 2018;29(8):2247-2254.
- Kher U, Tunkiwala A. Surgical technique for socket shield procedure. Clin Dent Reviewed. 2020;4(1).
- Osstell®. 2021. The evidence-based Osstell ISQ Scale. [online] Available at: https://www.osstell.com/clinical-guidelines/the-osstell-isq-scale/. Accessed October 22, 2021.
- Schoenbaum T, Swift E. Abutment Emergence Contours for Single-Unit Implants. J Esthet Restor Dent. 2015;27(1):1-3.
- Cunha D, de Oliveira M, Ferreira H, Pinheiro A, Senna P. Poncho technique to seal fresh socket with platelet-rich fibrin in immediate loaded implant. Clin Oral Implants Res. 2018;29:388-388.
- Sohn D, Kim H. Simplified Ridge and Extraction Socket Augmentation using Sohn’s Poncho Technique. J Implant Advanced Clin Dent. 2018;10(2):16-36.
Stay Relevant With Implant Practice US
Join our email list for CE courses and webinars, articles and mores

