Dr. Charles D. Schlesinger describes a unique two-drill protocol

 Although implants have been, and will continue to be, placed freehand, technology has brought guided surgery into the hands of any doctor who may want to utilize it. The use of CT-guided surgery can increase accuracy and predictability of implant placement but also drastically cut down the time of actual surgery.
[userloggedin]
Buser and colleagues point out that successful esthetic outcome can only be achieved with an ideal implant position in all three dimensions.1 They describe proper implant position as a zone within the buccolingual, mesiodistal, and apicocoronal dimensions rather than a specific point. By positioning the implant within these comfort zones, it is predictable to achieve a functional and esthetic outcome.2
Guided surgery systems are either designed for a specific implant type/company or generic kits that work with multiple systems. A variety of software is available to treatment plan; virtually place the implants, and then allow the fabrication of a surgical guide to be used with specific guided surgical instrumentation. For this case, I utilized a surgical system with a unique two-drill protocol to simplify the surgical phase of treatment.
Clinical case
 A 54-year-old female with an unremarkable medical history presented to the clinic with the complaint of “I do not like my teeth.”
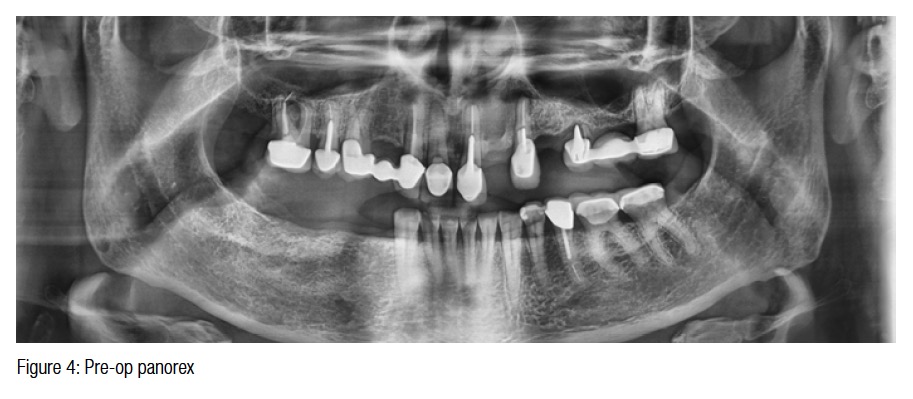
Upon both radiographic and intraoral evaluation, it was determined that the patient had extensive decay and chronic periodontal disease confined to the maxillary arch. The panorex showed a pneumatized sinus on the left and multiple periapical radiolucencies associated with failing endodontic treatment. The mandibular arch was healthy with no signs of pathology beyond incisal wear and would require only implant placement to replace teeth Nos. 28, 29, and 30 (Figures 1, 2, 3, and 4).
The treatment was to be carried out in two phases. The initial surgical phase would include complete edentulation of the maxillary arch, including lateral sinus elevation on the left side and grafting of the sockets and a bony defect associated with the area of the left lateral incisor. Three small diameter implants — SDIs (OCO Biomedical) — would be placed to provide increased retention for the interim full upper denture.
Guided placement of three implants in the mandibular fourth quadrant was also to be carried out at this initial phase of treatment. Definitive implants on the maxillary arch at Phase I were contraindicated due to the extensive pathology associated with the previously mentioned issues. An immediate maxillary denture will be worn for 4 months until the healing phase is completed, and definitive implants can be placed in the maxillary arch. This treatment will be featured in a future article. This article will focus on the surgical treatment of the mandibular arch.
Surgical Phase I
Due to the multiple periapical radiolucencies, the patient was placed on 300 mg of clindamycin 3 times a day starting 3 days before surgery and will continue the antibiotic therapy for an additional 5 days post-op.
Maxillary arch
The maxillary arch was edentulated, and the sockets were grafted with OsteoGen® Plugs (Impladent Ltd.). OsteoGen Plugs are made up of a mixture of OsteoGen and Type 1 collagen. A lateral approach (Caldwell-Luc) sinus elevation was carried out on the left side in preparation for implants at Phase II. The site was grafted with pure OsteoGen particulate. Three 2.5 mm x 12 mm SDI implants (OCO Biomedical) were placed to help retain the upper denture during the healing phase. The interim maxillary denture was tried in and the occlusion adjusted. A soft reline material (Mucopren®, Kettenbach USA) was used to provide retention around the O-Ball abutments of the implants. Housings with O-Rings will be retrofitted a few weeks down the line once healing of the soft tissues has been established.
Mandibular arch
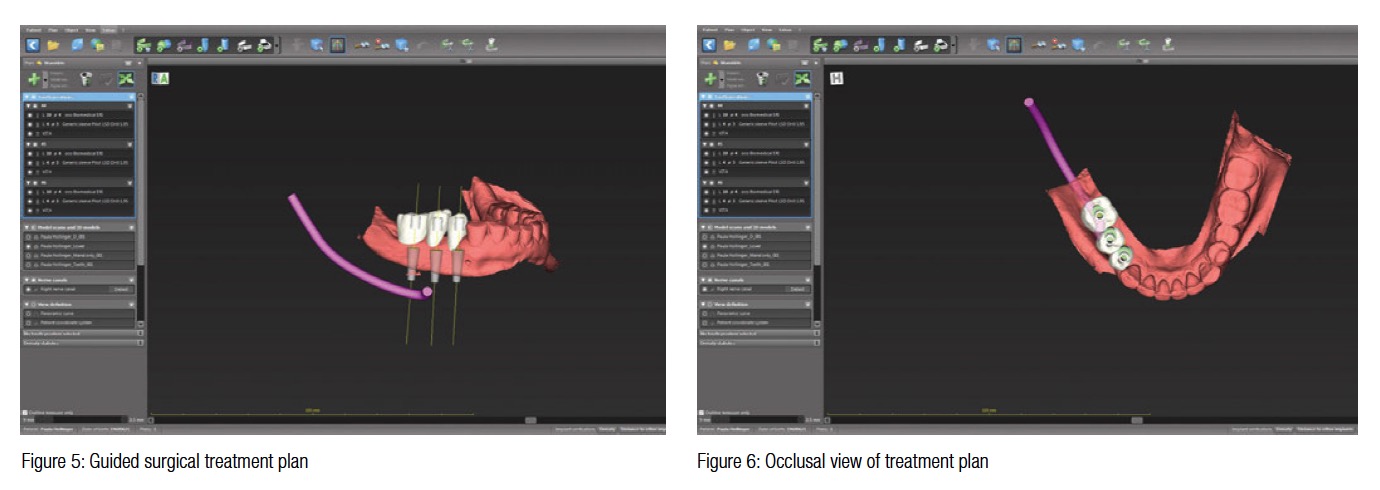
Implant sites Nos. 28, 29, and 30 were treatment planned using a Vatech PaX-i3D CBCT (Vatech USA). The treatment plan was devised using coDiagnostiX imaging software (Dental Wings, Montreal, Quebec), and the guide was fabricated by 3DDX (Figures 5, 6, and 7).
The lower arch was anesthetized with a local infiltration of Septocaine® with epi-nephrine 1:100,000 (Septodont). Once profound anesthesia was established, the surgical guide (3DDX) was tried into place. Openings within the guide allow visualization and verification of complete seating (Figure 8).
The case was treatment planned for three 4.0 mm x 10 mm TSI implants (OCO Biomedical) and the use of the OCO Biomedical Guided Surgery System for placement. This system is unique in that it is the only two-drill protocol system on the market and drastically simplifies the surgical procedure since only one key is used per implant size (Figure 9). The double-ended key has the pilot on one side and the final osteotomy former on the other (Figure 10).
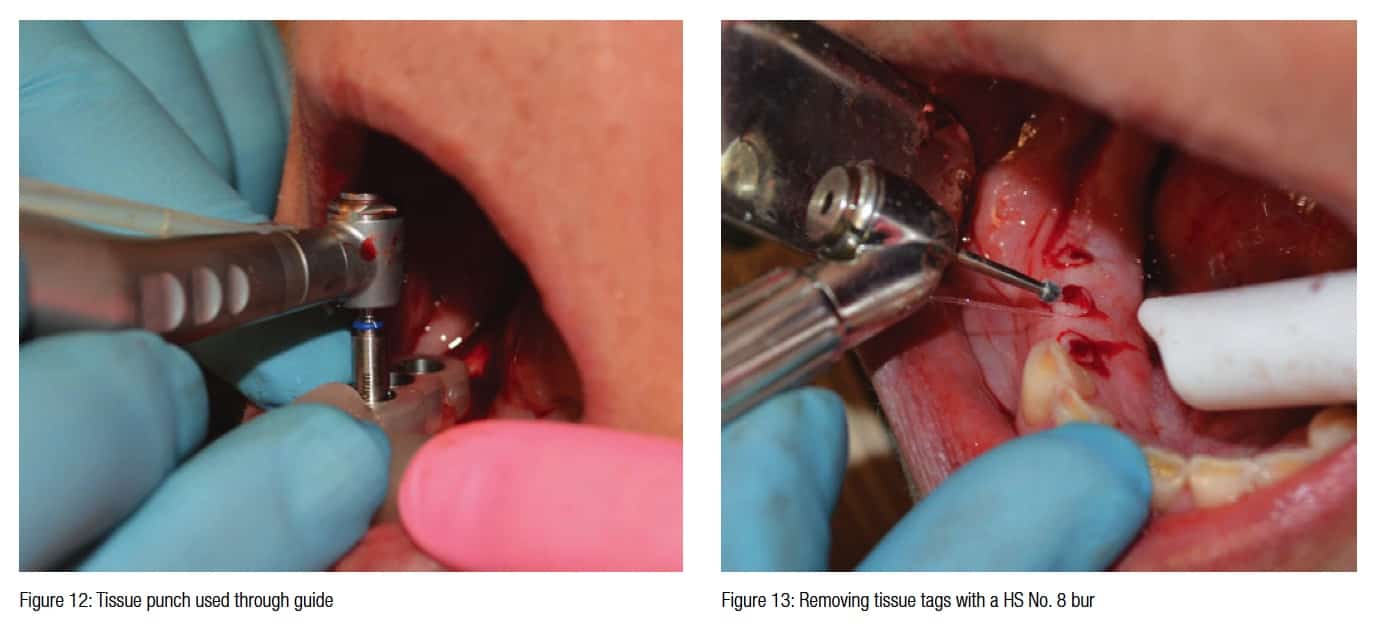
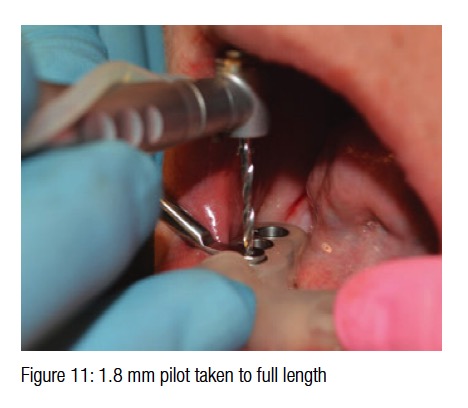 The 4.0 key is placed into the guide sleeve, and the 1.8 mm pilot drill is taken to full length. The digital treatment plan called for the use of a 20-mm length bur for all three implant locations (Figure 11). Once the pilot holes were completed, a 4.0 guided tissue punch was used in each location (Figure 12).
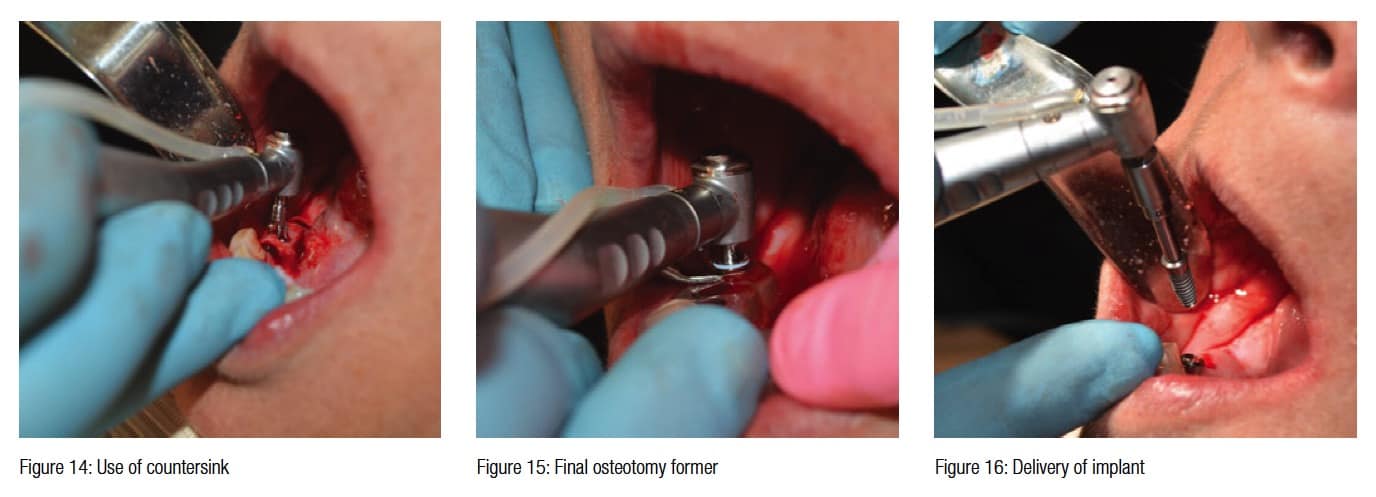
The guide was then removed to allow access to remove the tissue plugs with a No. 8 round bur on a surgical high-speed handpiece (Figure 13). Since tissue level implants were being utilized, a countersink was now used to allow the imbedded tapered platform of the TSI implant to be placed into the crestal bone to allow for the patented body of the implant to attain dual stabilization (Figure 14). This countersink also allows for placement when the crestal bone has an irregular topography by removing the proper amount of bone that is needed to allow for complete seating of the implant. When using bone level ENGAGE™ implants (OCO Biomedical), this step is not necessary.
Once the countersink procedure is completed, the guide is replaced, and the opposite side of the key (final osteotomy side) is inserted into the guide sleeve. With internal irrigation, the final internally irrigated osteotomy former (3.6 mm) is taken to the 20-mm length as indicated by the treatment plan (Figure 15).
The guide is then removed; the implant osteotomies are checked for integrity 360 degrees around and flushed with sterile saline. The sites are now ready to receive their implants.
 4.0 mm x 10 mm OCO Biomedical TSI implants were placed using a handpiece and implant driver set to 40N/cm (Figure 16). Usually, the TSI implant has a gold titanium nitride (TiN) finish, but these implants were prototypes with an internal hex configuration and were not put through the TiN process. A torque driver is applied, and the implants were fully seated with the following torque values. An Osstell (Osstell, Gothenburg, Sweden) unit was used to get an ISQ reading on each implant:
With both sufficient insertion torque values and ISQ readings, the choice to immediately load was taken. The post–op panorex shows well-positioned implants ready for restorations (Figure 17); 4.0 mm solid crown and bridge abutments were torqued to 30N/cm on each implant. Five minutes later, they were re-torqued to accommodate for any pre-stretch that may have occurred (Figure 18).
Acrylic copings were placed, and acrylic resin temporaries were made using a thermo-form matrix of the wax-up and Visalys® Temp temporary material (Kettenbach

 USA) (Figure 19).
Once the occlusion was adjusted and the interproximal embrasure spaces were contoured, the temporary was cemented using Improv® temporary cement (MS Biologics) (Figure 20). The patient was dismissed with postoperative instructions and will return to the clinic in 1 week for a follow-up exam. Final impressions could have been taken at this time due to the outstanding primary stability, but the choice to delay restoration for a few months was chosen by the patient for financial reasons.
Conclusion
Guided surgery can drastically decrease the amount of time a surgery takes along with increasing the accuracy and safety of dental implant placement. By utilizing CBCT and guide technology, it is possible to provide the very best treatment to our patients while maximizing our production and decreasing the stress of implant surgery.
[/userloggedin]
[userloggedout][/userloggedout]
- Buser D, Martin W, Belser UC. Optimizing esthetics for implant restorations in the anterior maxilla: anatomic and surgical considerations. Int J Oral Maxillofac Implants. 2004;19(suppl):43-61.
- Norkin FJ, Ganeles J, Zfaz S, Modares A. Image guided implant surgery in today’s clinical practice. Inside Dentistry. 2013;9(12):44-48.
Stay Relevant With Implant Practice US
Join our email list for CE courses and webinars, articles and mores

